Countless times I’m asked how to prevent brute force and password spraying attacks for SSL-VPN and there are multiple steps you can take to protect against these attacks. None is a silver bullet and your level of effort is a direct correlation with how advanced your adversaries are. Skilled attackers won’t trigger a denial of service condition. They won’t hit you from the same IP address. They will use proxies and relays. So how do you stop them? In this post I’ll write-up multiple steps you can take to make these attacks less effective and more difficult. And at the same time I need to rest a moment on the basics of remote access: have a password policy that follows best practices (i.e. NIST’s) and requires multi-factor authentication.
What’s Enabled by Default?
Before diving into hardening techniques, we need to look at what the FortiGate has enabled by default to protect against these attacks:
To protect against resource exhaustion and DoS, the FortiGate will disconnect idle connections after 300 seconds by default.
To also protect against resource exhaustion and DoS, the FortiGate will wait 30 seconds by default before terminating incomplete login attempts.
To protect against brute force, the FortiGate will temporarily lock an account after 2 logins by default (meaning two failures or one failure with one success).
To also protect against brute force, users will be blocked from reconnecting to SSL-VPN for 60 seconds by default after exceeding the number of login attempts specified earlier.
This Fortinet write-up has more explanations and the range of values you can assign to each attribute: https://community.fortinet.com/t5/FortiGate/Technical-Tip-SSL-VPN-timers-explanation-and-SSL-VPN-Login/ta-p/203615. Now let’s look at some additional protections we can enable…
Setup SSL-VPN on Loopback Interface
If you setup SSL-VPN on a loopback interface, you can leverage firewall policies on the FortiGate to restrict access to it. Fortinet has added features in newer versions of FortiOS to use local-in policies or restricting hosts on SSL-VPN to achieve the same without setting up SSL-VPN on a loopback interface. However, by setting up SSL-VPN on a loopback you’re able to apply IPS and anti-malware policies, etc. to these connections so I opted for this method in my setup.
On the FortiGate under Network > Interfaces > Create New, you’ll create a new interface of type Loopback Interface. Nothing fancy, you’ll just give it an IP address with /32 mask. I enabled Ping, but that’s not necessary since we’ll control access via firewall policy later on.

Now we’ll create a 1:1 Virtual IP address on our designated port to translate our WAN IP address to our Loopback under Policy & Objects > DNAT & Virtual IP:

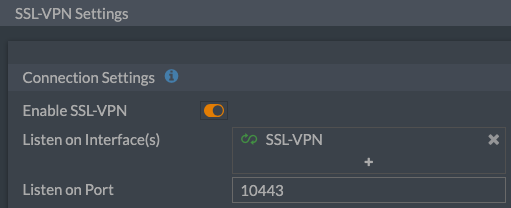
I changed the port to 10443 instead of 443 to at least eliminate botnets and scanners from wasting my time/resources. Security through obfuscation (hiding) isn’t really security, but it keeps the laziest scanners uninterested.
Next, I create a firewall policy to permit access to that interface:

Lastly, I configure SSL-VPN on the FortiGate to listen on that new Loopback interface under VPN > SSL-VPN Settings:

Logs for SSL-VPN connections are under Local Traffic:

As well as VPN Events:

To recap, all we’ve done in this section is setup SSL-VPN on a new Loopback interface. It’s no more or less secure than it was before, which is why we’ll move on to hardening options next…
Utilize Geo-Blocks in Firewall Rules
Right before our “Permit SSL-VPN” firewall policy, we’ll add a Deny using geographic locations as source IP addresses. First, let’s create a new Address Object using Geography for each country we’d like to block:

You can also create an Address Group and combine multiple Geography Address Objects to deny connections from. And then we’ll specify the source as this location with the Action of Deny:

Or you can modify your earlier “Permit SSL-VPN” Firewall Policy to allow specific countries instead. Either way, we have now restricted entire countries from being able to access our SSL-VPN.
Utilize Threat Feeds in Firewall Rules
Why stop at blocking countries when we can block known bad IP addresses as well! Now we’re using actionable threat intelligence to block the adversary. We begin by creating an IP Address Threat Feed under Security Fabric > External Connectors:

And then navigate back to your “Deny SSL-VPN” Firewall Policy to edit it. You’ll add your IP Address Threat Feed to the source with the Action still being Deny:

At this point we’re preventing attackers coming from unauthorized countries as well as coming from known-bad IP addresses.
Using Temporary Blocks in the FortiGate
As mentioned earlier, the FortiGate can also utilize temporary IP address blocks when someone logs in incorrectly multiple times from the same IP address. Skilled attackers will use a distributed attack across multiple proxies/relays, but this will still catch some attacks. As mentioned in the beginning, the FortiGate’s default login-attempt-limit for SSL-VPN users is 2 and the login-block-time is 60 seconds. If you’d like to modify this, here is the configuration:
config vpn ssl settings
set login-attempt-limit x <- Insert the number of attempts to allow in place of x.
set login-block-time y <- Insert the number of seconds to block attempts for in place of y.
end
This Fortinet write-up has the diag commands to see who is blocked as well: https://community.fortinet.com/t5/FortiGate/Technical-Tip-How-to-limit-SSL-VPN-login-attempts-and-block/ta-p/194229?externalID=FD48714.
Please note that extending block-times might increase help desk calls from legitimate users who type their credentials in incorrectly.
Automation Stitches
Now we’re ready to introduce some automation into our hardening with stitches on the FortiGates. This write-up from Fortinet walks you through creating the trigger and action to permanently block SSL-VPN failed logins: https://community.fortinet.com/t5/FortiGate/Technical-Tip-How-to-permanently-block-SSL-VPN-failed-logins/ta-p/287171
You’ll first trigger on FortiOS Events that match failed logins. You’ll then run a script to add the source IP address to an Address Group on a blocklist (as we did earlier with the IP Address Threat Feed).

The downside to this Automation Stitch is that you can easily, permanently block legitimate users who entered their credentials wrong. Maybe it’s just me, but I like a little more control before blocklisting things. If only there were a Security Orchestration And Response solution to our need…
SOAR for Automation
This section is more theory than practice as I am still building out FortiSOAR in my lab. But using the same logic in my Automation Stitch, I can evaluate my FortiGate (or centrally via the logs in FortiAnalyzer) to trigger a playbook. I then perform enrichment on the source IP address with whois, country of origin, existence in my threat intelligence feeds, etc. FortiSOAR presents me with an alert and I decide if this is malicious or accident and I run my playbook accordingly to add the attacker to my blocklist. I promise I’ll update this section once I find time to create this automation in FortiSOAR, but the life of a Systems Engineer means you spend most of your time where your customers are and this day/week/month I’m deep in other Fortinet solutions. More to come on this piece!
Conclusion
I hope this post gets you thinking about how you can go beyond the default security features in FortiGates to block clever attackers and new campaigns. If you have experience in this area, please leave a comment below and let me know what’s worked for you and what hasn’t. And as always, thank you for reading!
Andrew
outstanding guide, thank you!
Hey, nice one, thanks !