I love the goal of Zero Trust: don’t trust and continuously verify. It protects against extending the LAN to the remote PC connecting over the VPN, including preventing usage of personal devices by employees. It continuously checks the posture of the endpoint accessing an application. It doesn’t make the application publicly accessible, but instead provisions granular access via a proxy. And when you think of the bulk of employees needing VPN access just for web applications, you can improve your security posture by shifting these employees to a Zero Trust Network Access (ZTNA) solution.
I used our amazing documentation to configure this, but I like screenshots and lessons learned which is why I walked through this process and shared how I set it up.
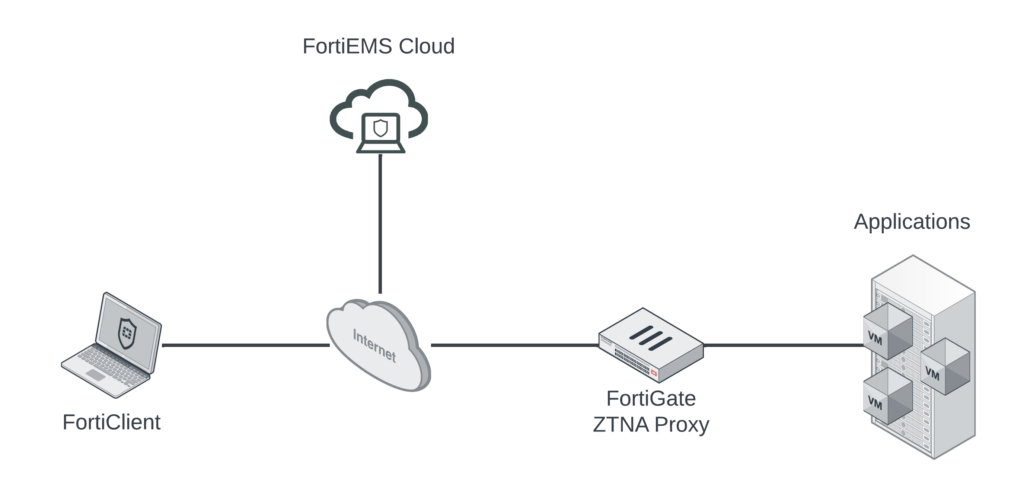
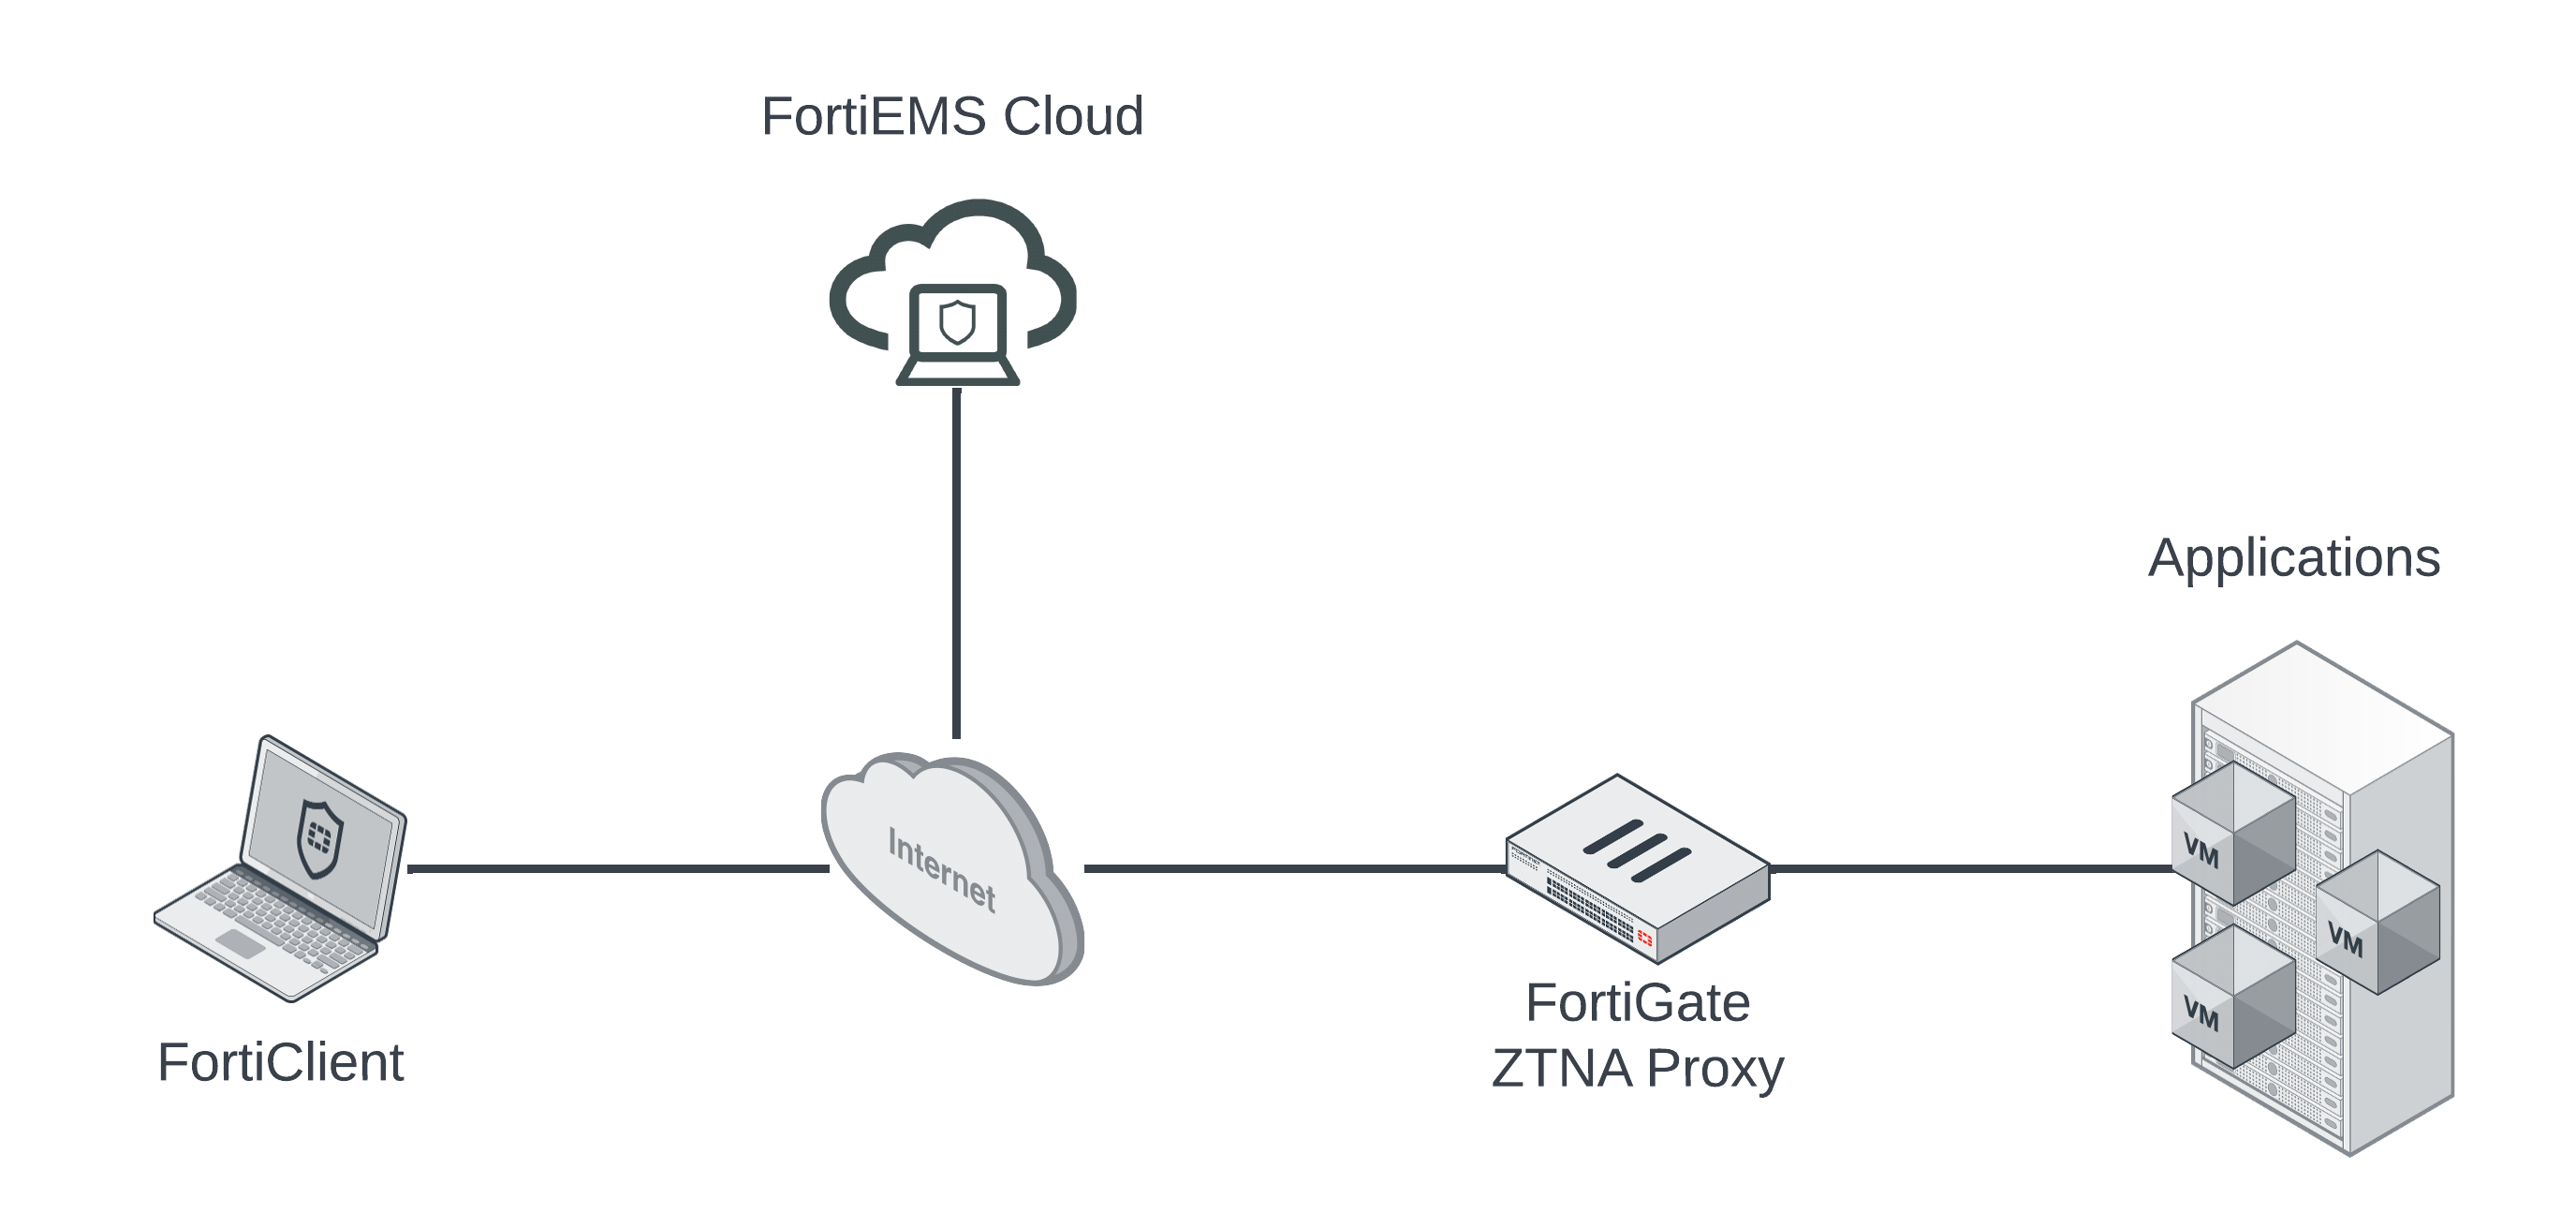
Fortinet’s ZTNA solution in the diagram above includes the following three components:
- FortiGate NGFW acting as Zero Trust Network Access Proxy sitting in front of applications, providing granular access policies for those applications.
- FortiClient on endpoints acting as posture-checker, sharing telemetry information, and building ZTNA tunnels to protected applications.
- FortiEMS (on-prem or in the cloud) collecting FortiClient telemetry and sharing it with the FortiGates acting as ZTNA Proxies.
For my setup, I have each of those components as well as FortiAuthenticator acting as SAML IdP so that users will authenticate in addition to being posture-checked when accessing protected applications.
In the diagram below, you can see the traffic flow between the ZTNA components:
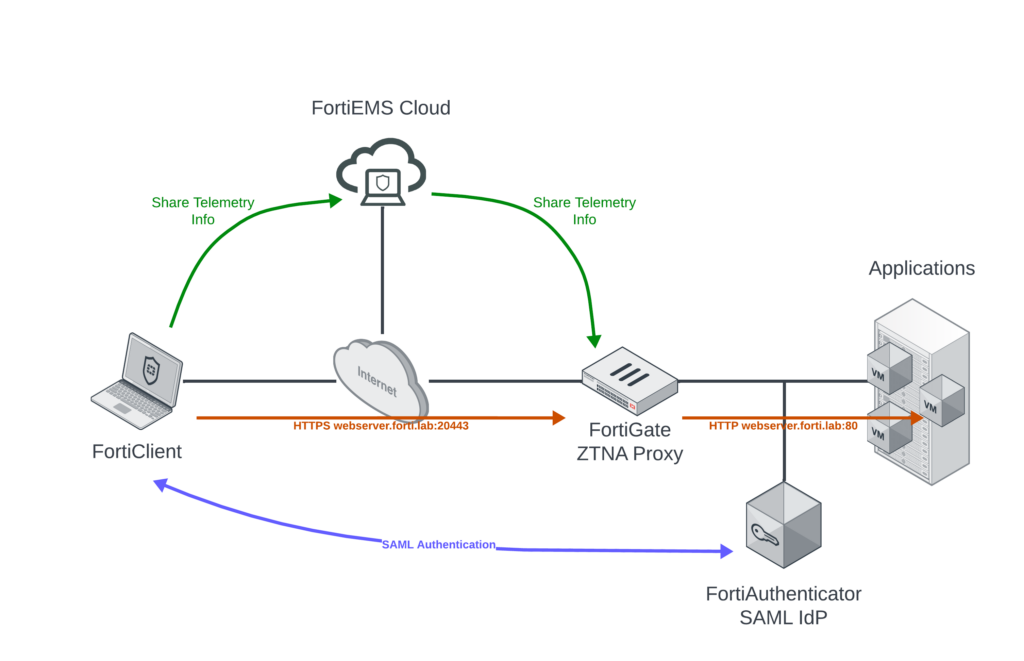
FortiClient shares ZTNA tag information with FortiEMS Cloud; this is then shared with the FortiGate ZTNA Proxy so that the ZTNA tags can be incorporated into the Proxy Policy. Since we’re using FortiAuthenticator as our SAML IdP, the SAML login information is sent between the FortiClient and FortiAuthenticator (I know you SAML purists will say that’s not how it works and you’re right, but my goal is to simplify that flow in the diagram; if you want to get into how it really works you can watch an explanation here: https://www.youtube.com/watch?v=UkN6bs2rR_Q). The employee on the laptop will access the protected webserver.forti.lab via HTTPS/20443 and the ZTNA Proxy will translate that to HTTP/80 on the back-end.
Preparation
In reality, adding DNS records for the protected applications as well as your SAML IdP would’ve already been done for an organization. But I built everything from scratch and wanted to highlight this pre-requisite. I added DNS A Records for my protected web server (webserver.forti.lab) and FortiAuthenticator SAML IdP (fac.forti.lab; I also made FortiAuthenticator “public” so remote PCs could authenticate across the Internet). I added these DNS entries on my public “Internet” DNS server as well as private Domain Controller DNS server.
You’ll see in the walkthrough portion later on, but I’m using self-signed certificates for the web server and FortiAuthenticator and that’s not how you’d run it in production. If this was more permanent or I was actually using this environment in my day to day, I would definitely recommend provisioning third-party signed certificates for a streamlined process interacting with these systems.
FortiEMS Cloud
Fortinet Endpoint Management System (FortiEMS) can run on-premise or in the cloud. The FortiEMS Cloud version is a PaaS offering allowing you to sync FortiClient telemetry information between FortiClients and EMS over the Internet. If you opt to run FortiEMS on-premise or in your private cloud, you’ll just need to open it on TCP/8013.
To keep this post short, I don’t detail how to setup some of the FortiEMS details but you can read more about that here:
- Create deployment package. In FortiEMS, this designates a FortiClient version, target OS and invitation code to map the FortiClient installer to the desired features (web filtering, AV, etc.).
- Install FortiClient on the endpoints. You’ll use the invitation code to register it back to FortiEMS. There are many ways to handle the deployment using your favorite Mobile Device Manager.
- Define the Zero Trust Tags. You’ll use these tags in your FortiGate ZTNA Proxy rules, so they can be as detailed or broad as your goals.
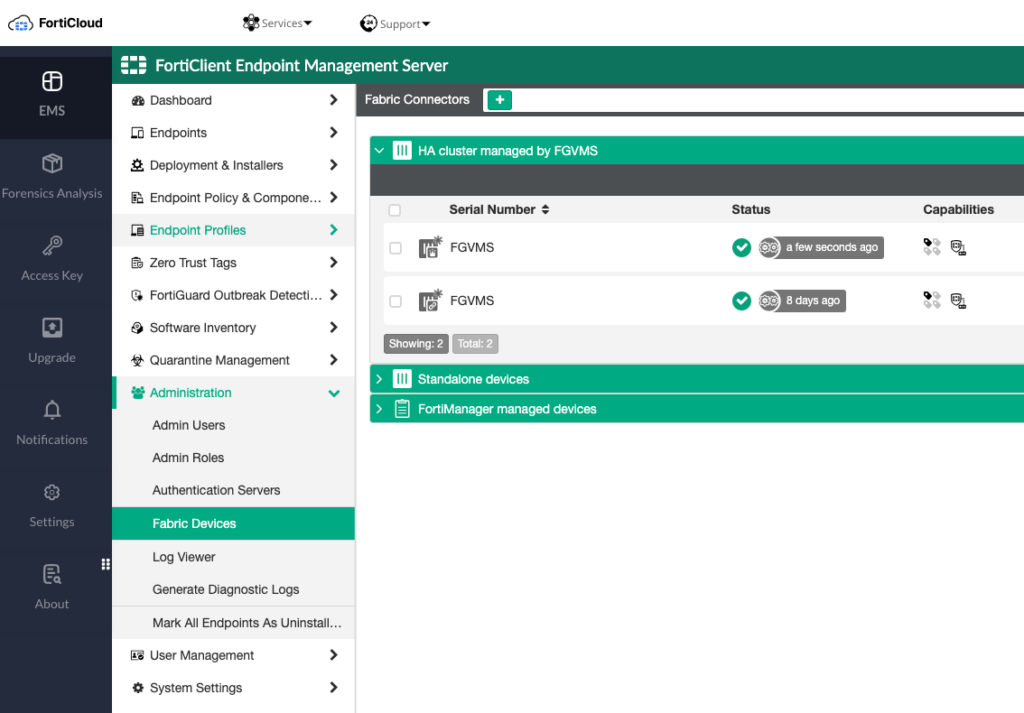
To get those ZTNA tags shared between the FortiGate ZTNA Proxy and FortiEMS, you’ll use a fabric connector on the FortiGate. Navigate to Security Fabric > Fabric Connectors > FortiClient EMS and click Edit. I chose FortiEMS Cloud and provided my FortiCare credentials:
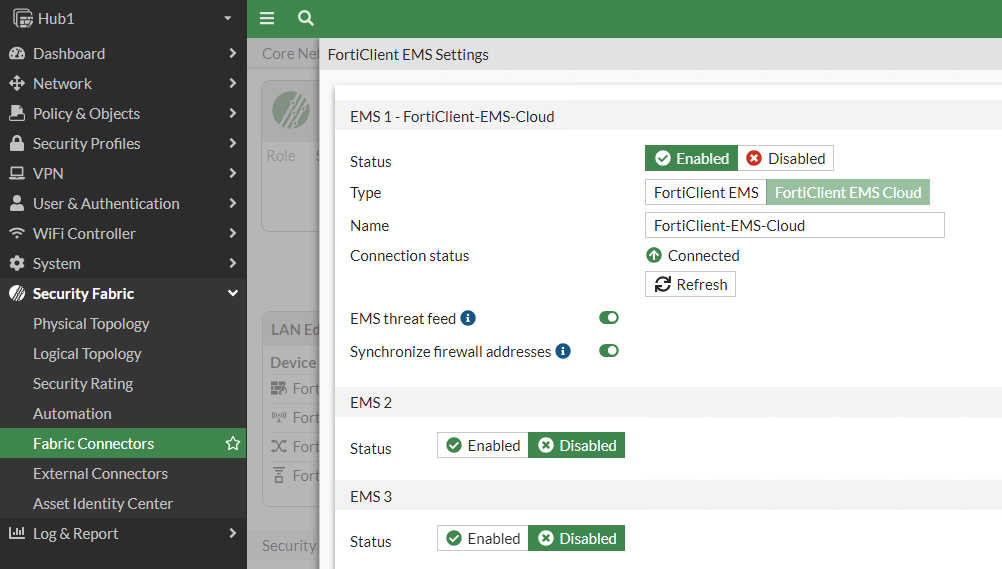
You’ll need to pop back over to FortiEMS and authorize the FortiGate under Administration > Fabric Devices:
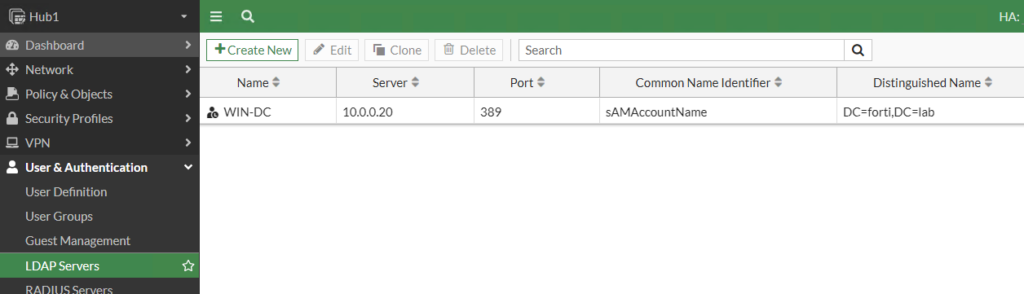
Setup Active Directory Groups on FortiGate
We’ll point our FortiGate ZTNA Proxy to Active Directory to retrieve Group membership information. We do this so we can incorporate AD Groups into our access policies so that some users can access the resource(s), but other users cannot.
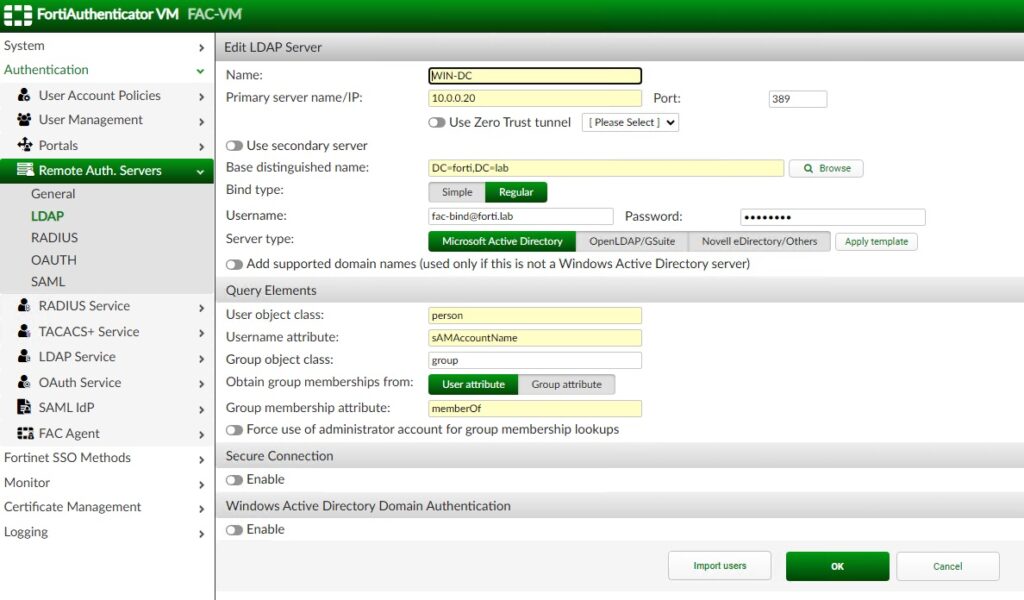
First, we’ll setup our LDAP server on our FortiGate:
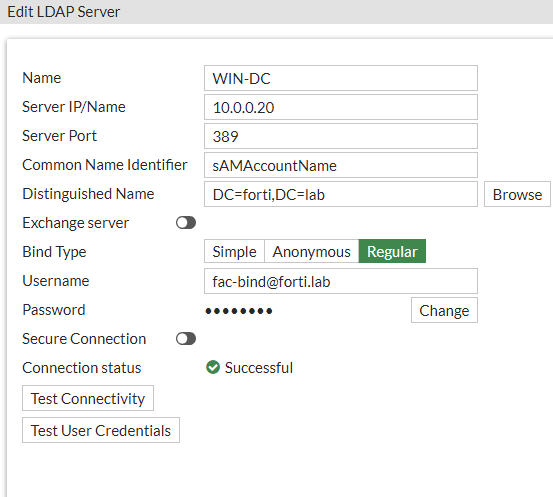
I’m running Windows Active Directory 2016 and learned that I needed to use sAMAccountName for my CN. I discovered this by clicking “Test User Credentials” and my authentication failing despite connectivity passing; the default Common Name is just “cn” and that didn’t work for my AD server. That was a fun way to spend days troubleshooting, but the “diag debug app fnbamd -1” command helped me realize the Common Name being used wasn’t matching my AD server.
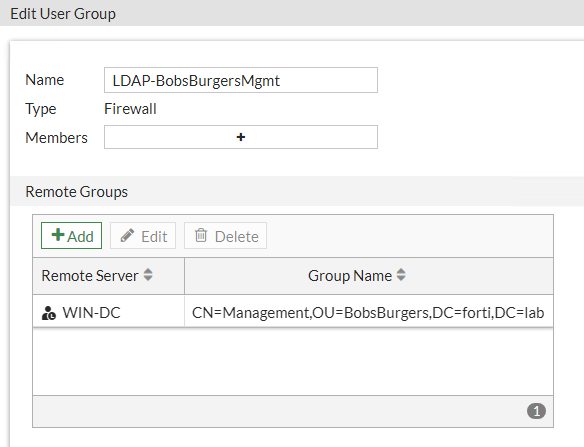
Second, we’ll create the Groups we want to match on. I’m a big fan of the show Bob’s Burgers and have setup my AD environment for these groups:

I am using the LDAP-BobsBurgersMgmt Group in my ZTNA policy so that only Management employees can access the protected application:
Configure FortiAuthenticator as SAML IdP
This step is optional if you already have your SAML Identity Provider (IdP), but since this is a fresh environment I needed to configure FortiAuthenticator as mine. And I first needed to point FortiAuthenticator as my SAML IdP to my identity source (Active Directory):
Second, we will configure FortiAuthenticator as a SAML IdP:
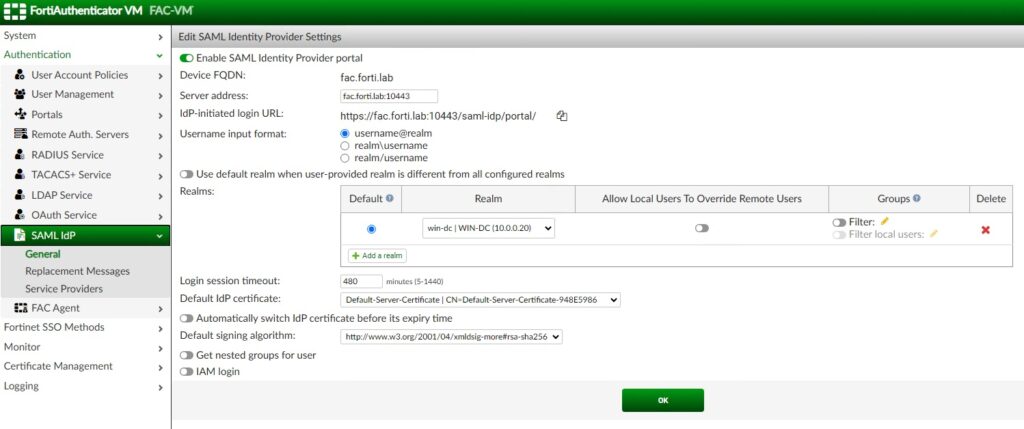
In the screenshot above, you can see that we point our default Realm to our “WIN-DC” Active Directory server.
Create SAML SP on FortiGate ZTNA Proxy
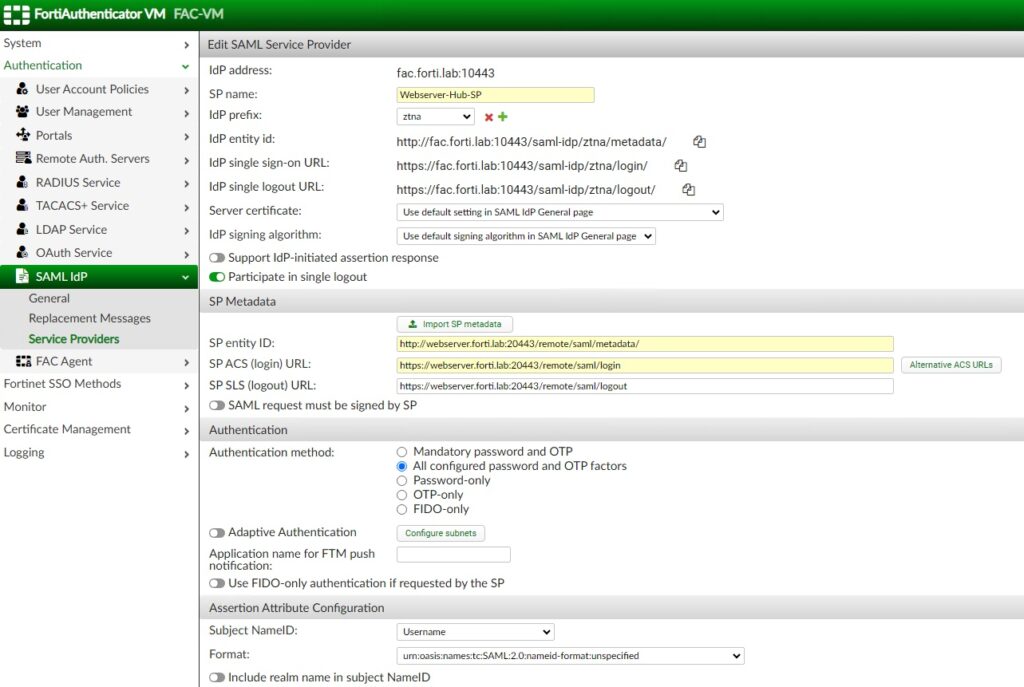
On FortiAuthenticator acting as my SAML IdP, I need to create a new SAML Service Provider (SP). You would do the same on your IdP of choice, but if you’re using FortiAuthenticator you’d use the following:
The SP Metadata will come from the FortiGate, so let’s jump over to it to generate it. You’ll navigate to User & Authentication > Single Sign-On and create a new one for the application we’re protecting:
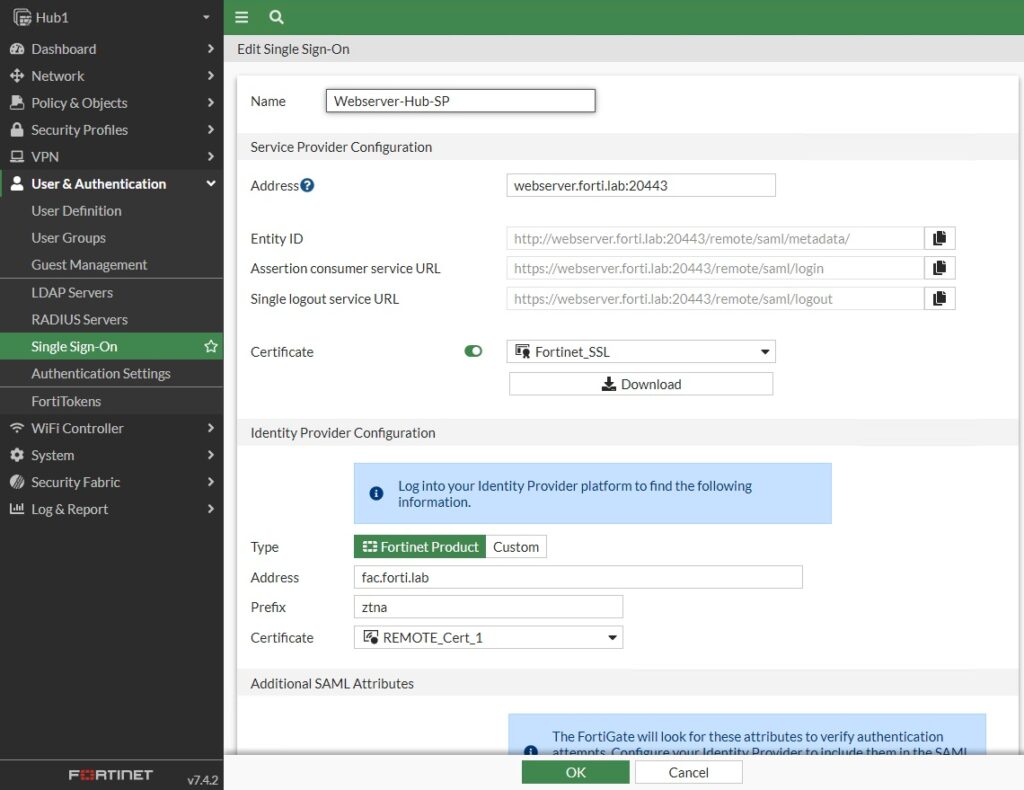
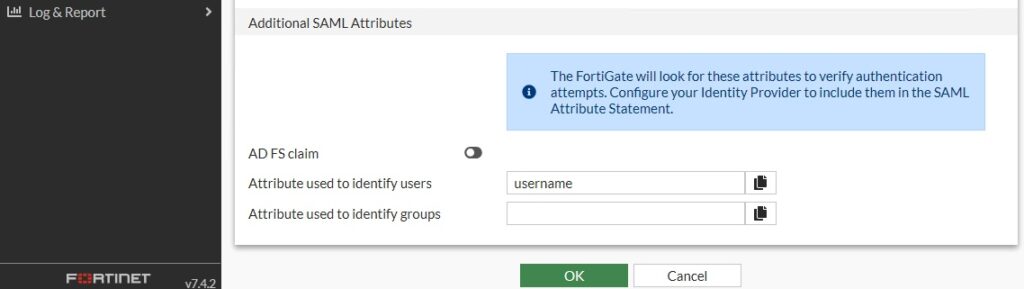
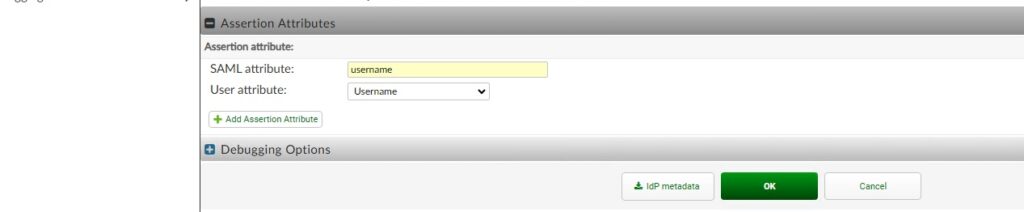
You’d take that Metadata and jump back to FortiAuthenticator to paste the Entity ID, Assertion URL and Logout URL from the FortiGate. I confirmed the attribute used for assertion matched on both the SP and IdP; I used “username” for mine.
Configure Authentication Settings, Rule and Scheme on FortiGate
Since we’re incorporating authentication and authorization into our ZTNA Access Policy, we need to setup these three components:
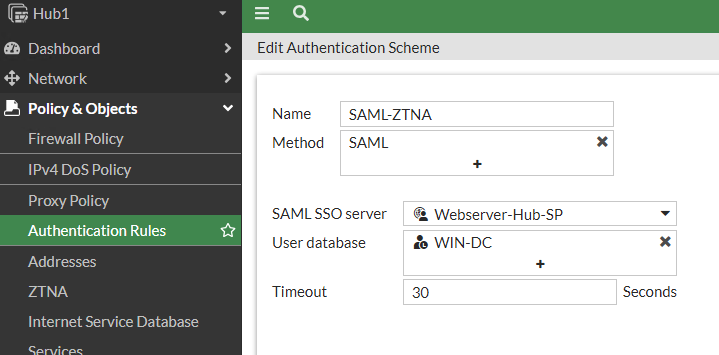
First, we’ll create the Authentication Scheme on our FortiGate ZTNA Proxy and reference the SAML SP we had just created. The authentication scheme defines the method of authentication that is applied. For ZTNA, basic HTTP and SAML methods are supported. My scheme maps SAML as the method to the SAML server and AD user database and is configurable under Policy & Objects > Authentication Rules > Authentication Scheme:
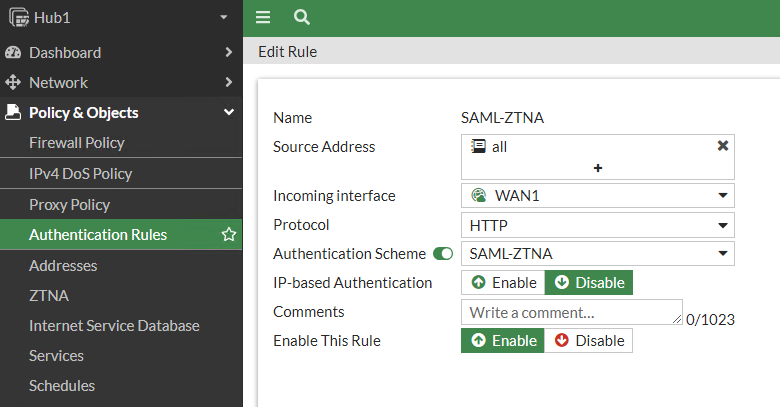
Second, we’ll create the Authentication Rule referencing that Authentication Scheme we just created. The authentication rule defines the proxy sources and destinations that require authentication, and which authentication scheme to apply. For ZTNA, active authentication method is supported. My rule maps the ZTNA Proxy interface and protected application protocol to the scheme:
And third, we configure the Authentication Settings to reference that Authentication Scheme created in the first step. We also create a FQDN object for our protected application; I called this “webserver.forti.lab” in my lab:
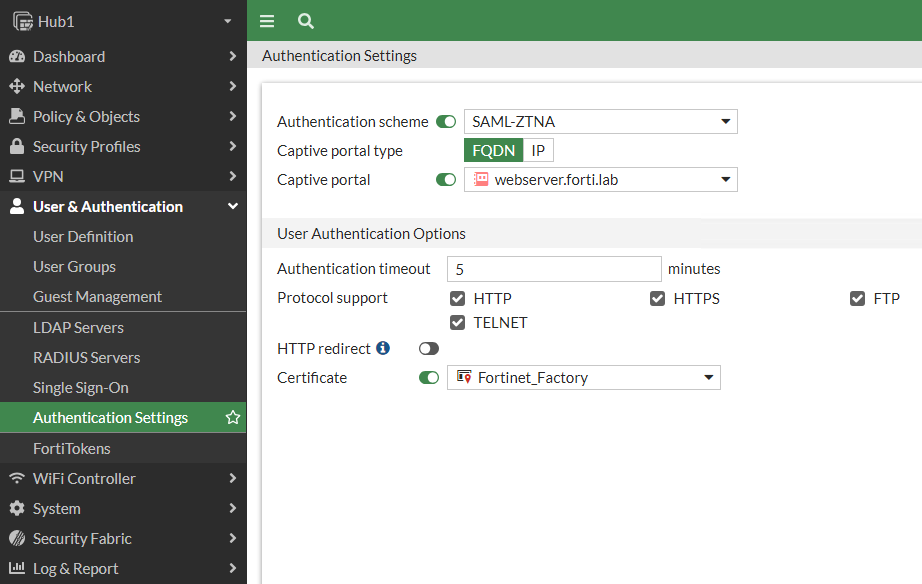
After the authentication rule triggers the method to authenticate the user and a successful authentication returns the groups that the user belongs to.
Create ZTNA Access Proxy to Use SAML
Now that all the authentication is configuration, we’ll create our ZTNA Proxy for our protected application. We’ll use a 1:1 NAT on our FortiGate to map 100.100.100.100:20443 on the “Internet” to 10.0.0.100:80 on our LAN. Under Policy & Objects > ZTNA we define this as well as the SAML server and the SSL certificate presented to the employees. Since the FortiGate hosts the SSL certificate for the protected application, you would normally import the SSL certificate and key to the FortiGate. In the config below though, I just use the factory-installed “Fortinet_SSL” certificate when accessing my protected webserver; this is that annoying self-signed certificate warning I mentioned at the beginning and if you had your own certificate, you’d load it onto the FortiGate and reference it here.
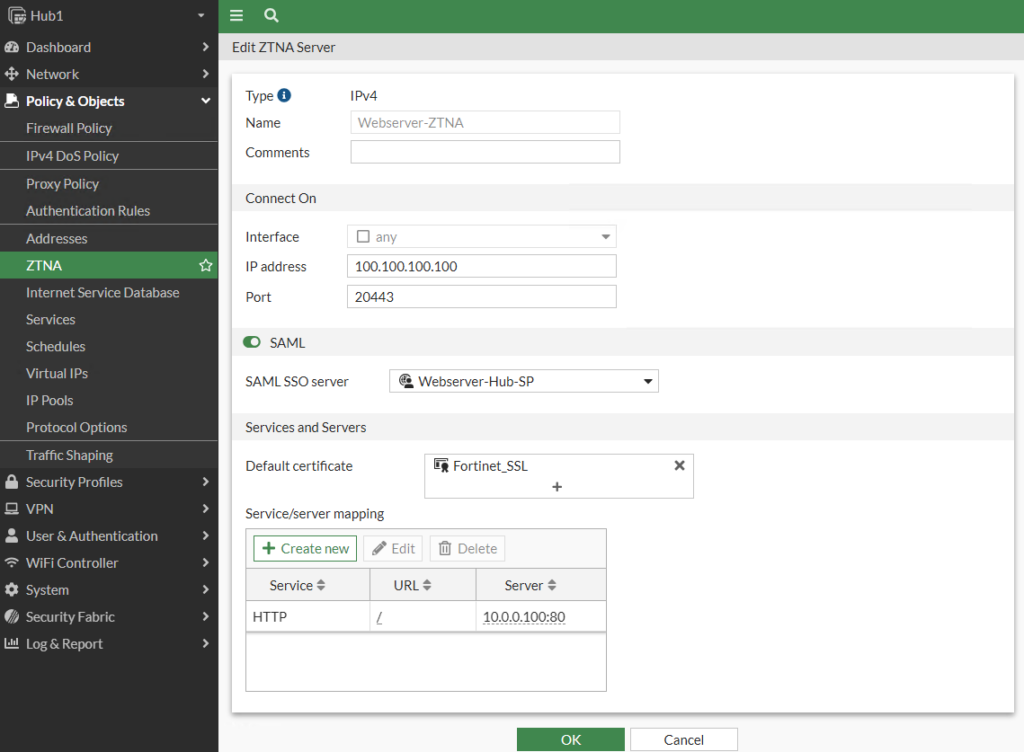
You can also configure this via the CLI:
config firewall vip
edit “Webserver-ZTNA”
set type access-proxy
set server-type https
set extip 100.100.100.100
set extintf “any”
set extport 20443
set ssl-certificate “Fortinet_SSL”
next
end
config firewall access-proxy
edit “Webserver-ZTNA”
set vip “Webserver-ZTNA”
set log-blocked-traffic disable
config api-gateway
edit 1
set service http
config realservers
edit 1
set ip 10.0.0.100
set port 80
next
end
next
edit 2
set service samlsp
set saml-server “Webserver-Hub-SP”
next
end
next
end
Create Access Proxy Rule
Our last step is to create the Access Proxy rule where we define who has access to the protected application. Our rule allows employees who are members of Bob’s Burgers Management connecting from endpoints with the FortiLab Domain tag and Windows11 tag to access our protected application as we inspect the traffic against our AV and IPS engines:
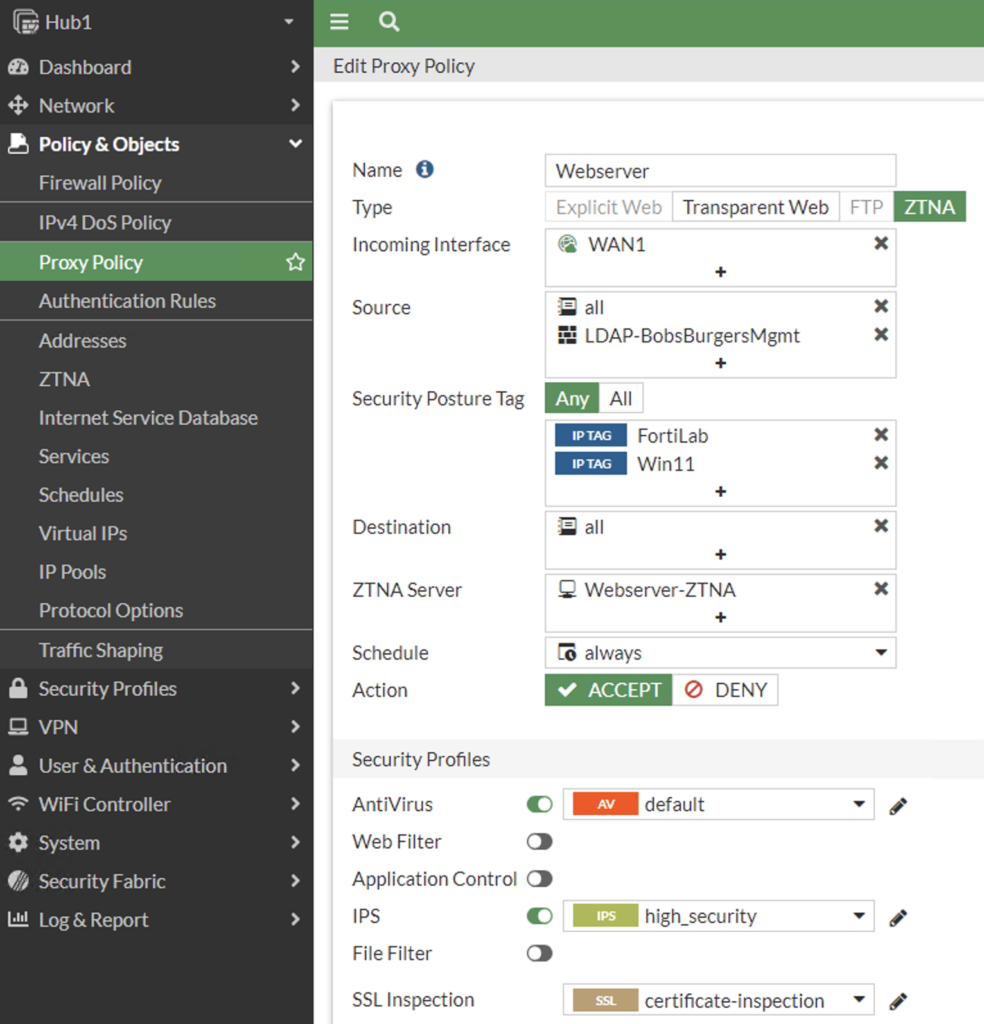
You can also configure this via the CLI:
config firewall proxy-policy
edit 1
set name “Webserver”
set proxy access-proxy
set access-proxy “Webserver-ZTNA”
set srcintf “WAN1”
set srcaddr “all”
set dstaddr “all”
set ztna-ems-tag “EMS1_ZTNA_FortiLab” “EMS1_ZTNA_Win11”
set action accept
set schedule “always”
set logtraffic all
set groups “LDAP-BobsBurgersMgmt”
set utm-status enable
set ssl-ssh-profile “certificate-inspection”
set av-profile “default”
set ips-sensor “high_security”
next
end
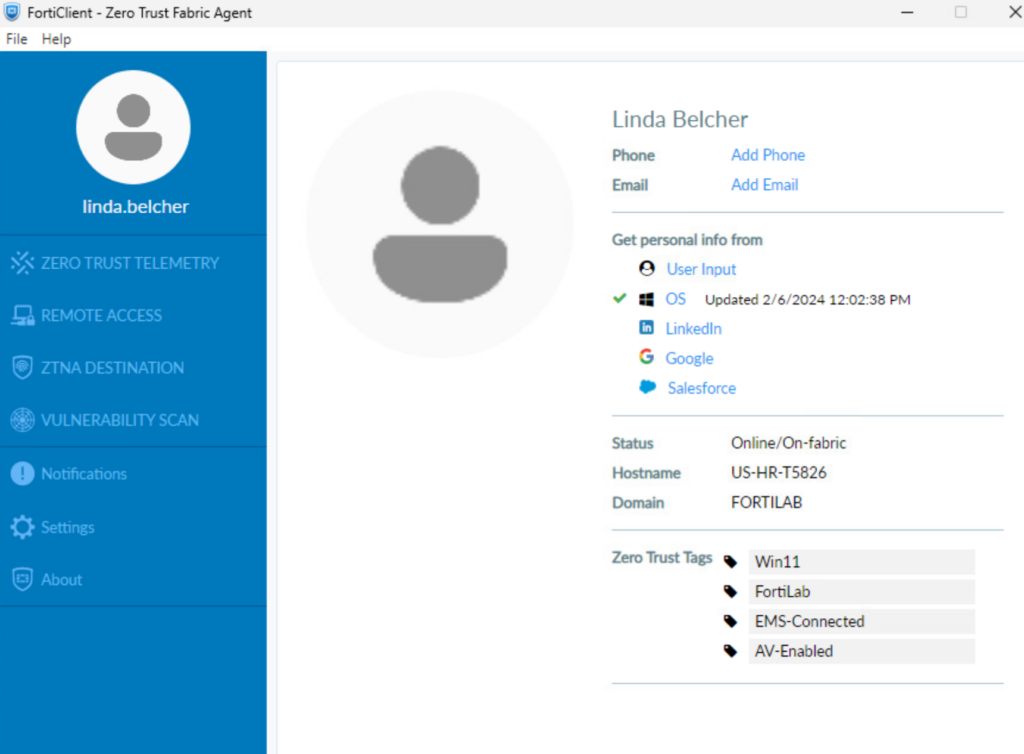
Testing
First, it’s wise to check our ZTNA tags. We can find these in FortiEMS across all endpoints or locally via our FortiClient. Our client has Win11, FortiLab domain, EMS-Connected, and AV-Enabled:
From this computer, we navigate to https://webserver.forti.lab:20443 (which resolves to 100.100.100.100 on the ZTNA Access proxy). We confirm the FortiClient certificate we’ll present to the ZTNA Proxy which checks the FortiClient certificate serial number against FortiEMS:
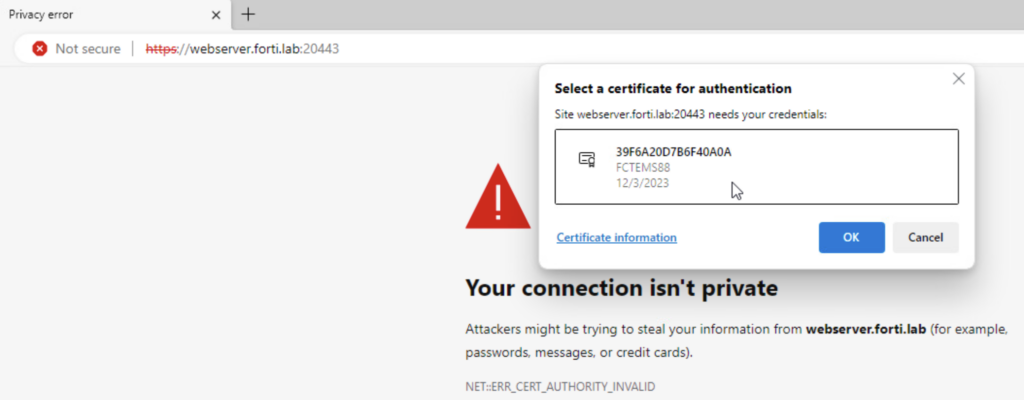
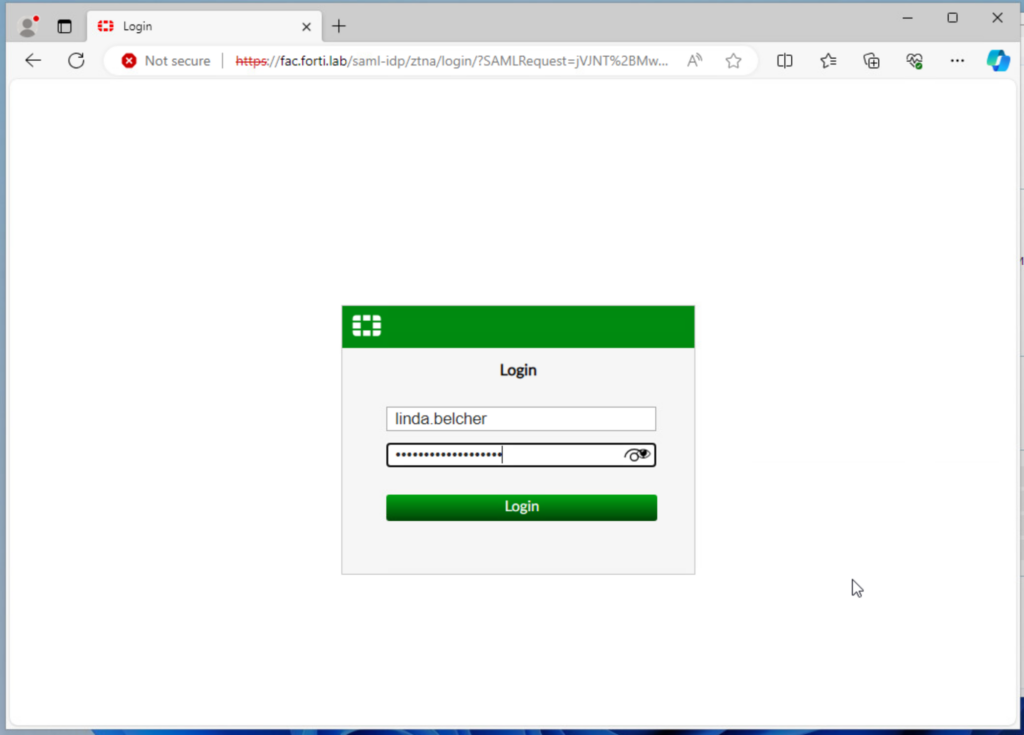
Since I’m using self-signed certificates, we accept the webserver.forti.lab certificate (Fortinet_SSL that we chose earlier), then we accept the FAC certificate. We login with your AD credentials at this point:
And we’re presented with this “Policy Denied” message:
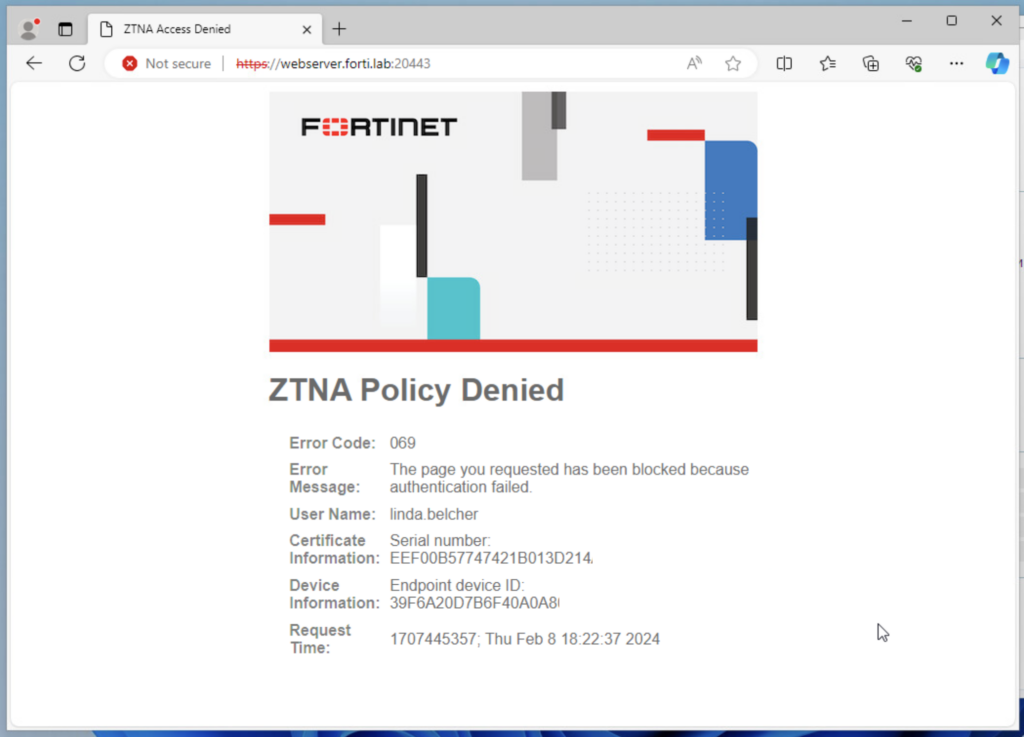
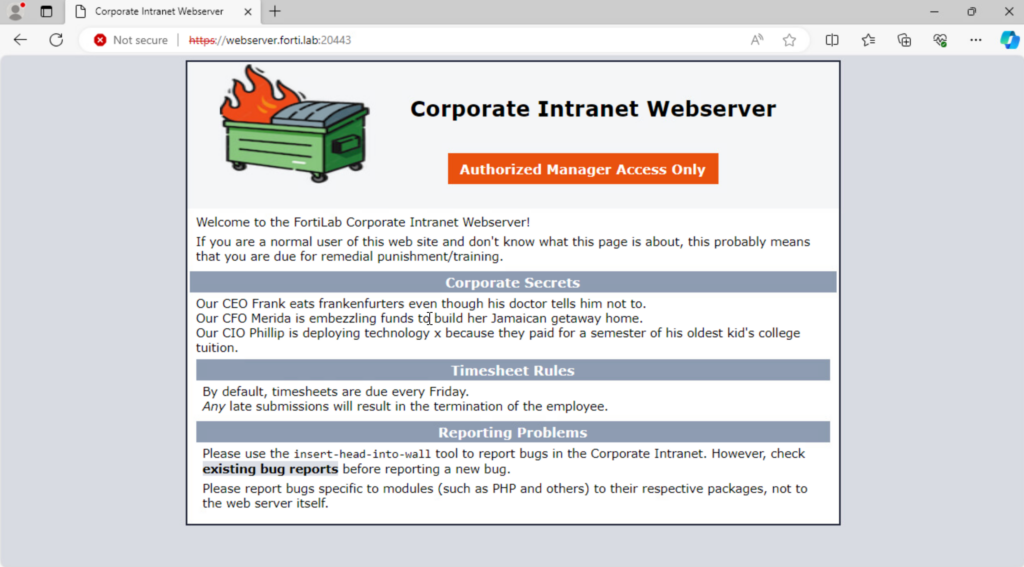
Bummer! But wait, this would make sense since this user is not a member of the LDAP-BobsBurgersMgmt group. Let’s try again with a Management employee:
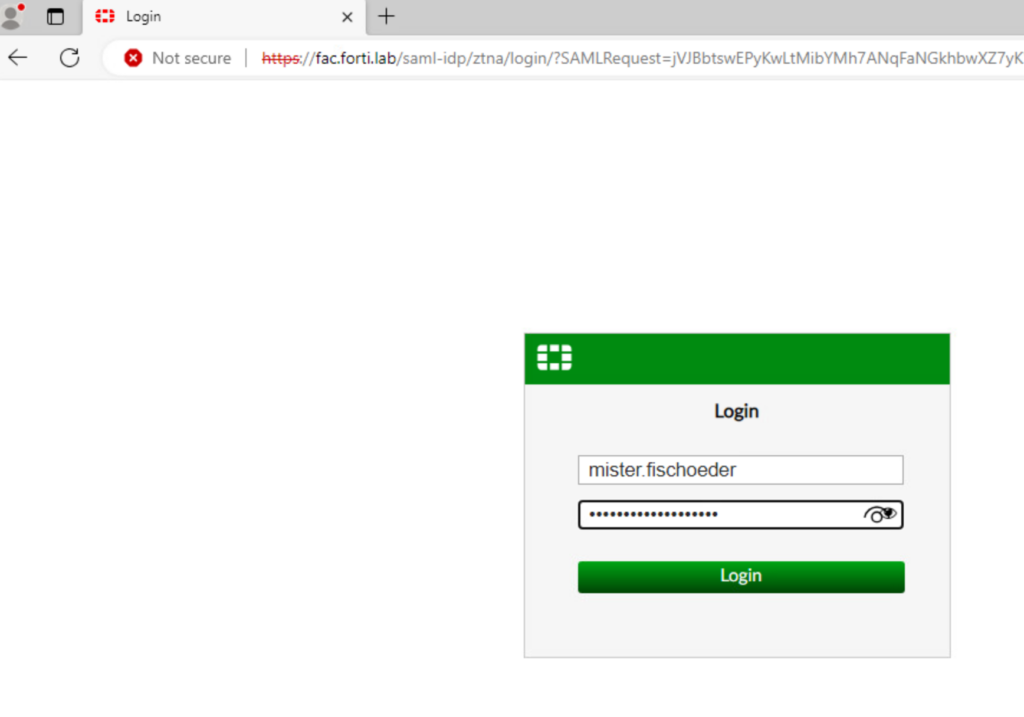
And we’re able to access the protected webserver with all those corporate secrets!
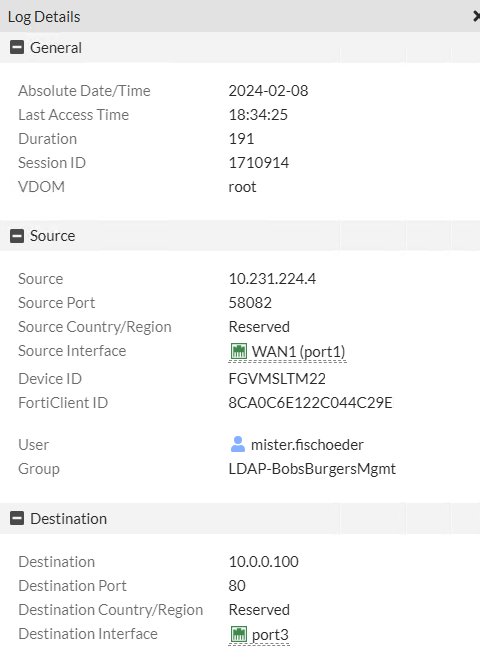
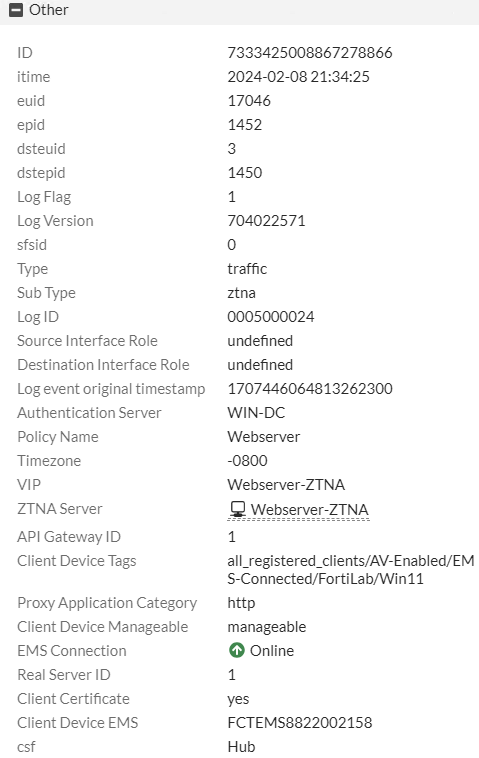
And all of this info shows up in our FortiGate ZTNA Proxy logs:

Conclusion
You can see in above write-up that ZTNA is a compelling alternative to SSL VPN. It gives us so much more control over who and what is accessing our protected applications. And we can incorporate SAML with MFA when accessing each of those applications, even if the applications themselves don’t support it.
I think my next step will be to set it up on my border FortiGate to access my Windows jump box via RDP since that’s all I use SSL VPN for today. And I’ll make sure I write up the process in a future post!
But in the meantime, what has your experience been deploying Fortinet ZTNA? Any lessons learned? Thanks for reading!
Andrew
Hi, I’m trying to setup this with Azure AD and saml SSO.
Can you please provide a full tutoriel as well ?
Hi Alyson, I’ll work on a full tutorial but in the meantime I wanted to share how to configure Azure AD/Entra ID as a SAML IdP on a FortiGate: https://docs.fortinet.com/document/fortigate-public-cloud/7.0.0/azure-administration-guide/584456/configuring-saml-sso-login-for-ssl-vpn-with-azure-ad-acting-as-saml-idp. Thanks for reading!
Andrew
Hi, I’m trying to setup this with jump cloud saml SSO.
Can you please provide a full tutoriel as well ?