
This was a long post in the making… I needed to setup FortiNAC from scratch to onboard and provide a captive portal for guests to self-register once they connected to my FortiGate-managed FortiAPs in tunnel mode. After going through a dozen how-to guides that helped with different aspects of FortiNAC and captive portals and then fumbling through debug output, I have it running in my lab! I’ll detail each of the steps so you’ll be able to do the same in your lab or production environment.
Components
I’m running FortiNAC-CAX as a VM on the FortiNAC-F 7.4 firmware. FortiNAC was developed on CentOS, but with CentOS going end of support the Fortinet developers moved the platform to just FortiOS (with a shell, which we’ll use in troubleshooting) known as FortiNAC-F. Hopefully that clears up the confusion on why we have FortiNAC 8.8 or 9.4 along with FortiNAC-F 7.2 or 7.4; might as well jump on the FortiNAC-F train before CentOS goes end of support. To keep this post shorter, I won’t step through the deployment process of FortiNAC but will highlight the components we’ll configure for our guest captive portal use-case. I also have a FortiGate 101F running FortiOS 7.0.x latest mature and a few FortiAPs managed by it that integrate with FortiNAC.
In the diagram below, I show each of these components and the two networks (Isolation and Guest) that we’ll use in our setup:
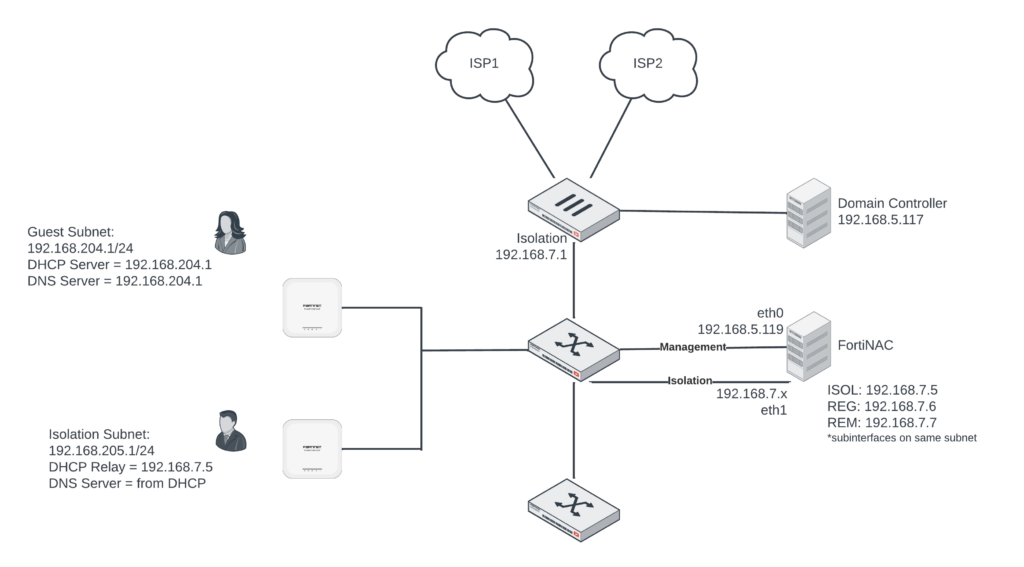
We use the following three networks:
- 192.168.7.x for FortiNAC Isolation interface
- 192.168.204.x VLAN 204 for Guest Access once authenticated
- 192.168.205.x VLAN 205 for Isolation where endpoints land before authenticating
FortiGate / FortiAP Integrations
Since the FortiGate acts as switch and wireless controller, create a SNMPv3 user on the FortiGate — we’ll use this by FortiNAC to read the L2 and L3 tables on the FortiGate:
config system snmp user
edit “fortinac”
set notify-hosts <FortiNAC eth0/port1 IP address>
set security-level auth-priv
set auth-proto sha256
set auth-pwd <password>
set priv-proto aes256
set priv-pwd <password>
next
end
config system interface
edit “Management”
set allowaccess ping https ssh snmp fgfm radius-acct probe-response fabric ftm speed-test
next
end
Create a super_admin user for FortiNAC to login to the FortiGate via SSH or HTTPS; for more efficiency in production, I would create an API user instead, but this is just a lab so I’ll keep it simple:
config system admin
edit “fortinac”
set trusthost1 <FortiNAC eth0/port1 IP address> 255.255.255.255
set accprofile “super_admin”
set vdom “root”
set password <password>
next
end
Add FortiNAC as a RADIUS server on the FortiGate. We need this for MAC Authentication Bypass (MAB), disconnect messages sent to RADIUS, Changes of Authorization (CoA) from FortiNAC to FortiGate, etc.
config user radius
edit “FortiNAC”
set server “<FortiNAC eth0/port1 IP address>”
set secret <secret>
set radius-coa enable
set acct-all-servers enable
config accounting-server
edit 1
set status enable
set server “<FortiNAC eth0/port1 IP address>”
set secret <secret>
next
end
next
end
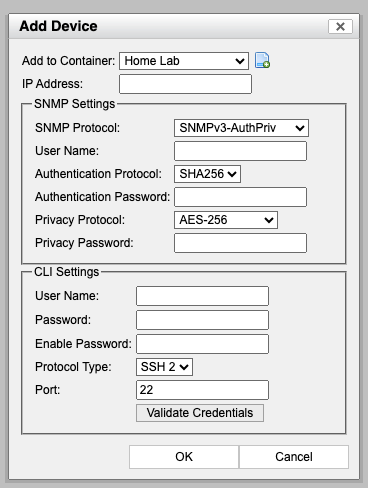
Add the FortiGate to FortiNAC under Network > Inventory. You’ll fill in the SNMP and HTTPS/SSH credentials you created a few minutes ago:
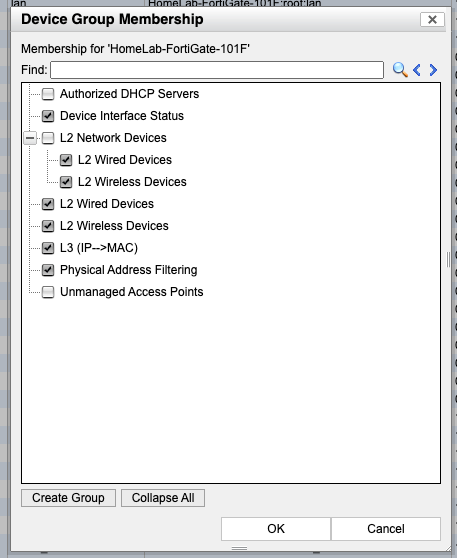
Next you’ll toggle on the address types you want sent to FortiNAC by right-clicking the Device > Group Membership and checking these (I recommend L2 and L3 at a minimum):
Setup Local RADIUS Server on FortiNAC
Go to FortiNAC Network > RADIUS > General Settings > enable Proxy Accounting and click Enable:
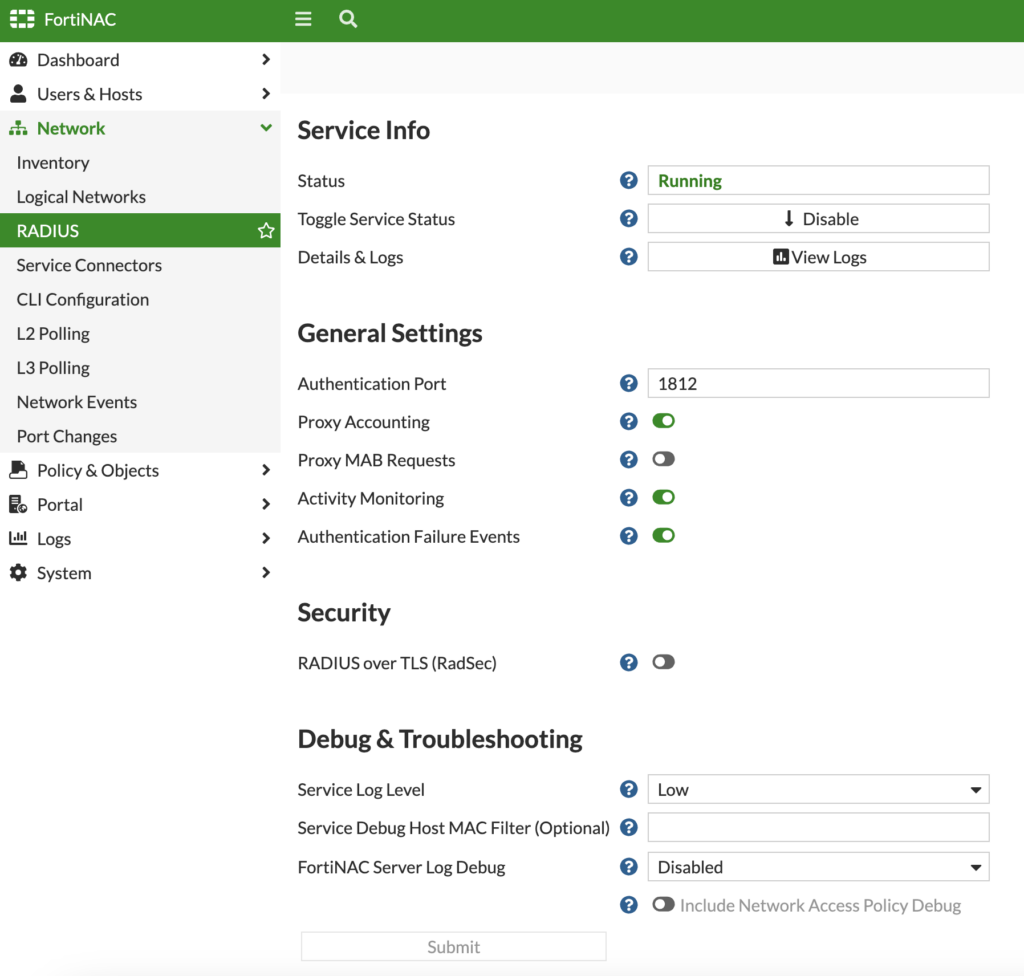
The service state should change from Disabled to Running. On the Virtual Servers tab, you can create a new Virtual Server or edit the Default. For our guest captive portal, we didn’t need to tweak these settings, but you would if using 802.1X. Likewise for the Attribute Groups and Winbind tabs, we don’t need to modify these for our guest captive portal using FortiGates and FortiAPs.
Wireless Configuration
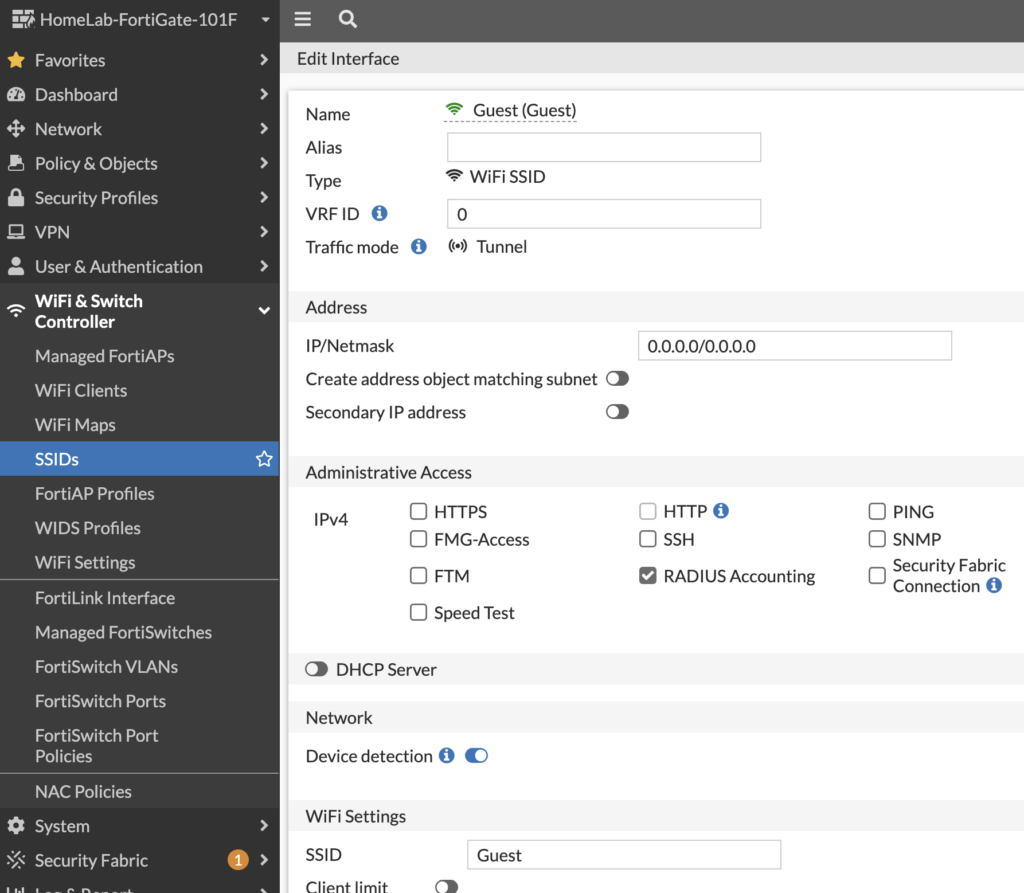
This part tripped me up, a lot. Because I’ve come across a lot of write-ups on integrating Bridged Mode SSIDs with FortiNAC. Or I’ve seen a few guides for Tunnel Mode SSIDs, but they weren’t quite complete. This took a lot of trial and error, but I got it working. Create the SSID in Tunnel Mode without any IP address, but with RADIUS Accounting enabled:
Enable MAC Address Filtering to FortiNAC and toggle on Dynamic VLAN assignment. Also, disable broadcast suppression:
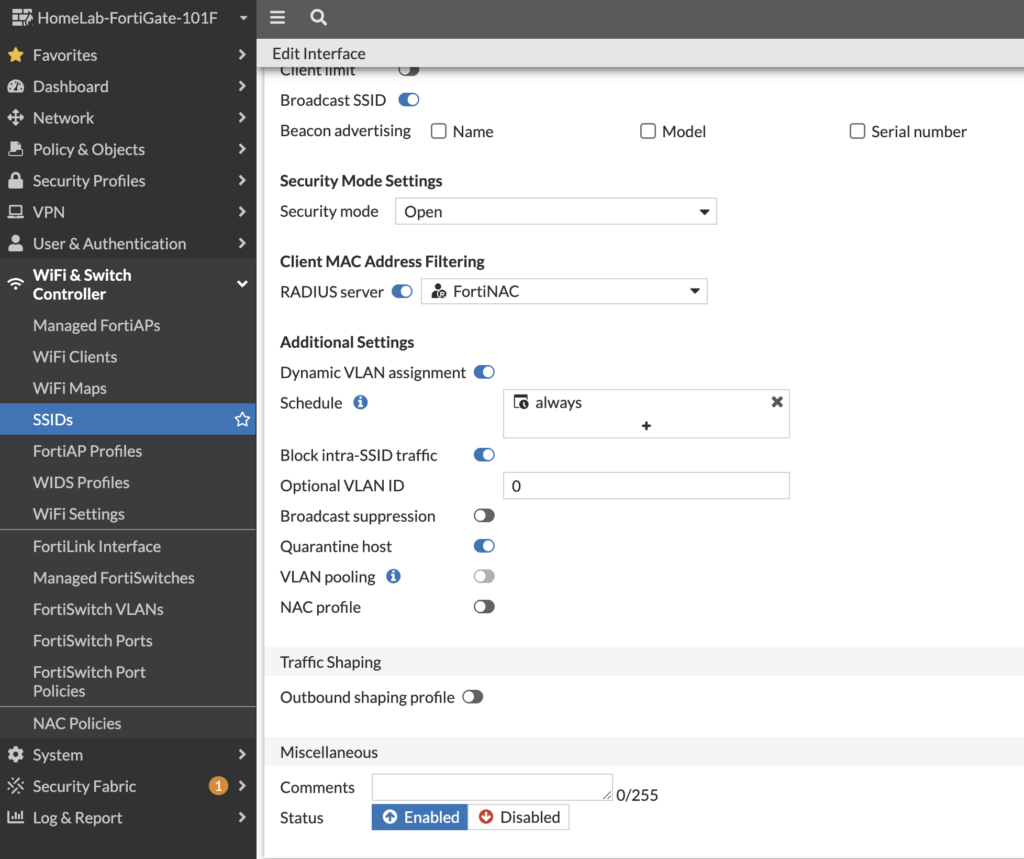
To spot-check your config, here it is in the CLI:
config wireless-controller vap
edit “Guest”
set ssid “Guest”
set security open
set radius-mac-auth enable
set radius-mac-auth-server “FortiNAC”
set intra-vap-privacy enable
set schedule “always”
set dynamic-vlan enable
unset broadcast-suppression
next
end
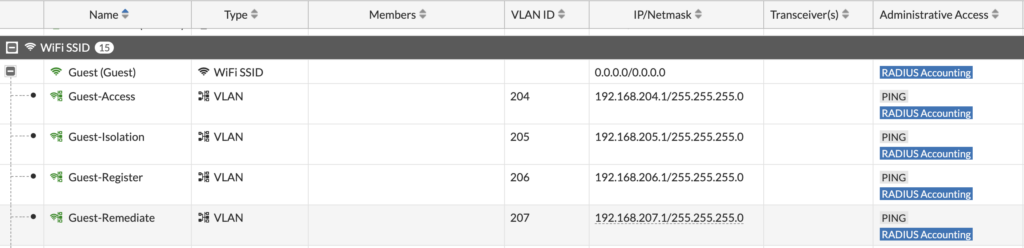
Next, we’ll create our multiple VLAN interfaces for each state we would want our guests to be in. Really, I only needed Isolation (where you start) and Access (where you go, once you authenticate). But I created the other networks for possible future uses:
First, we’ll create our Guest-Isolation network where guest users begin (thanks to FortiNAC sending a Change of Authorization to the FortiGate):
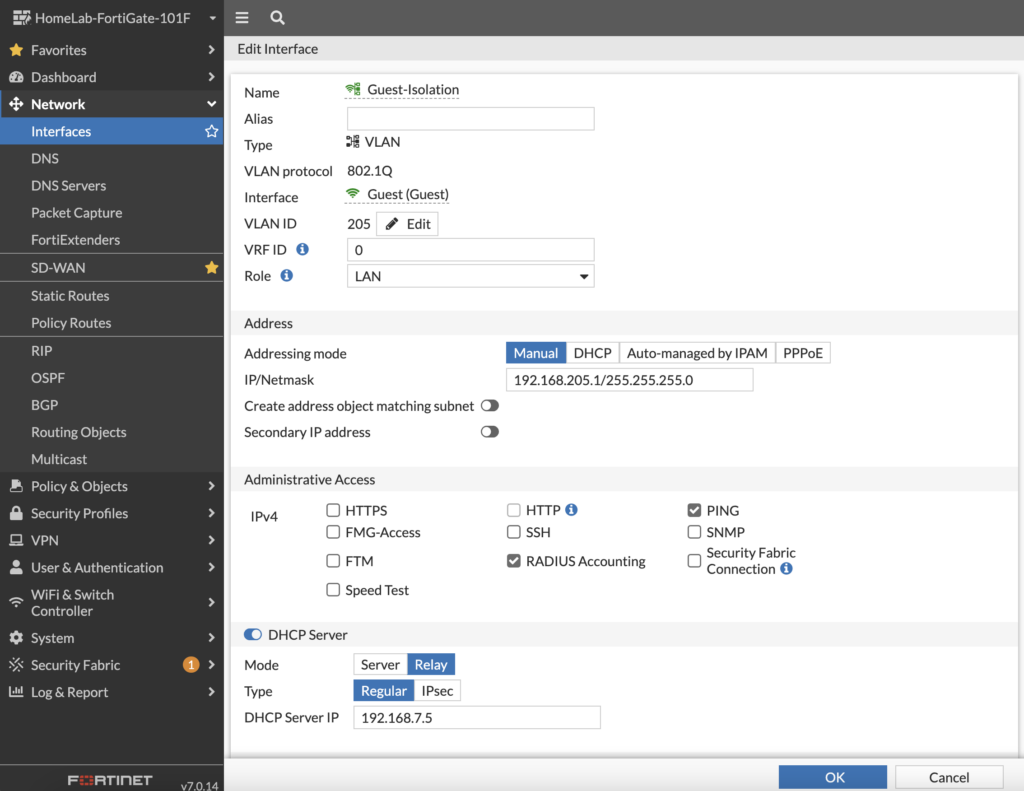
We configure a VLAN ID (we’ll later configure FortiNAC to use this) and set the DHCP relay IP address to FortiNAC’s eth1/port2 IP used for Isolation. We haven’t configured that FortiNAC Isolation interface yet, but will shortly. Basically, jot down an IP address you’ll use for FortiNAC to use for Isolation (and if you want to use Registration and Remediation, you’ll jot down IP addresses to use for that too). Here is the config on the CLI for a sanity check:
config system interface
edit “Guest-Isolation”
set vdom “root”
set dhcp-relay-service enable
set ip 192.168.205.1 255.255.255.0
set allowaccess ping radius-acct
set device-identification enable
set role lan
set dhcp-relay-ip “192.168.7.5”
set interface “Guest”
set vlanid 205
next
end
Second, we’ll repeat this for the Guest Access network where we place authenticated guests onto:
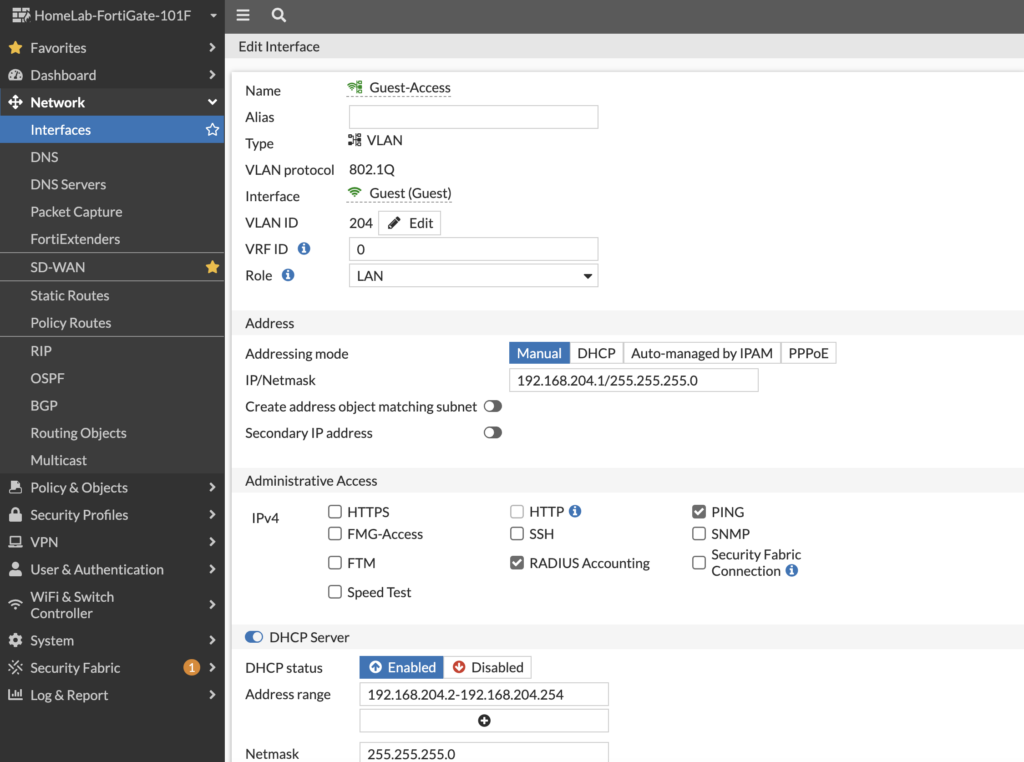
The difference here is that we allow FortiGate to act as the DHCP server — we don’t need to have FortiNAC providing DHCP addresses on its Isolation network any longer. And here’s the config on the CLI for this interface:
config system interface
edit “Guest-Access”
set vdom “root”
set ip 192.168.204.1 255.255.255.0
set allowaccess ping radius-acct
set device-identification enable
set role lan
set interface “Guest”
set vlanid 204
next
end
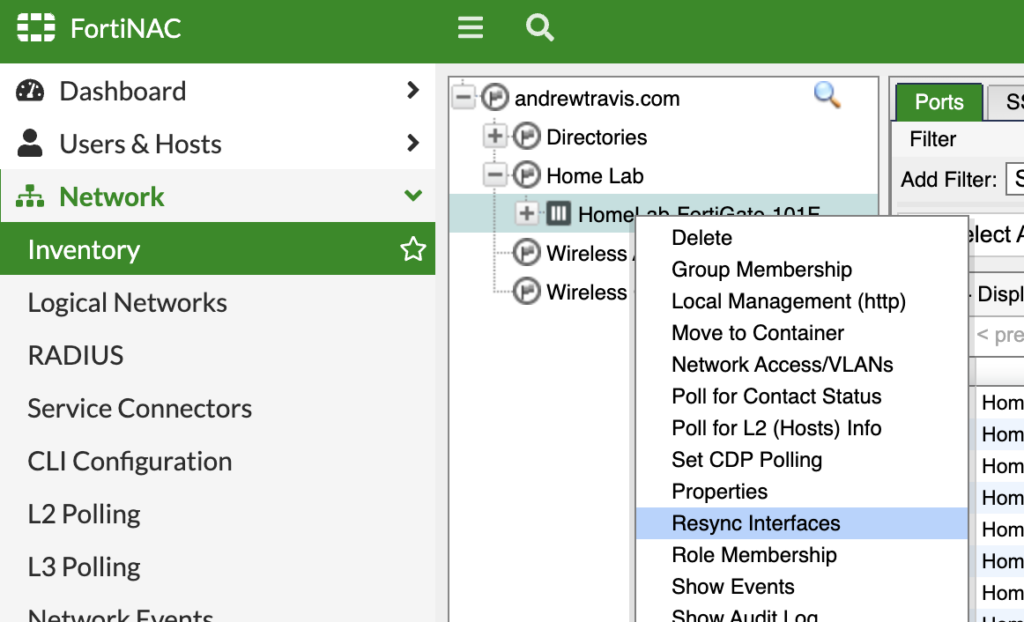
Hop back over to FortiNAC and navigate to your FortiGate under Network > Inventory. Right-click your FortiGate and select Resync Interfaces so that FortiNAC will know of the new SSID and new VLAN interfaces:
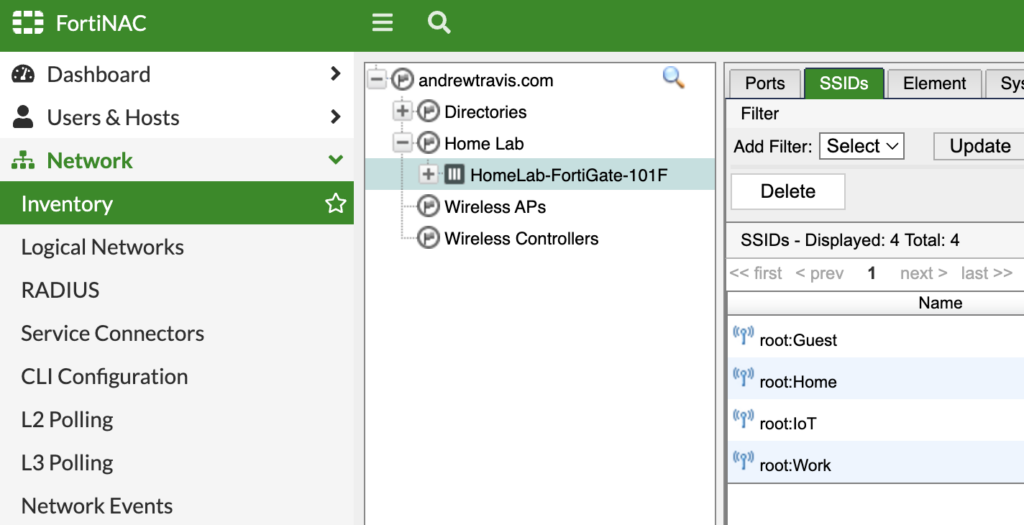
Now that our interfaces are sync’d, click on the SSID tab and edit the Guest SSID:
And map your VLANs to the roles for that network. I use VLAN 204 for my Guest Access and VLAN 205 for my Guest Isolation / Registration; I also mapped VLAN 207 for my Remediation network, but I’m not using it in any access policies:
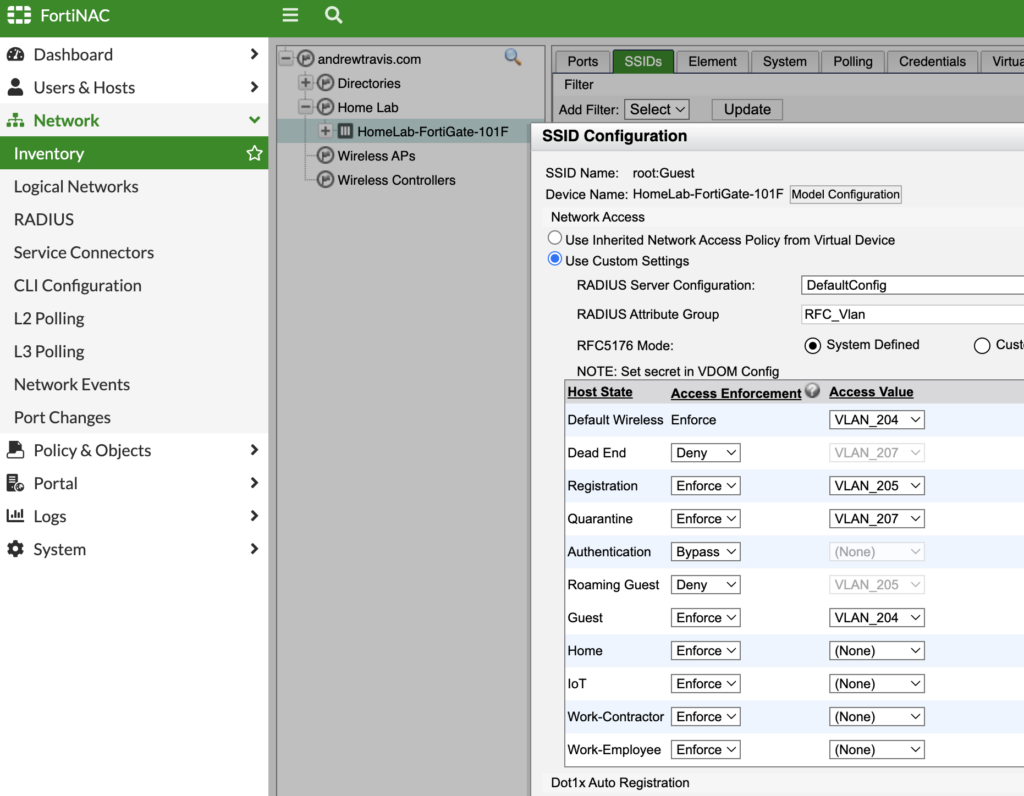
Make sure you set “RFC_Vlan” as your RADIUS Attribute Group so that the VLAN information is shared via RADIUS between the FortiGate and FortiNAC. When I ran debugs (which I’ll cover towards the end) I noticed no RADIUS attributes were being shared between FortiGate and FortiNAC until I set this.
Lastly in the Inventory menu, we’ll specify the Group Membership for each VLAN by right-clicking on the VLAN under the Ports tab to force Guest Isolation to register:
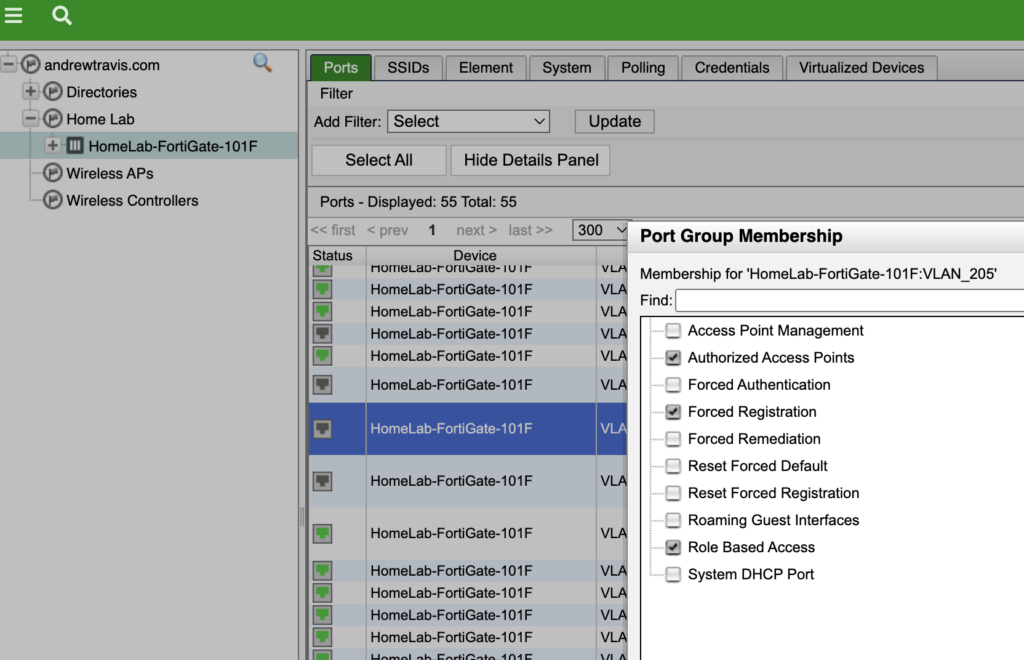
VLAN 204 = Guest Access = Role Based Access
VLAN 205 = Guest Isolation = Forced Registration, Role Based Access
Since I had created VLAN 206 for Registration and VLAN 207 for Remediation, I mapped those roles too, but they are out of scope for this post since we just use Isolation and Access for guest users.
Firewall Policies
In order for our Guest Isolation network to reach FortiNAC for DHCP, DNS and the Captive Portal, we need to allow it in our firewall rules. This is an easy step to overlook and you’ll know you missed it when your Guest Isolation clients never receive a DHCP address from FortiNAC:
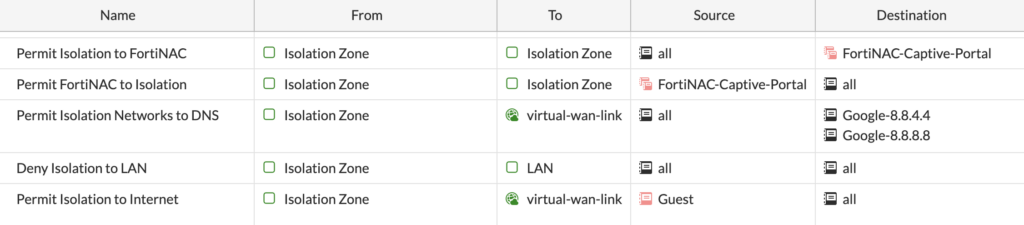
I also added rules for Isolation to reach Google for DNS, since that’s what I will soon configure FortiNAC to use as its DNS forwarder for Isolated endpoints. All of my various stages of Guest (the Guest SSID, Isolation, Registration, Remediation and Access VLAN interfaces) are member interfaces in that Isolation Zone in the above screenshot; it’s just an easy way to group my interfaces and simplify my firewall policies.
FortiNAC Isolation Config Wizard
You want to know the secret to insanity? Not realizing you need to set the “allowaccess” config on your FortiNAC’s Isolation interface to allow guest DHCP and DNS requests on top of setting everything up in the GUI Config Wizard! I wasted a week of FortiNAC not responding to DNS queries and the captive portal not popping up. I dug through countless community forums and customer tickets and nowhere did I find it mentioned that you need this configured. So make sure you SSH into FortiNAC and set the following configuration on your eth1/port2 Isolation interface for your Isolation FortiNAC interface to respond to your clients in Isolation:
config system interface
edit port2
set allowaccess dhcp dns http https ping radius radius-acct radius-local
next
end
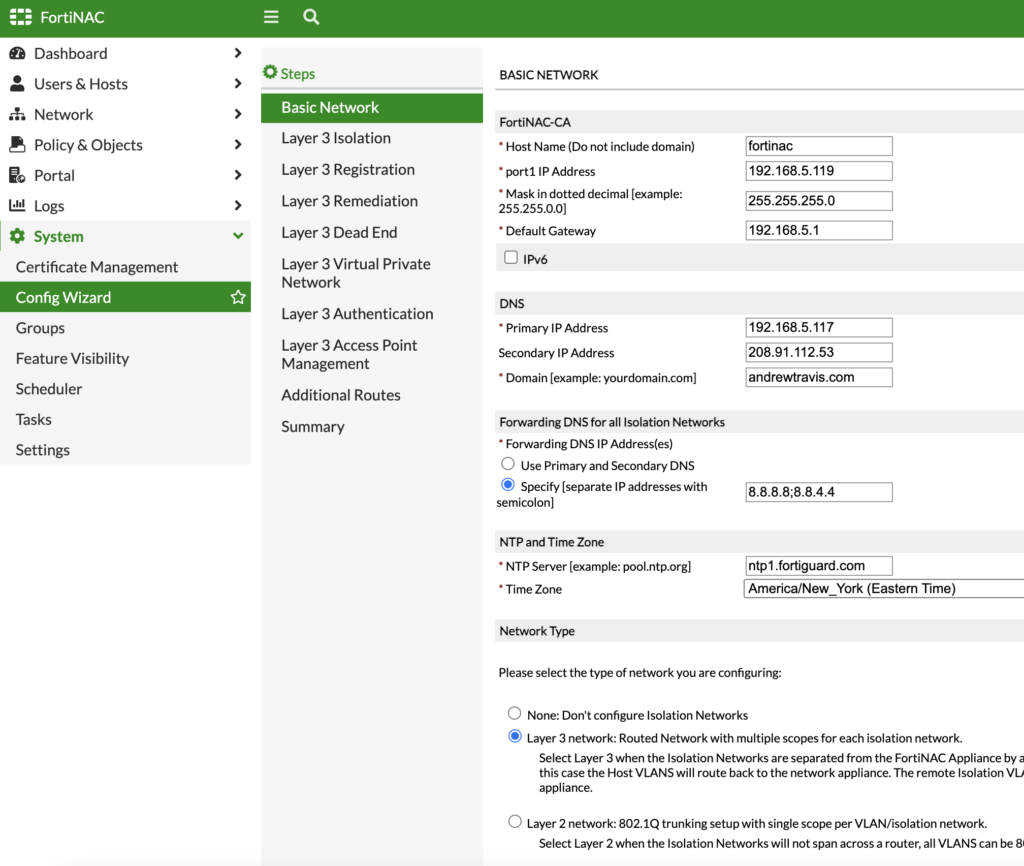
Now we’re ready to configure FortiNAC’s Isolation Config Wizard! In FortiNAC under System > Config Wizard, we’ll first configure forwarding DNS and enable our Isolation Type. I mentioned under the Firewall Policy section that I permitted DNS lookups to Google since that’s what I’m using for my Isolation network. Since my guests are separated by a Layer 3 boundary from my FortiNAC, my Isolation Type is Layer 3:
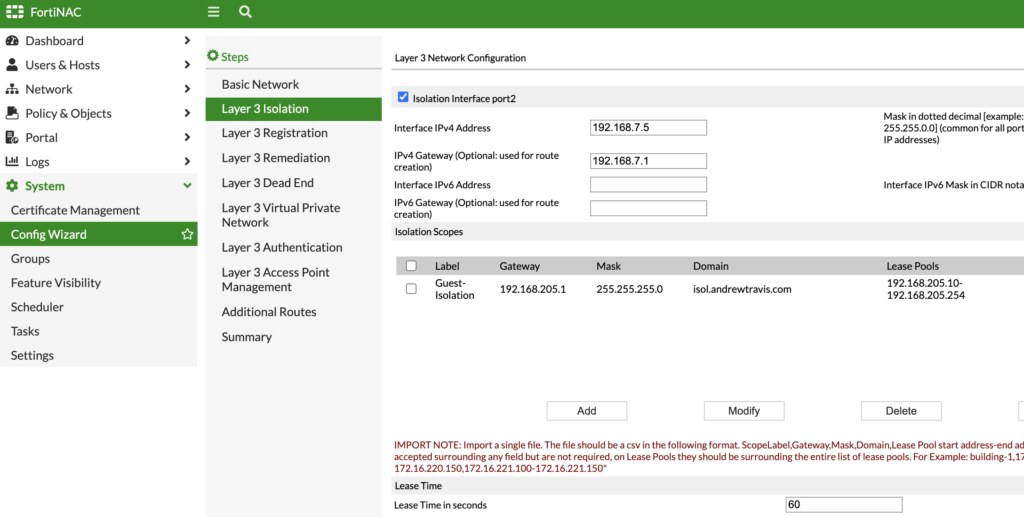
Click Next and on our next page, you remember when we jotted down the IP address we planned to use for DHCP Relay on our Isolation network? Here is where we’ll use that IP address (I used 192.168.7.5 in my config). We’ll also define the DHCP scope we want to use — FortiNAC will provide these short 60 second DHCP leases to Isolated clients so that they have network connectivity to FortiNAC’s Isolation interface. You’ll add a different scope per site here; since I just have 1 site, I have 1 scope (i.e. 192.168.205.x / VLAN 205 on my FortiGate):
If you’re not using the Registration and Remediation networks, you can skip those Steps. I defined those interfaces on FortiNAC and have VLAN interfaces for them on my FortiGate, but I’m not using them yet and won’t cover them in this post. I more than likely would use those for employees on a 802.1X network where I’m profiling and posture-checking the endpoints connecting to my network, but like I said that’s out of scope for our guest network here.
Skip down to Additional Routes and just confirm your Guest Isolation network has a route (since we’re using Layer 3). This is another thing that’s easy to miss (though FortiNAC automatically adds this route) if/when your Guest Isolation clients never receive a DHCP address from FortiNAC, it could be because FortiNAC is using its default route via eth0/port1 Management interface.

Lastly, spot-check everything under Summary. Click Apply, then Reboot and wait a few minutes:
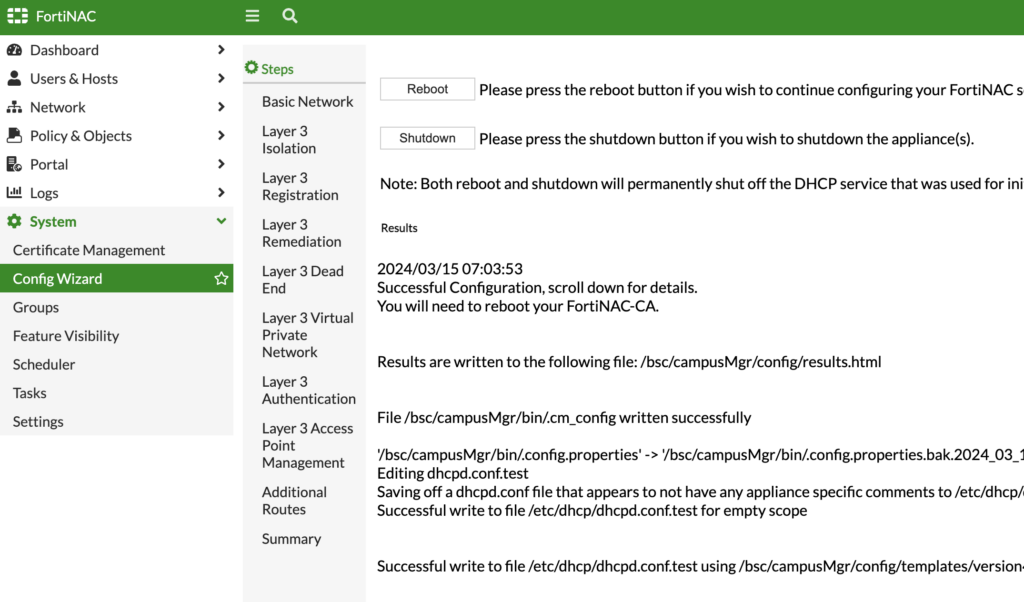
After FortiNAC reboots, we’ll go over to our Portal configuration. Navigate to Portal > Portal Configuration > Registration > Self-Registration Login:
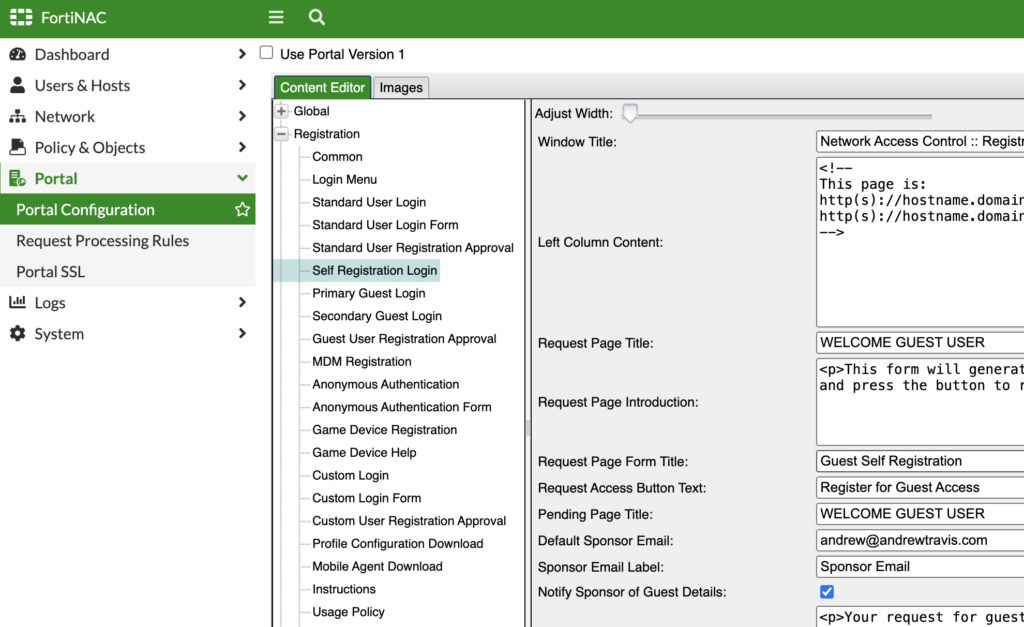
Here you can select the information you want your guests to enter as well as the email address of their sponsor. The trick here is ensuring that sponsors have accounts in FortiNAC under Users & Hosts > User Accounts and have a valid email address associated with their account. When the guest self-registers, they’ll enter an email address of a sponsor and FortiNAC will send an email to the sponsor to approve or deny the request.
The only other item I checked, and I apologize that I can’t remember if this is the default or not, is to specify the Default Guest Template to GuestSelfRegistration:
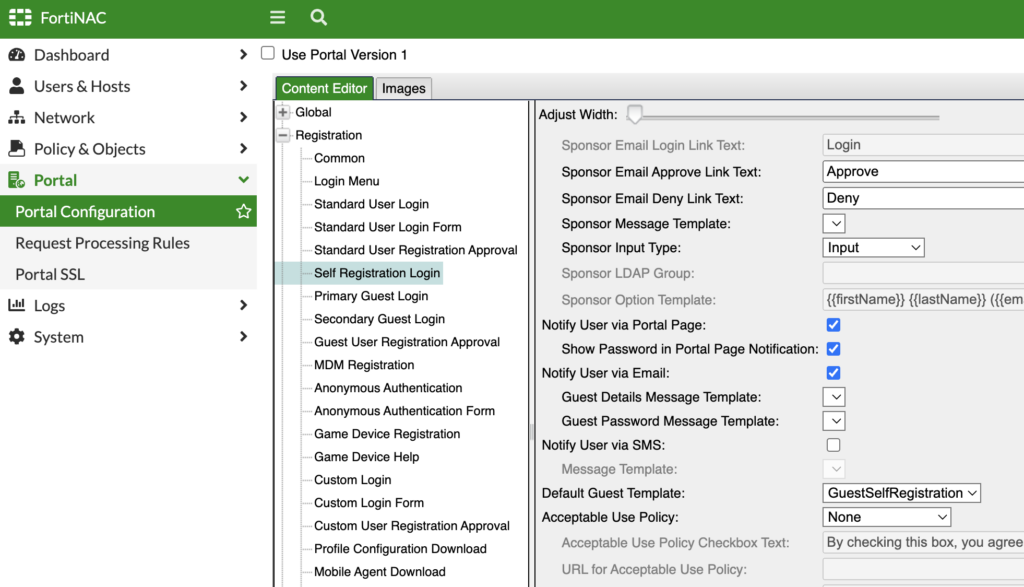
That GuestSelfRegistration is mapped to a built-in Role under Policy & Objects > Roles which we’ll cover next.
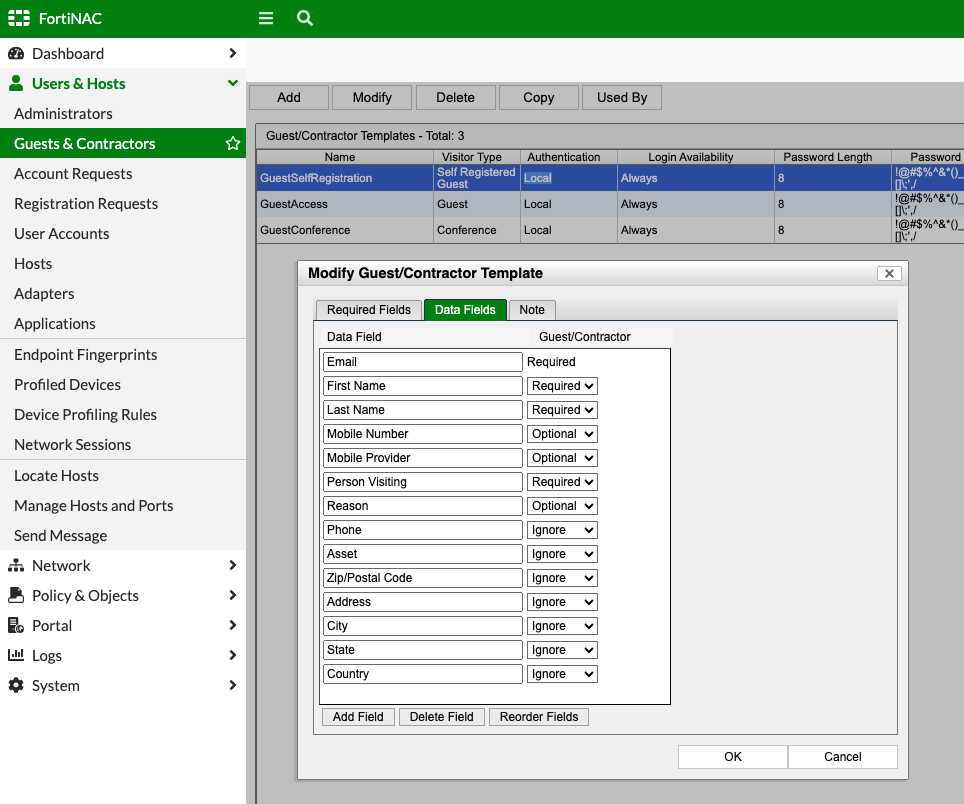
But before we do, let’s define which pieces of information we’ll require our Guests to enter when self-registering. Navigate to Users & Hosts > Guests & Contractors > Templates (top-right) > GuestSelfRegistration > Modify > Data Fields tab. Here you’ll require, make optional or ignore each attribute:
One last thing, since you’ll want a third-party signed SSL certificate on your Captive Portal, you’ll upload that to FortiNAC under System > Certificate Management and assign it to the Portal Certificate Target:

Now guests will have a signed certificate when accessing the Captive Portal upon redirect. This isn’t a requirement, but improves the user experience.
Roles and Network Access
I should’ve started this post saying I’m not a FortiNAC expert, I’m just determined to learn it. And this section 100% comes into play for wired network access. But I’m not sure that it’s required And I’ve since learned that it is not required for simple guest wireless access since we’ve already mapped our Guest SSID VLANs to Registration, Guest, etc. earlier. Feel free to skip this section and only return to it if pursuing wired Guest access. I had set this section up because I do plan to implement Guest on wired ports and a lot of the how-to guides walk you through setting this up (those how-tos are in the end under Resources).
FortiNAC uses Roles to group users and hosts and they can be used in user/host profiles to filter for specific Users or Hosts when applying network access policies, endpoint compliance policies, and Supplicant EasyConnect policies.
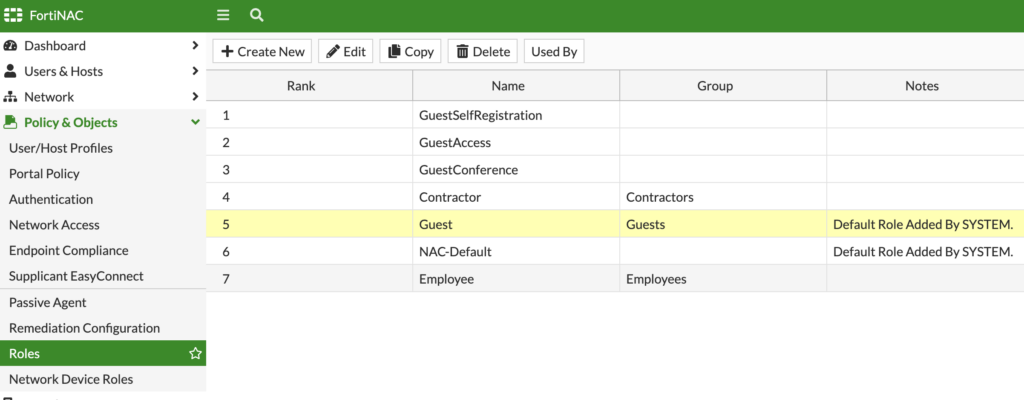
I’m using the built-in Guest role above and created a User/Host Profile for Guests that will match when someone self-registers via that Guest Self-Registration Portal:

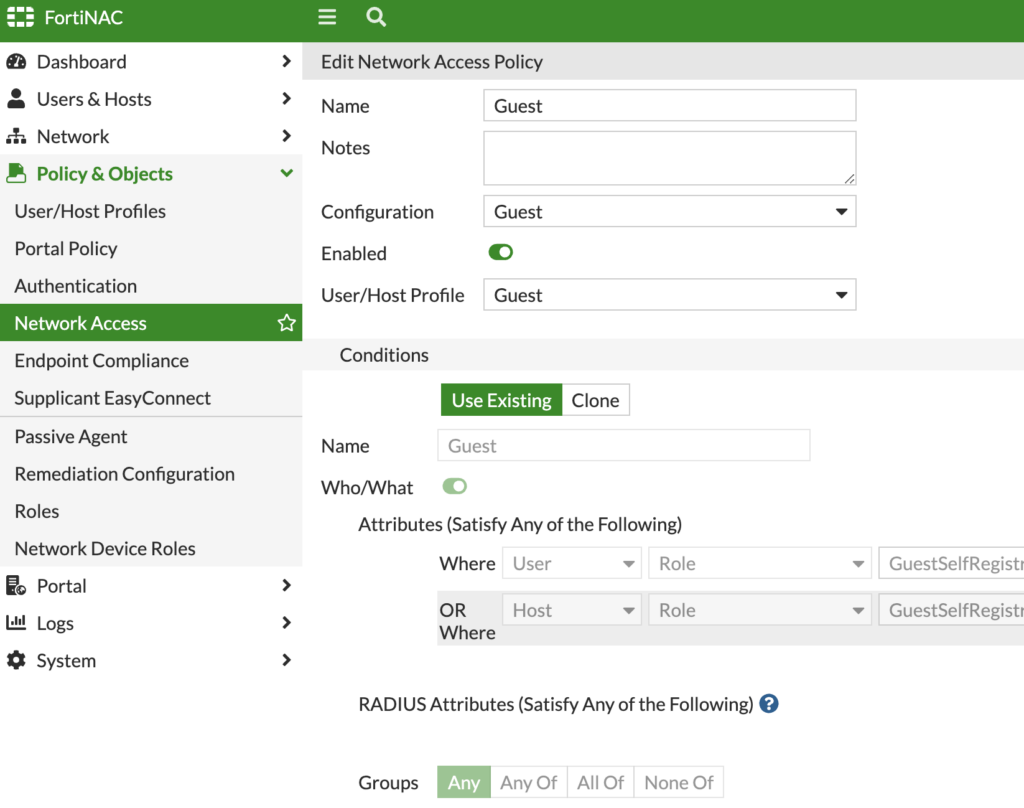
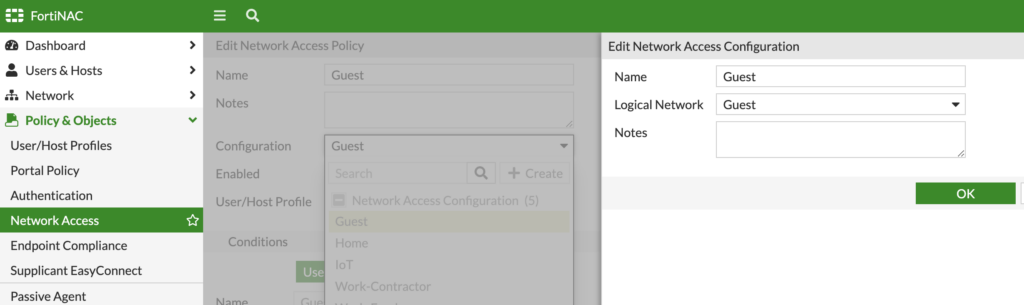
I then create a Network Access Policy to tie the Guest User/Host Profile to the Guest Logical Network (which we can map to a VLAN under Network > Inventory > Model Device) used for wired network access. Since we’re only focusing on wireless access, I don’t believe this step is required. But I still completed it for future use of wired networking on my Guest network.
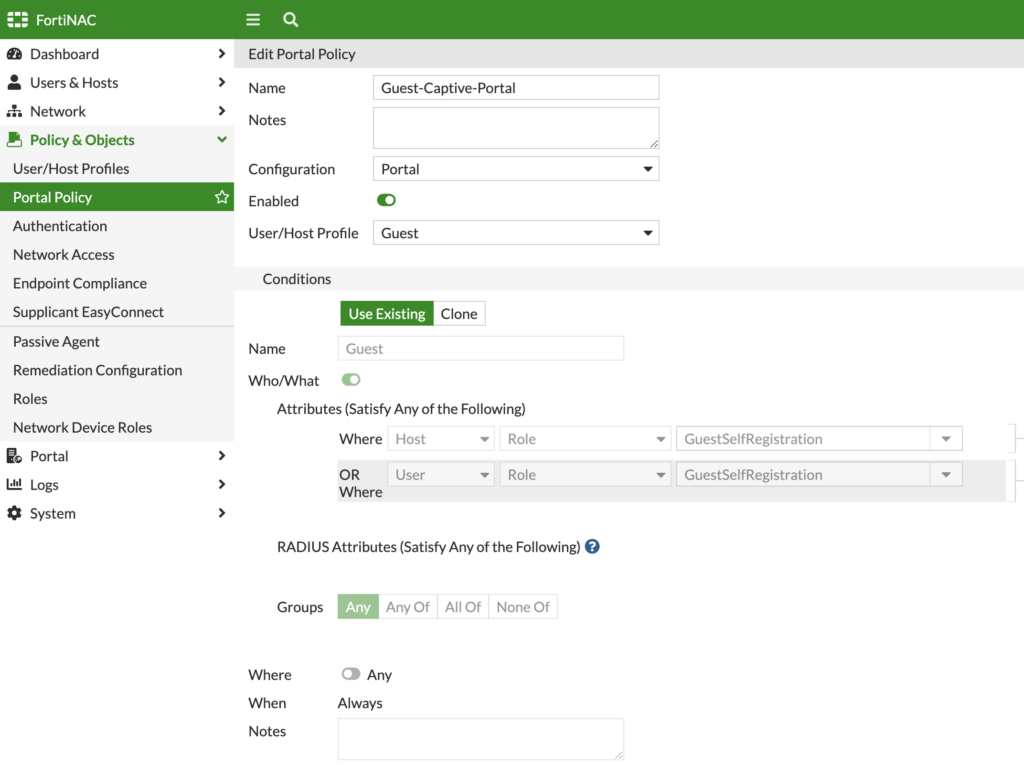
I also created a Portal Policy that mapped the Guest User/Host Profile to the Guest Logical Network:
Testing
Now that we’re through the configuration, let’s test it out! I connect to my Guest SSID and confirm that I receive a DHCP Address on the Guest Isolation network:
I open my browser and navigate to a website. A trick is to modify your list of allowed domains to force your operating system’s captive portal detection to pop up instead; you can find that list of domains and how to modify FortiNAC here: https://docs.fortinet.com/document/fortinac/9.4.0/enabling-captive-network-assistant/444956/configuration#_Toc111562767. Since FortiNAC is redirecting my connection to a HTTPS website, I receive a certificate error:
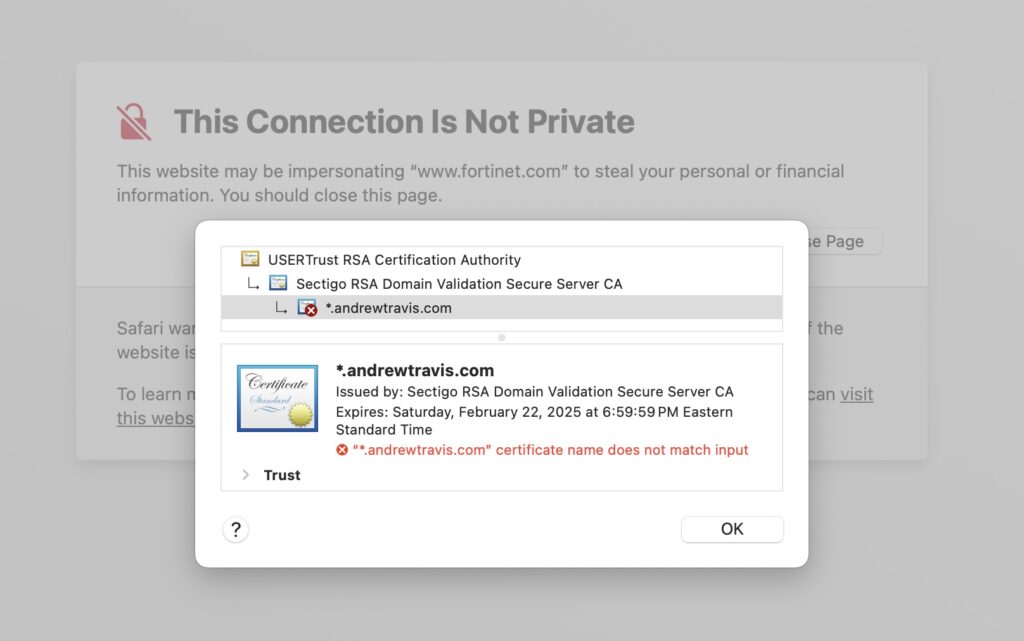
If I was reaching out to a HTTP website, the redirect would’ve been seamless. Once I click Visit Anyway, I am redirected to FortiNAC’s Isolation page and am prompted to login or self-register:
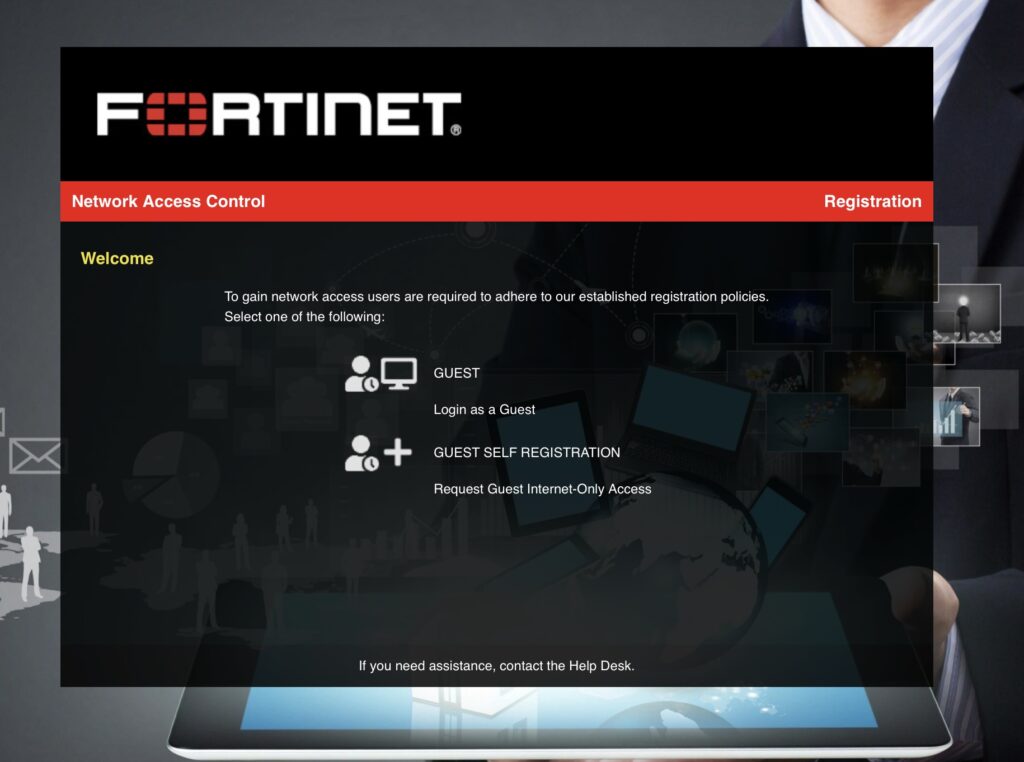
I’ll click Self-Register since I’m a new Guest and I’ll fill out the relevant information:
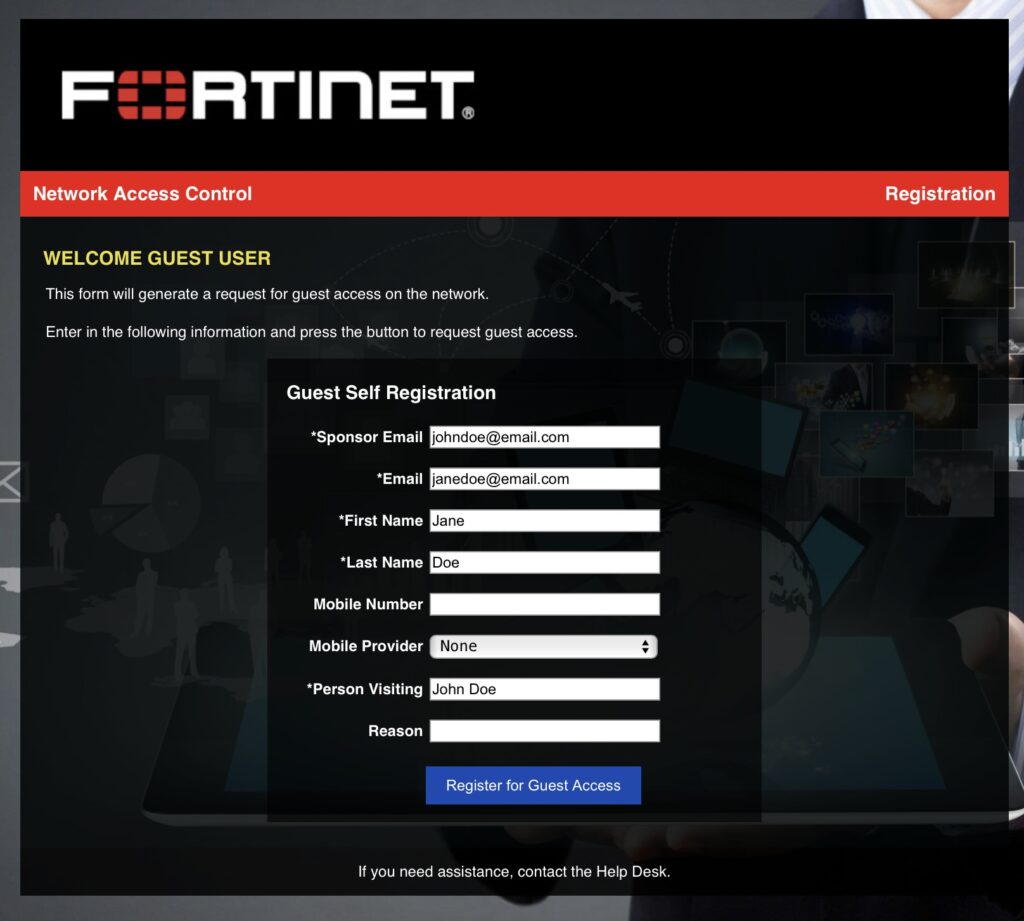
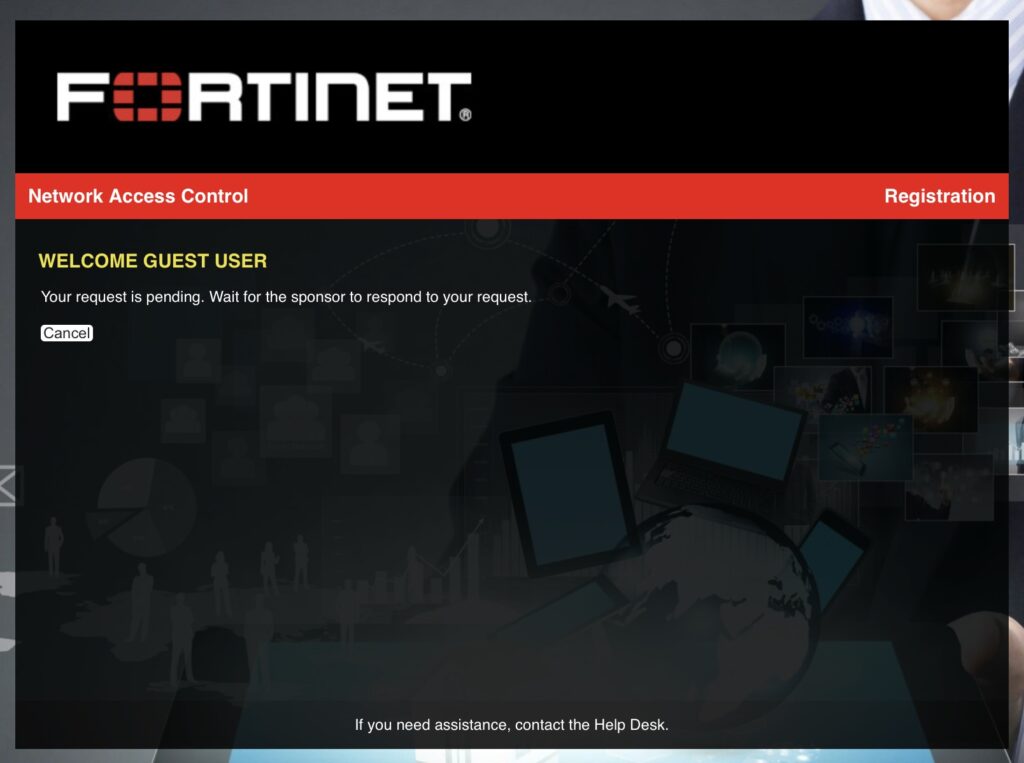
I had specified earlier which attributes I’ll require of self-registered guests marked with an asterisk *. Under sponsor email, if you don’t enter a valid email address of a sponsor (a User Account under Users & Hosts) then FortiNAC will pop up an error that the sponsor was not found. In the screenshot above I use a fake sponsor email and FortiNAC would prevent self-registration since that email address doesn’t exist for any users in FortiNAC. Once I enter a valid email address though, I’ll receive this message:
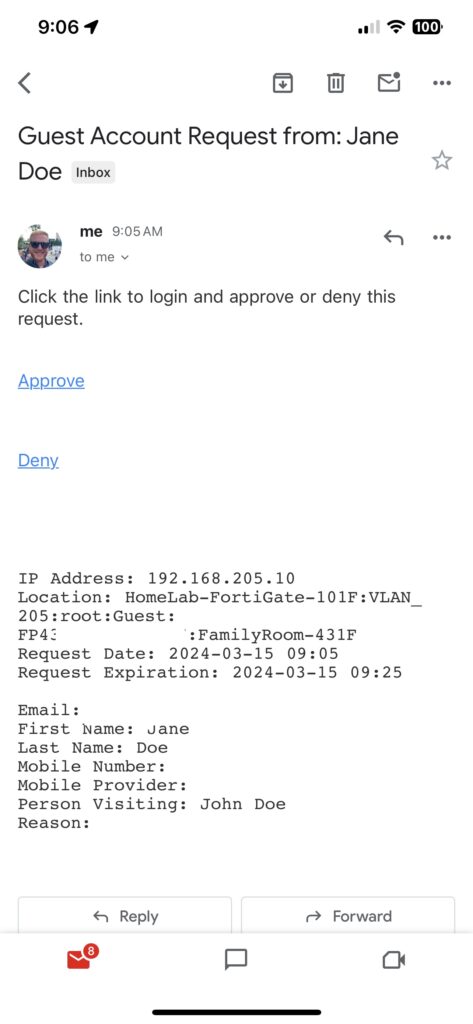
Note that the sponsor has to have access to FortiNAC’s management interface on port 8443 to be able to approve or deny access. They’d have to be on a LAN network, on VPN or accessing publicly to reach FortiNAC (I wouldn’t recommend this last option for good security measure). The sponsor will receive an email like this and be able to approve or deny access:
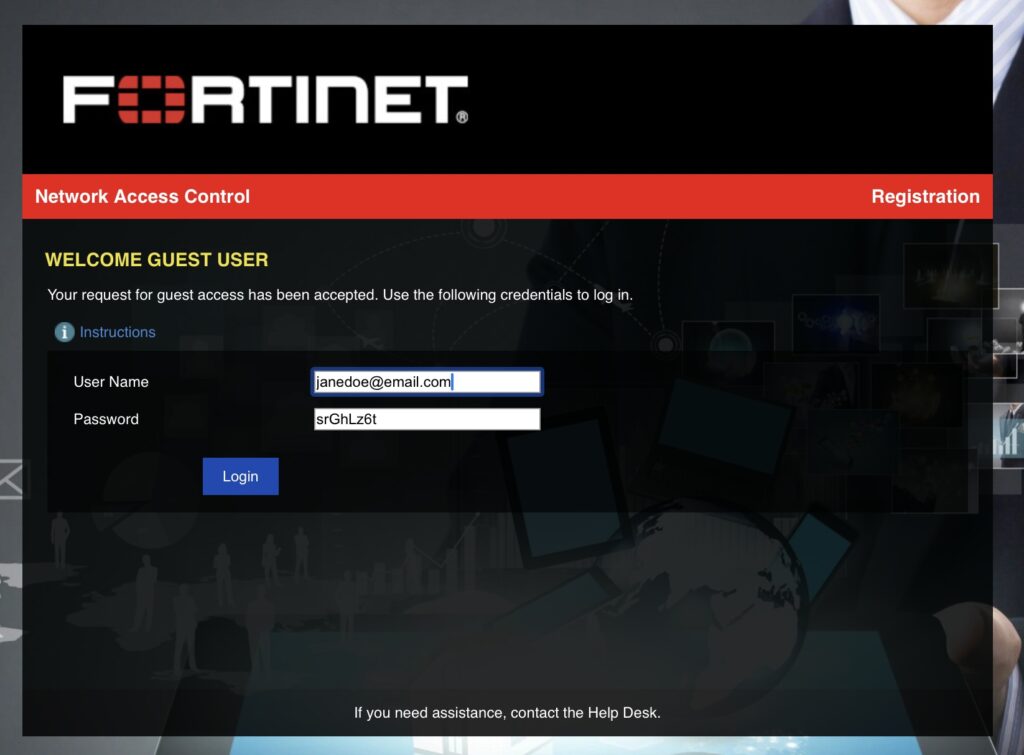
Once approved, the guest’s browser will automatically redirect and show the username and password to the guest (FortiNAC will also email it to the guest’s email address):
Once the guest clicks Login, they’ll be redirected to the URL they were originally visiting:
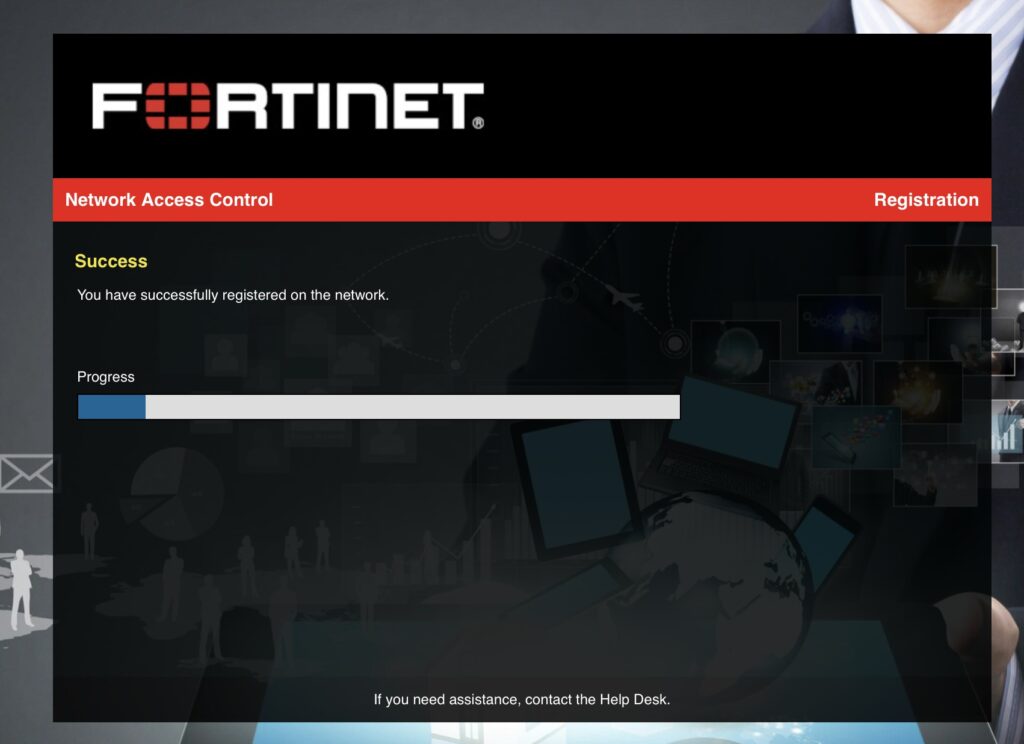
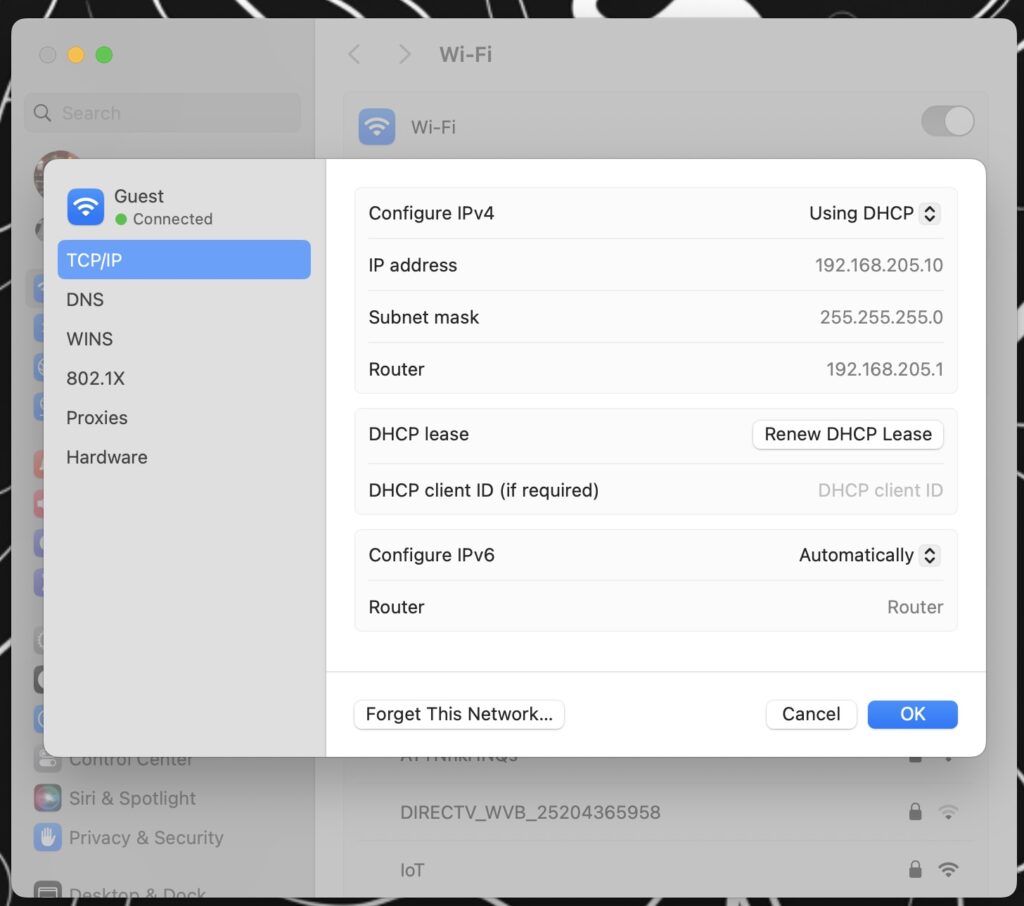
While that Progress bar is progressing, FortiNAC is sending a RADIUS CoA to the FortiGate to dynamically switch the VLAN from Isolation (VLAN 205) to Access (VLAN 204). When I check my TCP/IP settings, I now have a Guest IP address:
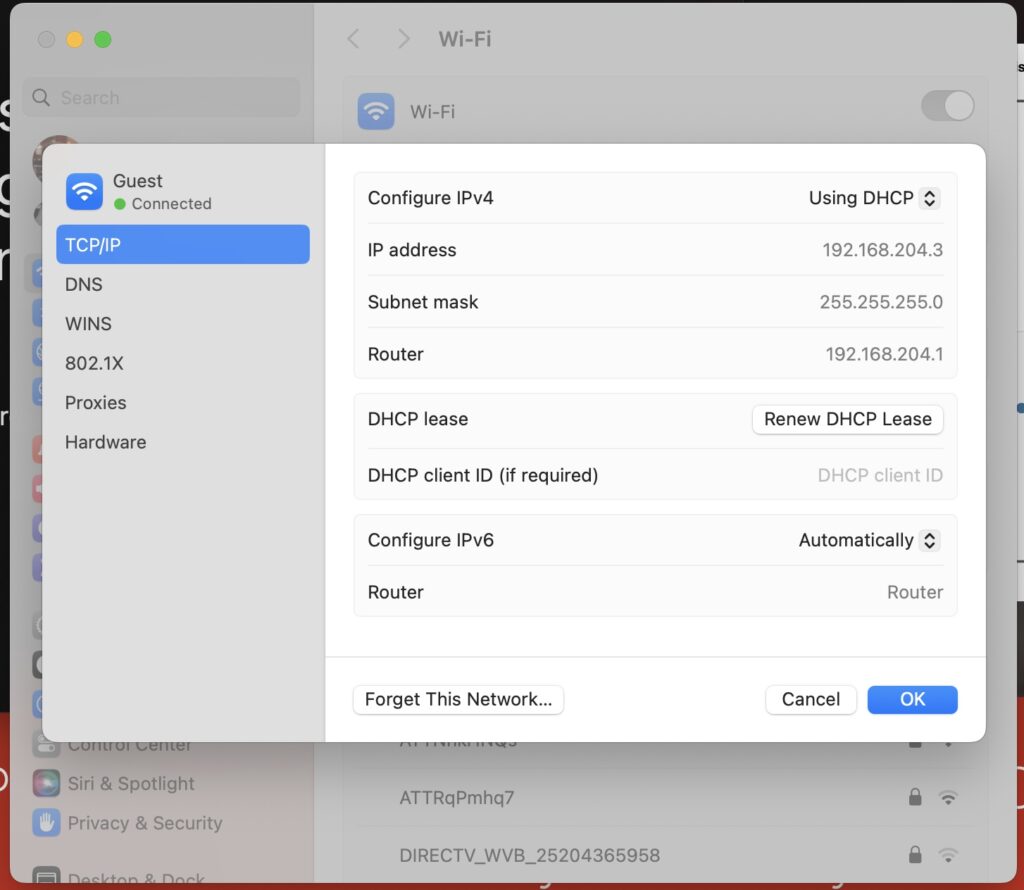
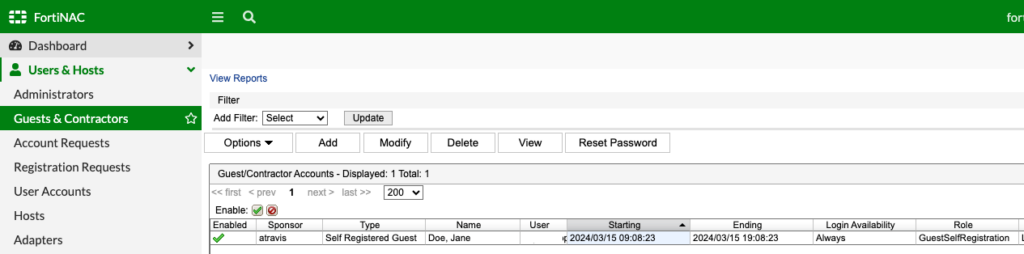
And as a guest, I navigate the Internet like normal. Any restrictions like allowed websites, allowed applications, etc. is controlled by the FortiGate I am connecting through. Back on FortiNAC, I can see my registered guests, who sponsored them, when access was granted and when it will expire:
Troubleshooting
Let’s say things don’t work perfectly your first attempt — they didn’t for me! Here are some handy troubleshooting tips to identify your issue:
Isolation Guests Not Receiving DHCP Address
You can either run tcpdump from FortiNAC’s CLI “exec tcpdump -i port2” or tail the dhcpd.log file:
fortinac # exec enter-shell
fortinac:~$ tail -F /bsc/logs/dhcpd.log
Mar 7 09:23:26 fortinac local6.err dhcpd: DHCPDISCOVER from 5c:e9:1e:c1:9a:67 via port2: network 192.168.7.0/24: no free leases
Make sure you’re seeing DHCPDISCOVERs and FortiNAC is sending back OFFERs. If you’re not, it could be a firewall rule blocking access or you forgot to define the DHCP scope under the Isolation portion of FortiNAC’s Config Wizard earlier.
DNS Not Resolving While in Isolation
You can either run tcpdump from FortiNAC’s CLI “exec tcpdump -i port2 port 53” or tail the named.log file:
fortinac # exec enter-shell
fortinac:~$ tail /bsc/logs/named.log
15-Mar-2024 09:11:02.824 queries: client @0x7ff28004d228 192.168.205.10#57487 (gdmf.apple.com): view isolation: query: gdmf.apple.com IN HTTPS + (192.168.7.5)
Make sure you’re seeing DNS queries/replies and logs showing up in named.log. My issue was the missing “allowaccess” on the Isolation interface permitting DNS so I was seeing all the DNS queries but no replies and my named.log file was empty. If you’re not seeing the DNS queries, check your firewall rules.
Guest Not Being Moved to Correct Network
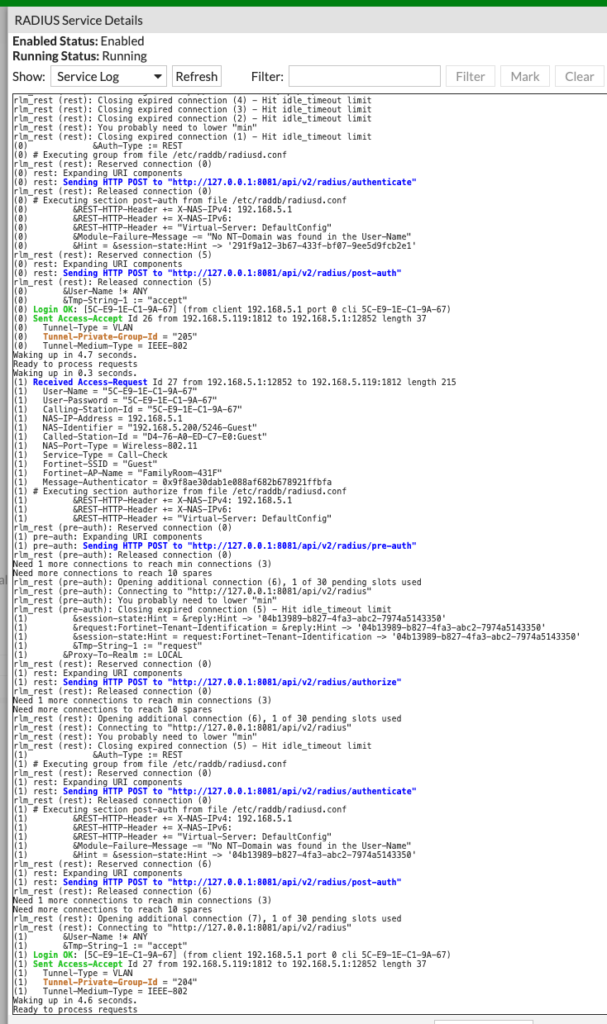
Check your RADIUS logs in FortiNAC under Network > RADIUS > View Logs. You’ll see great details of the RADIUS attributes being sent to FortiNAC and if you have missing fields, it could be because you forgot to enable RADIUS accounting for FortiNAC or forgot to enable dynamic VLAN switching on the Guest SSID. Here is what some of those logs look like, specifically focus on the Tunnel-Private-Group-Id in brown as that is the VLAN I was on (205) and the VLAN FortiNAC changed me to (204):
Debug Logs
This is your “nuclear option” to get deep in the weeds troubleshooting. I found this from looking through Fortinet TAC’s recommendations when customers call in and it’s not for the faint of heart, but it helped me at least confirm my RADIUS config was good.
fortinac # exec enter-shell
fortinac:~$ nacdebug -name BridgeManager true
fortinac:~$ nacdebug -name RadiusManager true
fortinac:~$ nacdebug -name DeviceInterface true
fortinac:~$ nacdebug -name RadiusAccess true
In the FortiNAC GUI, click the “?” button on top-right bar > Download Logs. Unzip this file and navigate to logs > output.master_xxxx.log.0.txt
Deciphering the output here is out of scope for this post (and would turn it into an even longer novel), but I was able to see the RadAttr RADIUS attributes shared which helped me realize I had forgotten to specify RFC_Vlan on my Inventory > SSID > “Guest” configuration. You can also see in the output the CoA that FortiNAC sends to FortiGate to change the VLAN from Isolation to Access. That was the only file I dug into in that zip file, but there are many more and I feel like I barely scratched the surface in all the troubleshooting info it provides.
Conclusion
I am happy I finally got this working, that my persistence paid off. And I wanted to understand FortiNAC’s captive portal capabilities in greater detail since I’m currently going through a Proof of Concept with a customer of mine. I share the various reference PDFs below in case it helps you fill in any blanks. Thanks for reading and good luck!
References
These are links to the how-to guides I followed. None of them helped me complete my setup by themselves, but each of them helped me put all the pieces together and they may help you too:
FortiAP Device Integration: https://fortinetweb.s3.amazonaws.com/docs.fortinet.com/v2/attachments/e3ad3042-1049-11ee-8e6d-fa163e15d75b/FortiNAC_FortiAP_Integration_Guide_vF72.pdf
FortiGate/FortiAP Integration: https://fortinetweb.s3.amazonaws.com/docs.fortinet.com/v2/attachments/ff288b2c-223d-11ed-9eba-fa163e15d75b/FortiNAC_Configuration_Wizard_rev92.pdf
An example of a simple network deployment of FortiNAC with FortiGate/FortiSwitch: https://community.fortinet.com/t5/FortiNAC/Technical-Tip-An-example-of-a-simple-network-deployment-of/ta-p/266446
FortiNAC Guest Captive Portal configuration and workflow: https://community.fortinet.com/t5/FortiNAC/Technical-Tip-FortiNAC-Guest-Captive-Portal-configuration-and/ta-p/215606
DHCP service running but isolated hosts do not get IP: https://community.fortinet.com/t5/FortiNAC/Technical-Note-DHCP-service-running-but-isolated-hosts-do-not/ta-p/196090
Local RADIUS Server: https://fortinetweb.s3.amazonaws.com/docs.fortinet.com/v2/attachments/484244b8-090c-11ed-bb32-fa163e15d75b/FortiNAC_Local_RADIUS_Server_v94.pdf
Troubleshoot DNS on Isolation:
FortiNAC Guest Captive Portal configuration and workflow: https://community.fortinet.com/t5/FortiNAC/Technical-Tip-FortiNAC-Guest-Captive-Portal-configuration-and/ta-p/215606
Captive Portal Detection: https://fortinetweb.s3.amazonaws.com/docs.fortinet.com/v2/attachments/8b7c4f99-1e56-11ed-9eba-fa163e15d75b/Enable_Captive_Network_Assistant_v9.pdf (I had to remove some Allowed Domains for iPhones to redirect to the Captive Portal).
Thank you for your effort Andrew,
I encountered a strange issue when the user connects to the isolation they are assigned an IP from FortiNAC and redirected to a portal to register after the user registers successfully, on FortiGate it is showing that the user now is in the production vlan but it is showing the registration IP, I tried to disconnect and reconnect the user after it has been registered on the first time but it is still showing a registration IP with the production vlan
Mohammed, it could be that the production network isn’t mapped to the correct VLAN under NAC > Network > Inventory > FortiGate > SSIDs. That’s the first place I’d check to ensure production role/network maps to the correct production VLAN.
Thanks for reading!
Andrew