
I’ve been using a two year old SD-WAN/VPN/BGP config in my Fortinet home lab, adjusted over time to take advantage of new VPN and BGP templates in new FortiManager releases. But I hadn’t utilized our SD-WAN Overlay Template yet and wanted to see how it worked. The goal of this Template is to combine SD-WAN, BGP, VPN and various CLI configurations all in one wizard. It’s the easy button and in this post I write-up how to walk through the wizard and any gotchas I discovered in the process.
Prerequisites
- FortiManager 7.2.0 or higher (Starting in 7.2.0, the SD-WAN Orchestrator is no longer available in FortiManager. Instead, you can use the SD-WAN Overlay Template wizard to configure your SD-WAN overlay network.)
- Hub(s) Added to FortiManager
- Branch Device Group Created (can be empty)
SD-WAN Overlay Template Wizard
The SD-WAN Overlay Wizard can be found in FortiManager > Device Manager > Provisioning Templates > SD-WAN Overlay:
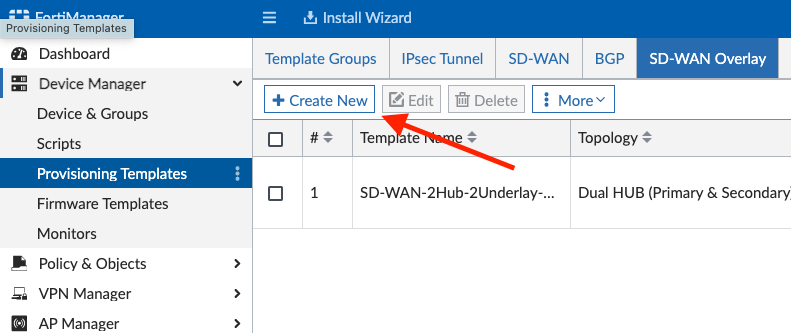
You’ll click Create New and then select your desired topology. I chose Dual Hub Primary and Secondary since most customers utilize this method, with a primary data center and secondary disaster recovery site.
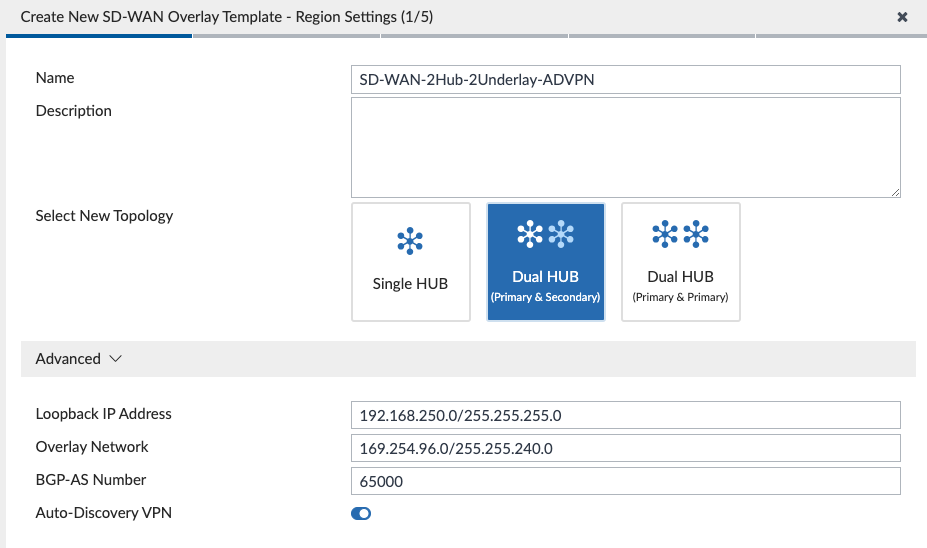
The Wizard prompts you to enter the subnet used for Loopback IP addresses (used for BGP and SD-WAN Health Checks) as well as the Overlay Network addresses for VPN tunnels. I entered a large Overlay Network subnet of 169.254.96.0/255.255.240.0 and the Wizard carved that up into smaller subnets for me (since I’ll have 4 VPN tunnels on each Spoke). We define our BGP AS Number for iBGP between Hubs and Spokes and lastly we enable Auto-Discovery VPN for our Spokes to be able to dynamically form Spoke to Spoke VPN tunnels for efficiency.
After we click Next, we are prompted to assign roles to our devices:
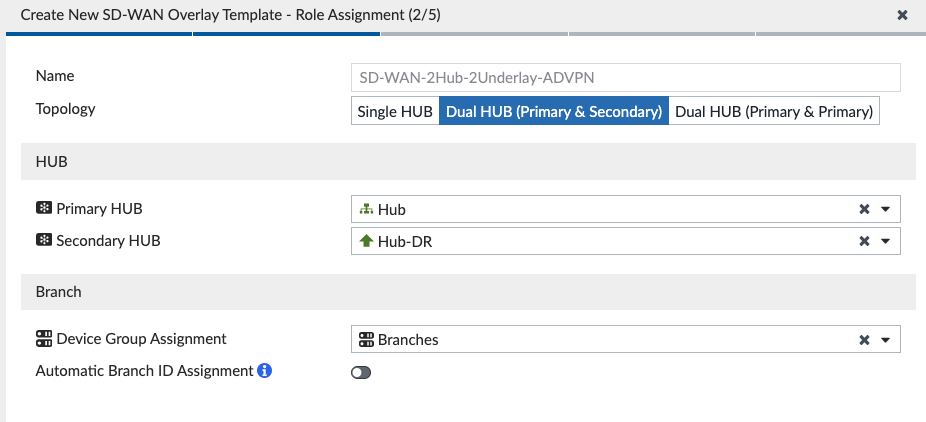
We select our primary and secondary Hubs as well as the Device Group Assignment; I had created a “Branches” Device Group to assign this Template to, but it is empty since I’ll pursue ZTP after everything is built on FortiManager.
After we click Next, we are prompted to configure the network:
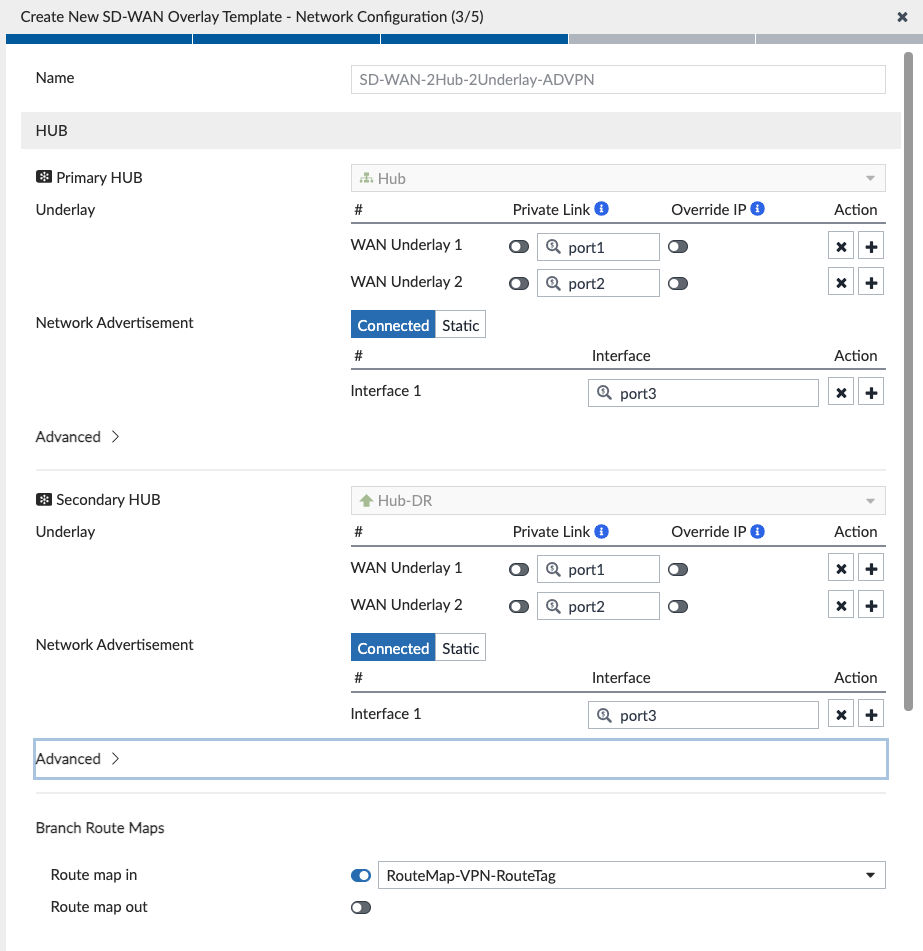
I map my WAN underlays on my Hubs to the interfaces connected (WAN1 = port1, WAN2 = port2 on my Hubs). I also had already configured Route Maps in an earlier iteration of my lab (read more about it here) and opted to select those existing Route Maps instead of the ones that the Template was going to create. Basically, these Route Maps pin return traffic to the same VPN tunnel. Likewise, I did the same for my Branches:
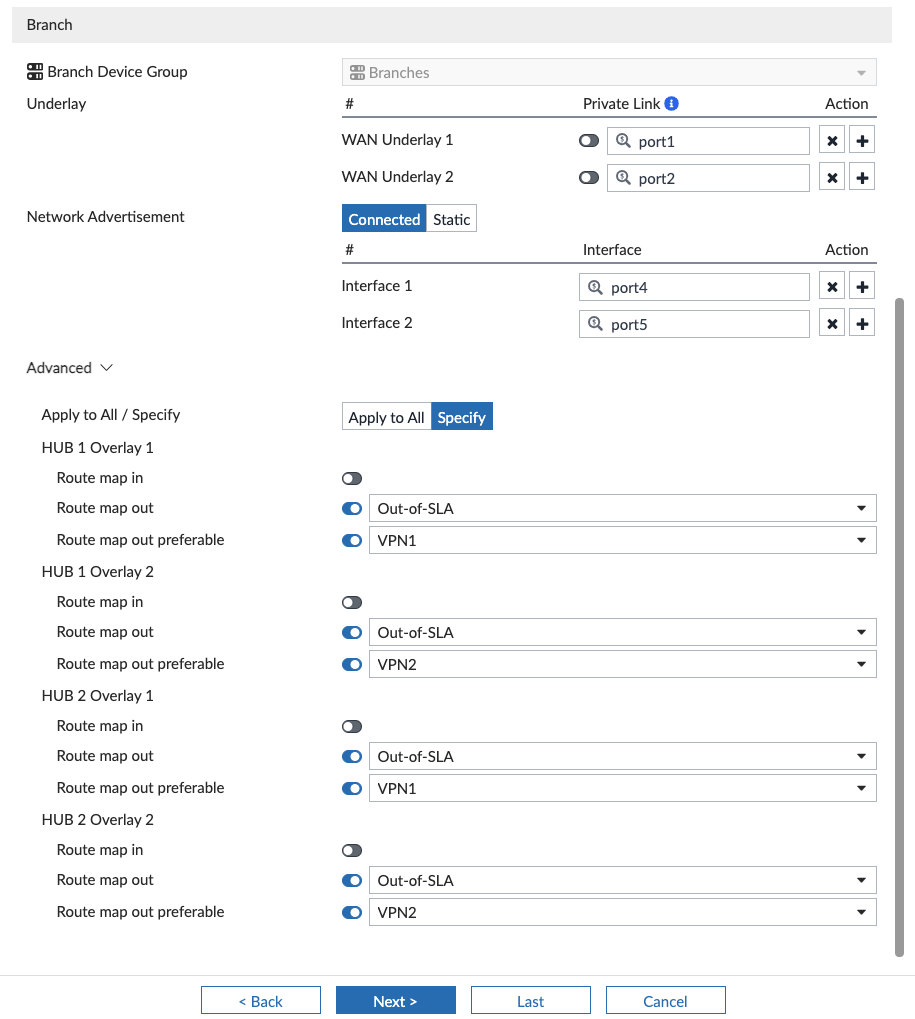
Something worth noting is that the Wizard is advertising connected networks that I specify (on ports 4 and 5, which are two of my Branch networks), but more on that later.
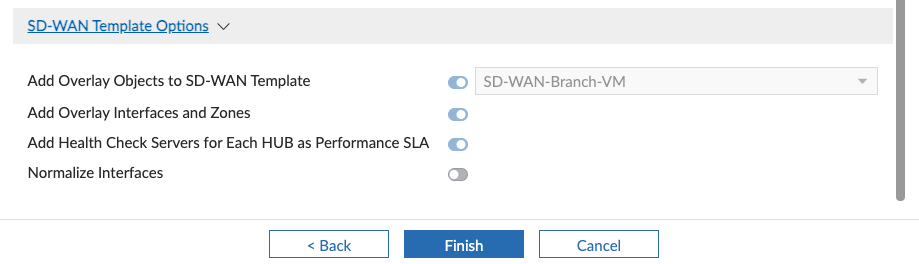
After we click Next, we create an empty SD-WAN Template that we will configure later in this post:
After we click Next, we can see a summary of what the Wizard will create when we click Finish:
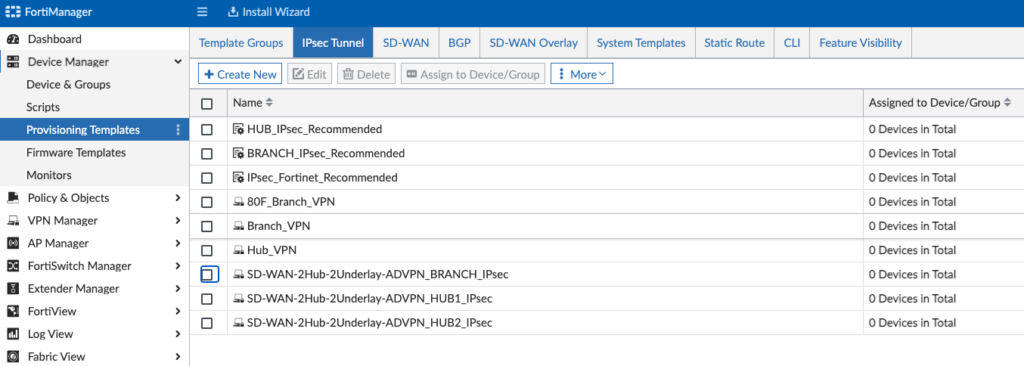
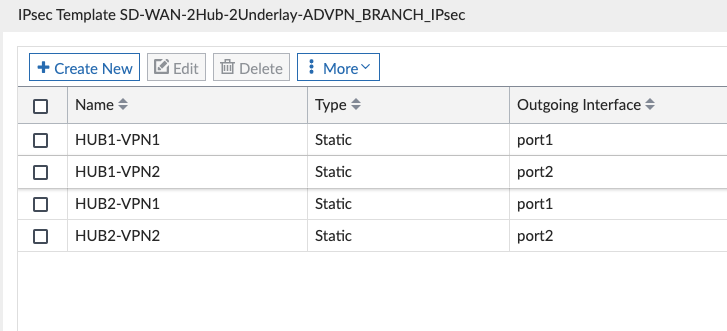
IPsec Tunnel Templates
The SD-WAN Overlay Template Wizard created the “SD-WAN-2Hub-2Underlay-ADVPN_….” IPsec Tunnel Templates for us:
Here’s our Hub Config:

And our Branch Config:
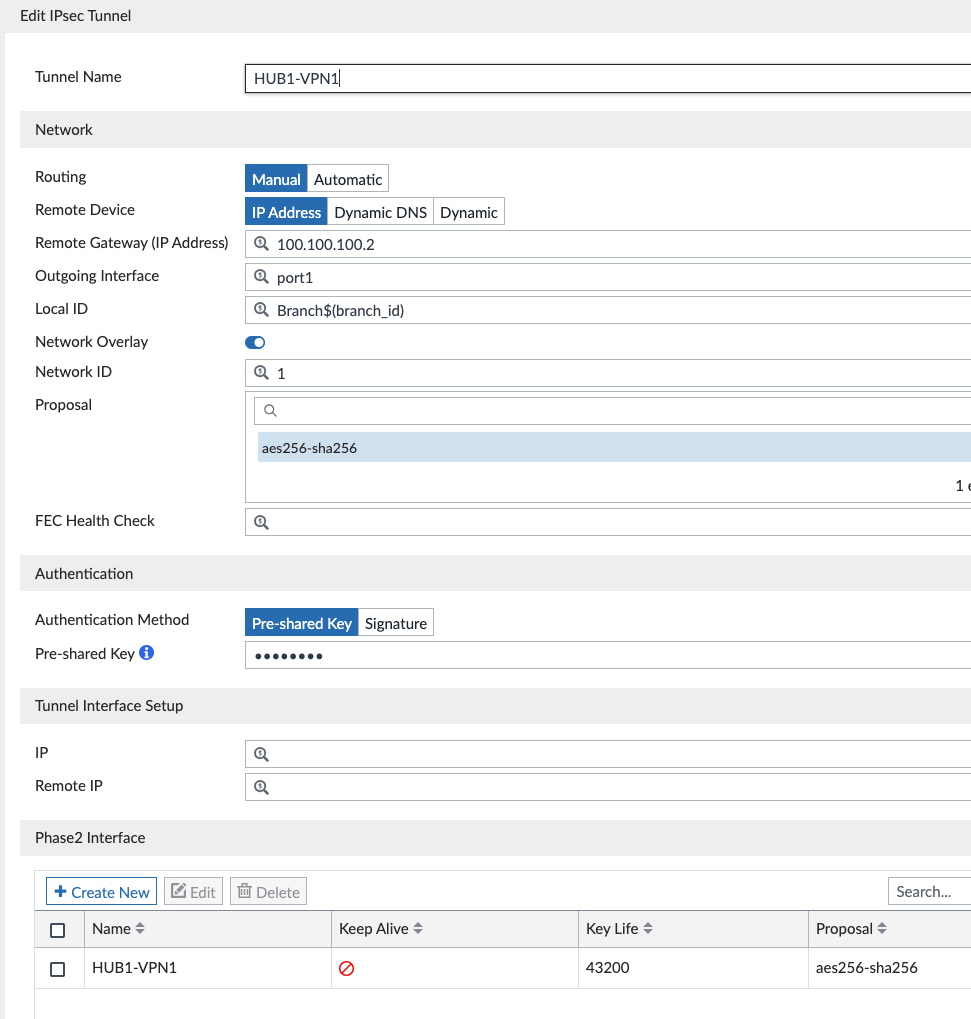
I edited each of these and made the following changes:
- All: changed preshared key to something instead of the default of “fortinet”.
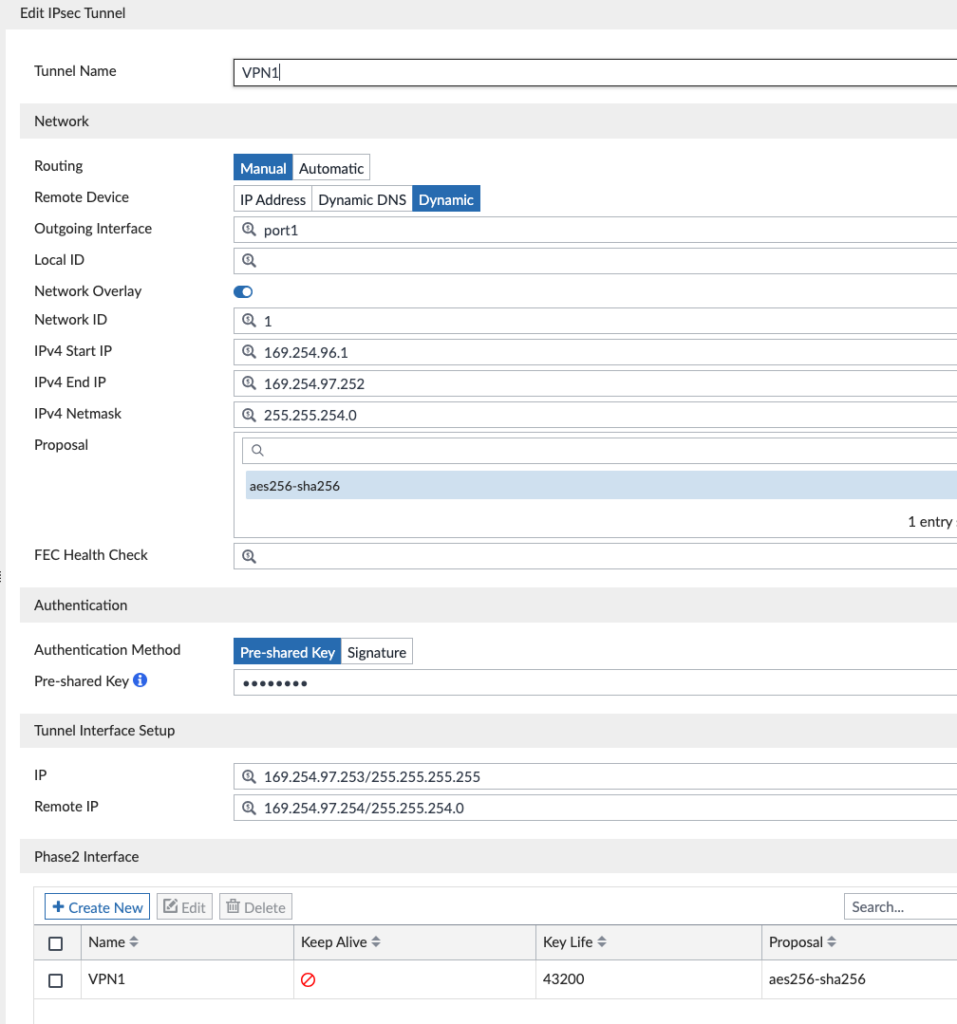
- Hubs: noted the VPN tunnel IP addresses used for each VPN1 and VPN2 tunnel interface on each Hub as you’ll need this later:
- Edit SD-WAN-2Hub-2Underlay-ADVPN_HUB1_IPsec > Edit VPN1
- Write down the Tunnel Interface Setup IP address
- Repeat for VPN2 and likewise on HUB2
- HUB1-VPN1 = 169.254.97.253
- HUB1-VPN2 = 169.254.99.253
- HUB2-VPN1 = 169.254.105.253
- HUB2-VPN2 = 169.254.107.253

SD-WAN Template
When we created the SD-WAN Template in the SD-WAN Overlay Template Wizard, we left it empty so that we could create everything in it now. One thing the Wizard did create was the SD-WAN Zones and Member interfaces:
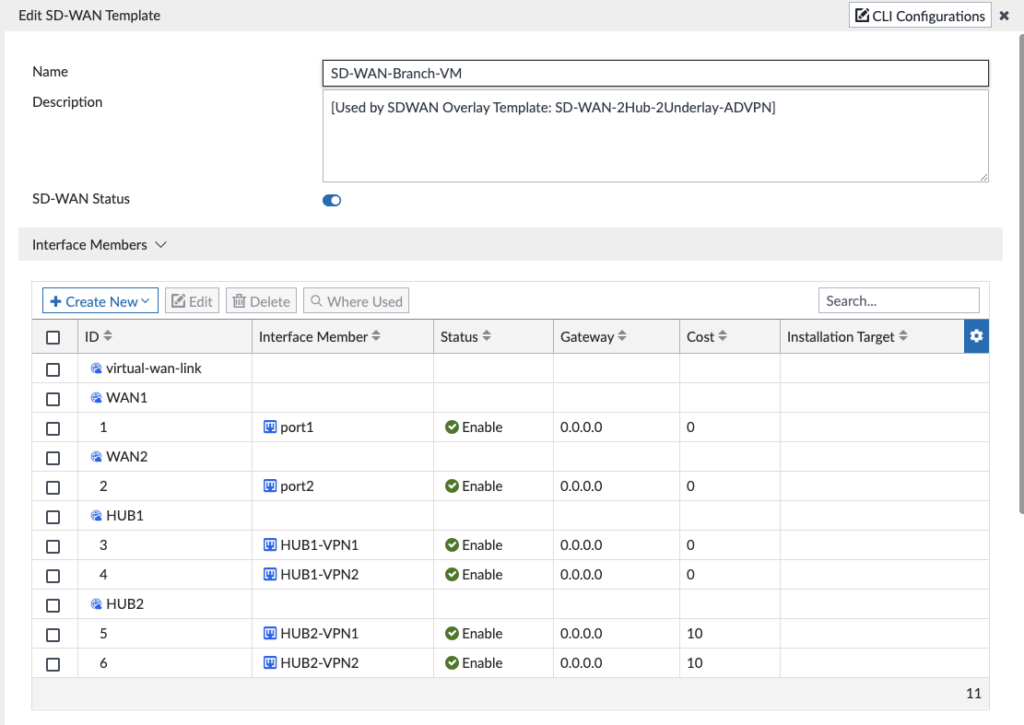
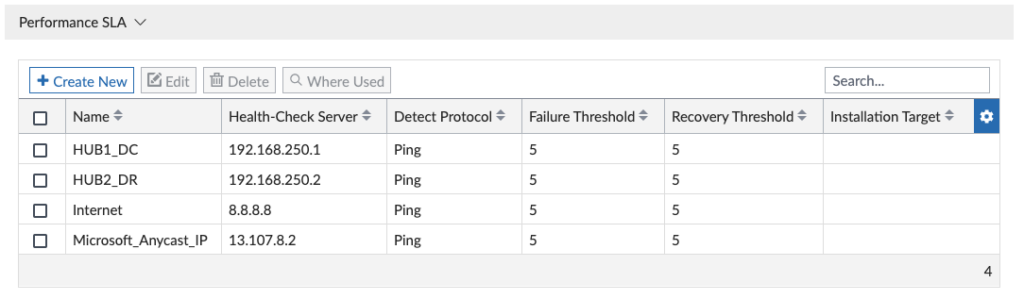
I didn’t have to modify the IP addresses or anything above since they were already defined in the IPsec Tunnel Template for the HUBx-VPNy interfaces and DHCP for WAN underlay interfaces. One cool thing I wanted to call out is that the Wizard gave Hub2 a higher cost so that it is less preferred in my “Hub” SD-WAN rule down below; it did this because I had specified Hub2 as my Standby (DR) site. I had to tweak the SLAs below since the SD-WAN Overlay Template Wizard chose an IP for the Hub Loopbacks that I wasn’t using and I also added a few more SLAs:
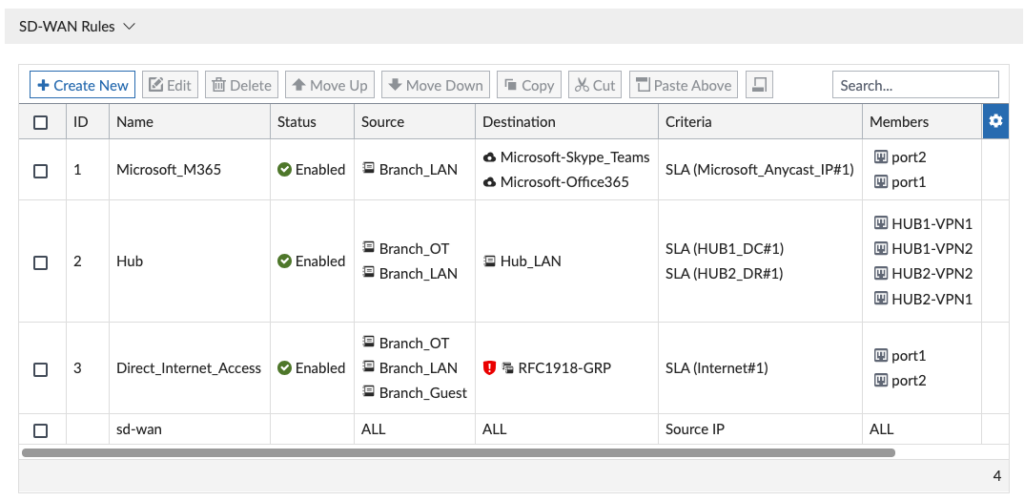
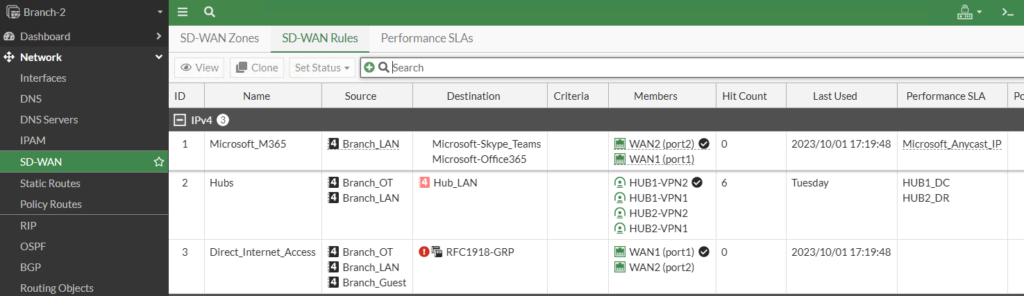
And then I created my SD-WAN Rules to match my business critical traffic:
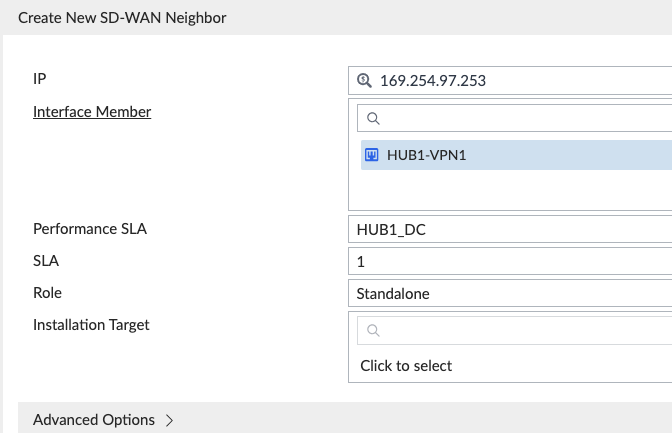
The SD-WAN Overlay Template created our SD-WAN Template without any SD-WAN Neighbors. The neighbor config is required as we selected BGP ‘route map out’ and ‘route map out preferable’ during the SD-WAN Overlay Template creation (we use this to pin healthy return traffic to the same tunnel). Route-map out preferable is tied to an SD-WAN health check. Earlier in the IPsec Template section we noted the 4 Hub Tunnel Interface Setup IPs and those will be used for our 4 SD-WAN neighbor IP addresses. We create a new neighbor under the SD-WAN Template and specify the Tunnel IP address:
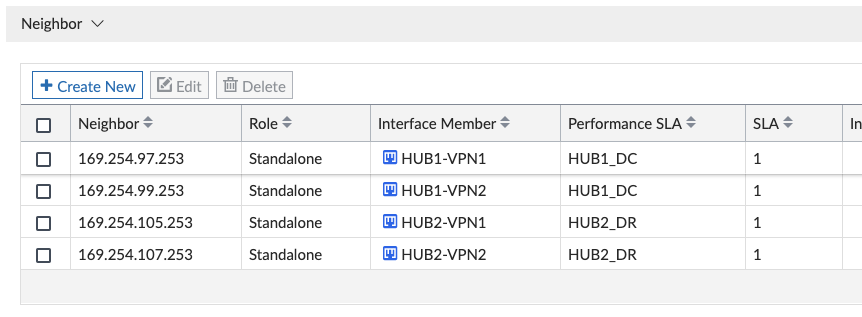
Be aware the Interface Member and Performance SLA combination for each is unique, as noted below for the 4 neighbors using 2 different SLAs:
BGP Templates
The SD-WAN Overlay Template Wizard created the following BGP Templates; we didn’t have to make any post-wizard edits to these, but I wanted to walk through what it created for reference:
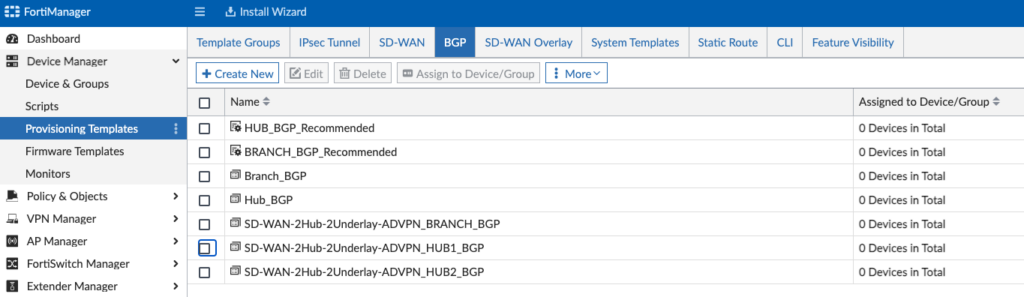
And we can see the Hub1 configuration in “SD-WAN-2Hub-2Underlay-ADVPN_HUB1_BGP”:
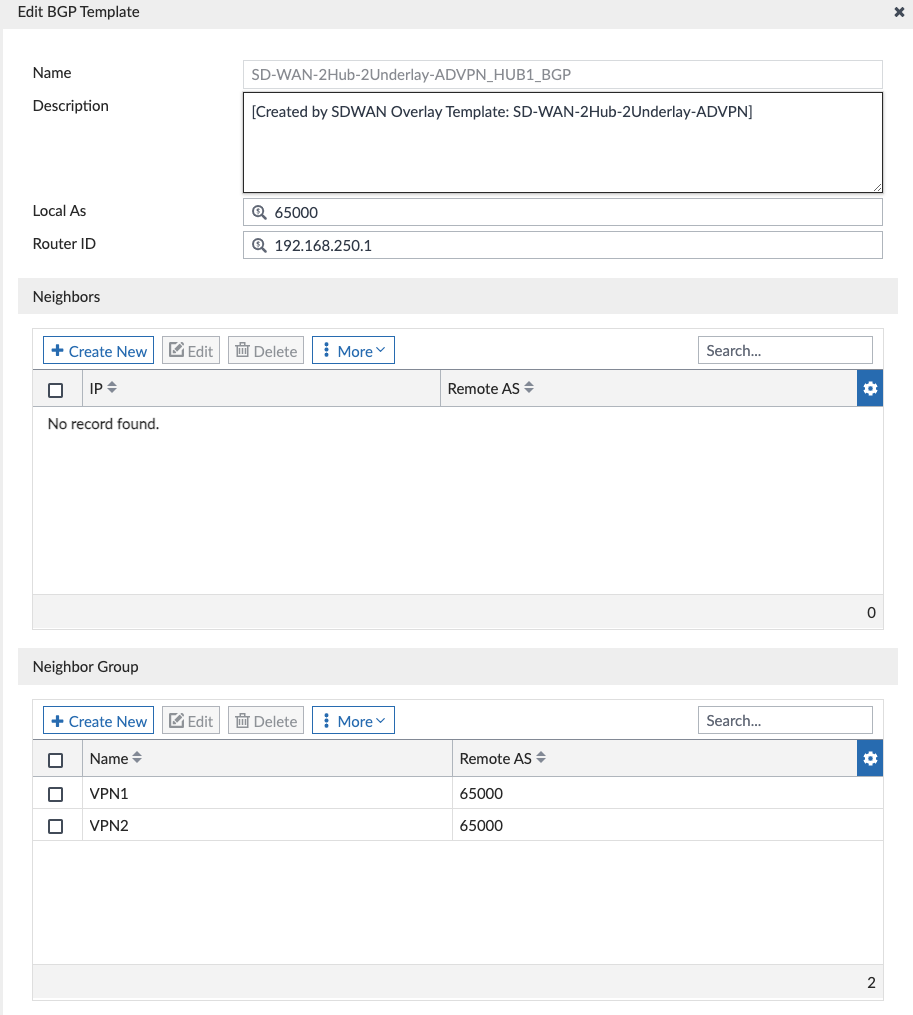
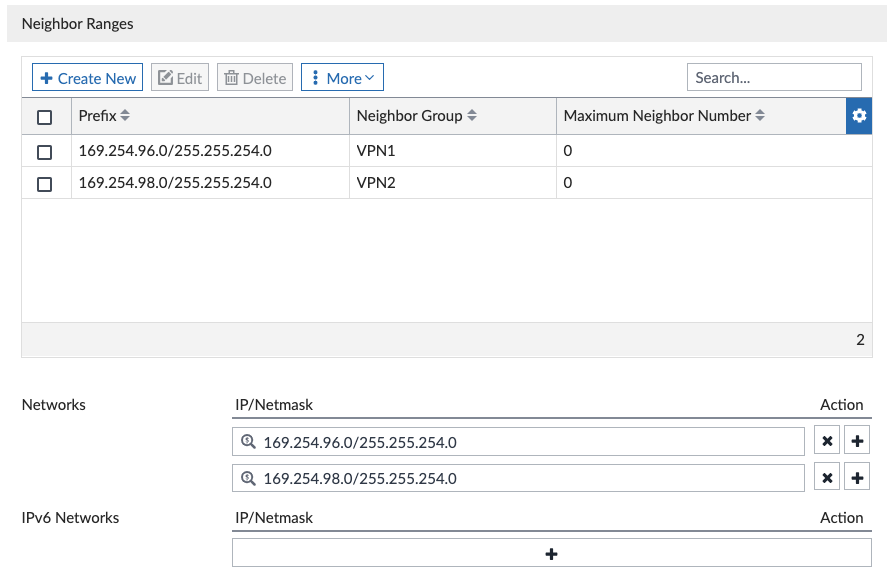
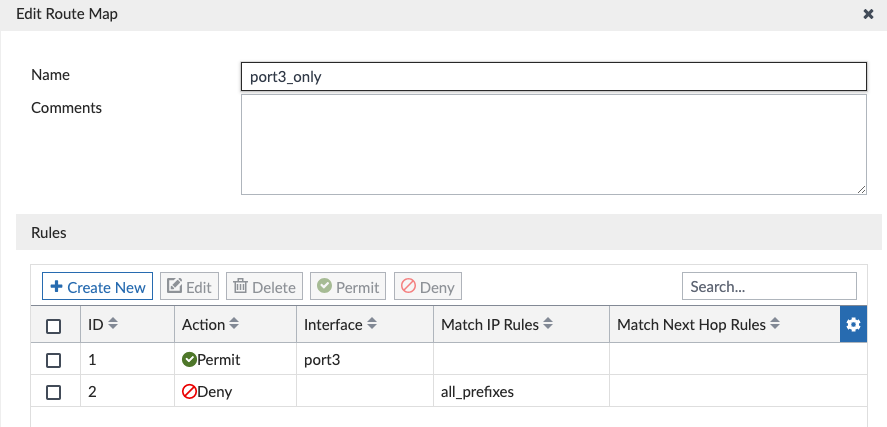
We didn’t have to edit any of this in the above screenshots, I’m just showing it here for reference. And the Wizard created the route-maps to advertise only the connected interfaces we selected (port3 on Hub):

Similarly, when we inspect our Branch BGP Template we see our BGP neighbors are the VPN addresses of the Hubs:
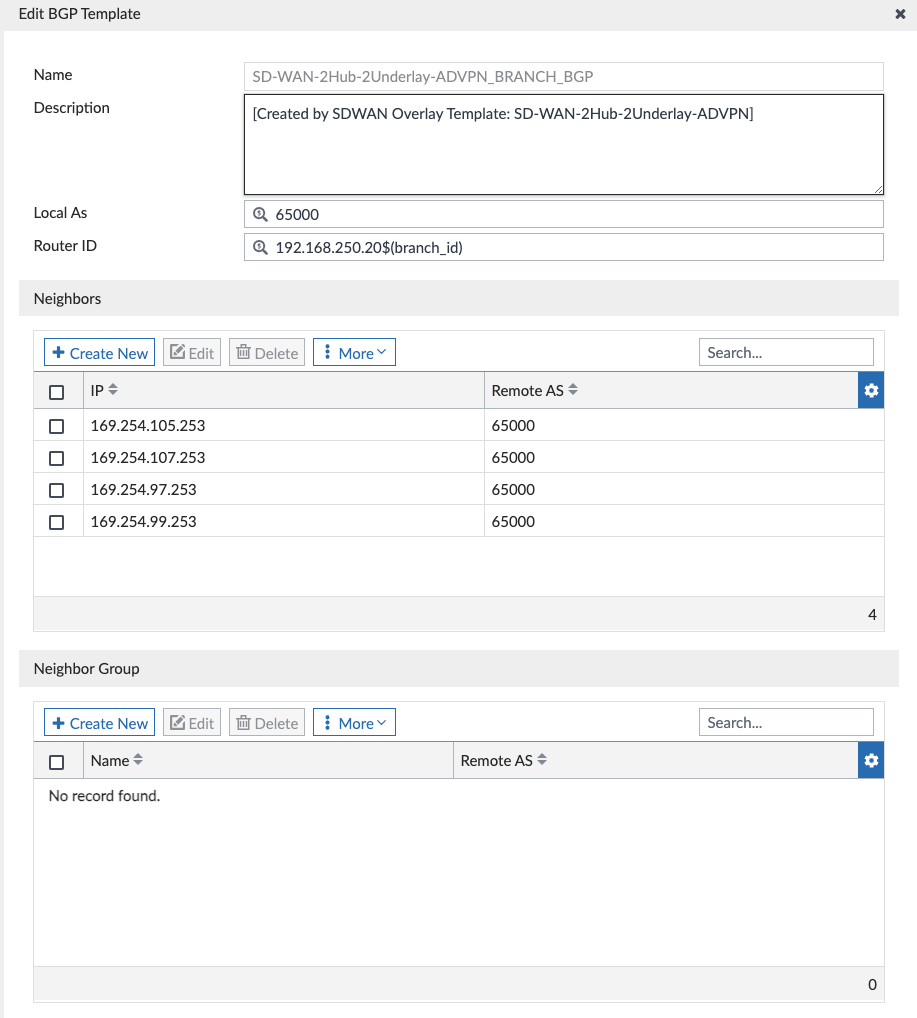
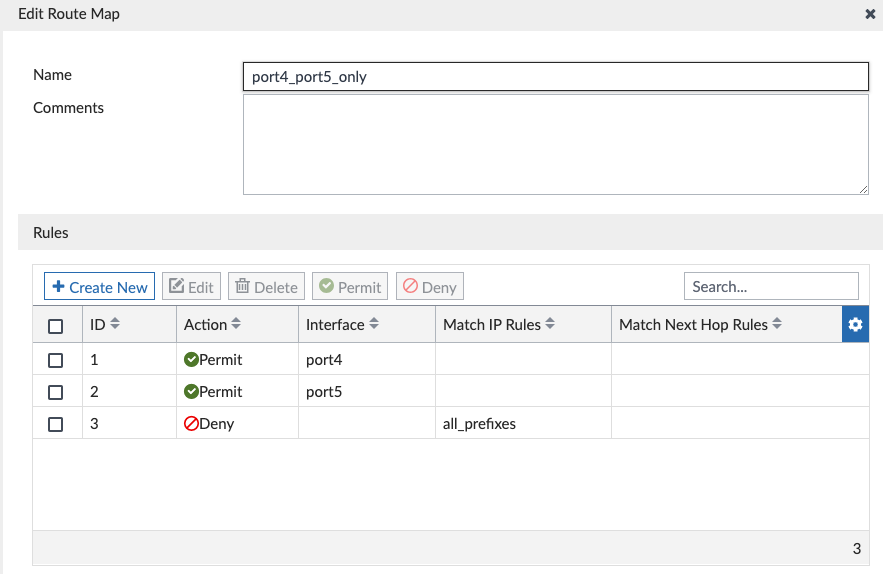
You’ll see below that we aren’t advertising any networks, but instead advertising connected interfaces using the “port4_port5_only” route-map; this is because I selected these two interfaces in my connected interface route redistribution:


That summarizes the BGP Templates the Wizard created. Nothing that we needed to change, but worth reviewing if/when we will need to down the road.
CLI Templates

I spent most of my post-Wizard tweaking in this section, simply because I already had existing config to use in my design. For a whitespace environment, you can leave these alone. But for my environment, I made the following adjustments:
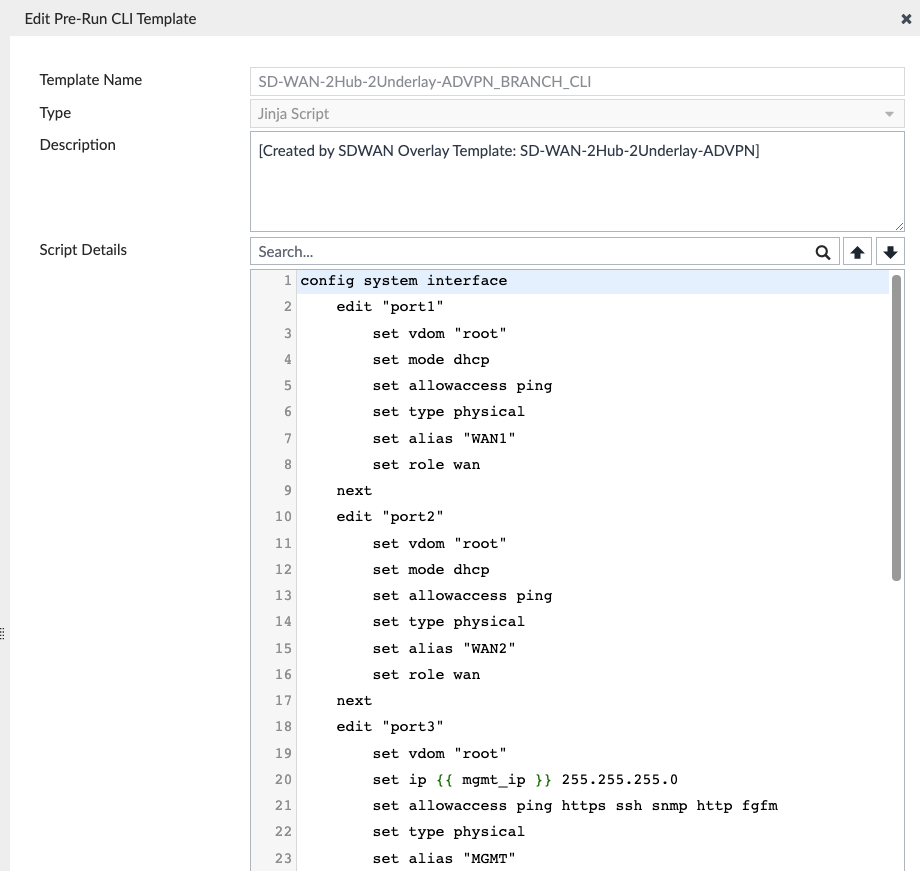
In the screenshot above, I create my various LAN interfaces above on the “SD-WAN-2Hub-2Underlay-ADVPN_BRANCH_CLI” CLI template, since I’m using ZTP to provision the Branches and don’t want to edit each device individually to create these.
And on the Hubs, I take advantage of the “SD-WAN-2Hub-2Underlay-ADVPN_HUBx_CLI” configs to define the route-maps to match what’s on the Branches:
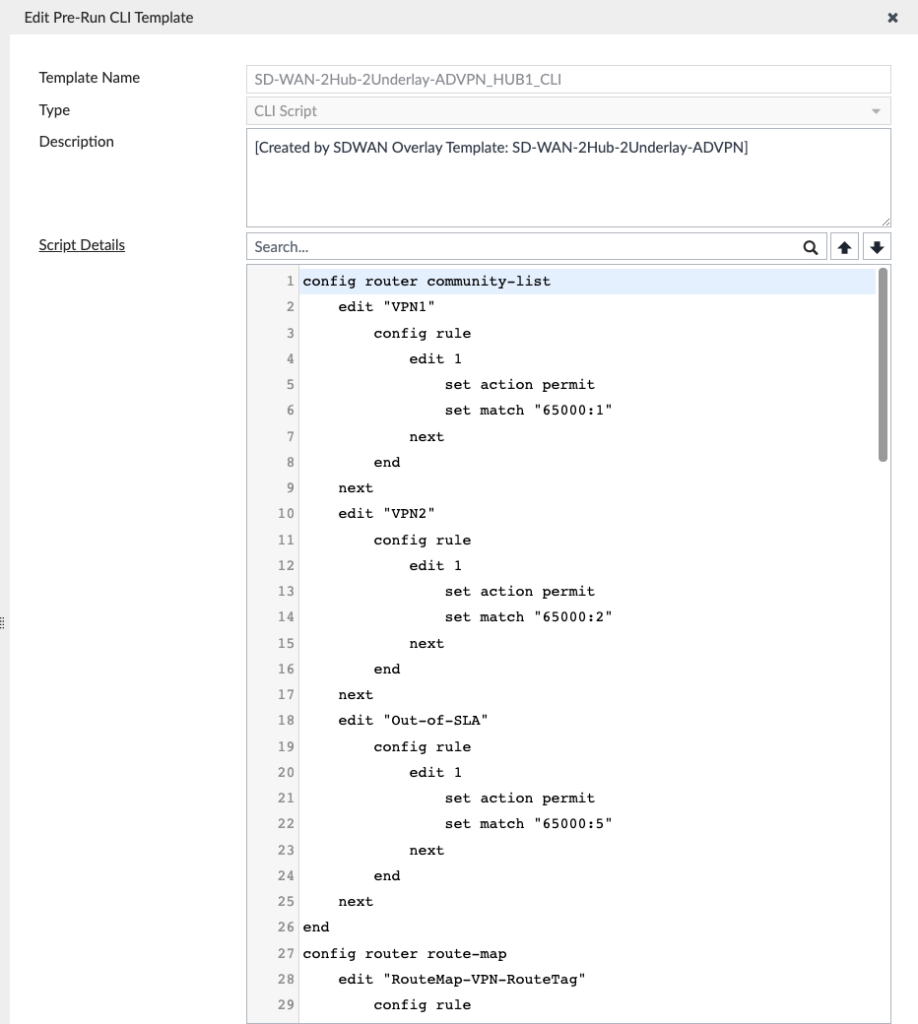
The SD-WAN Overlay Template would’ve created the communities and route-maps, but I made these changes in the Wizard to match my design (from my other blog post) — if you didn’t edit the route-maps or communities in the Wizard, then you won’t need to modify these.
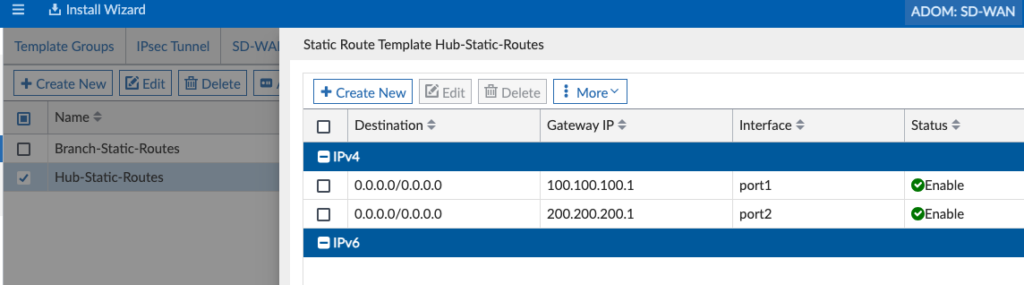
Static Route Template
This Template isn’t required and the SD-WAN Overlay Template Wizard didn’t create these, but I wanted a consistent WAN static route config on my Hubs and Branches and created these.
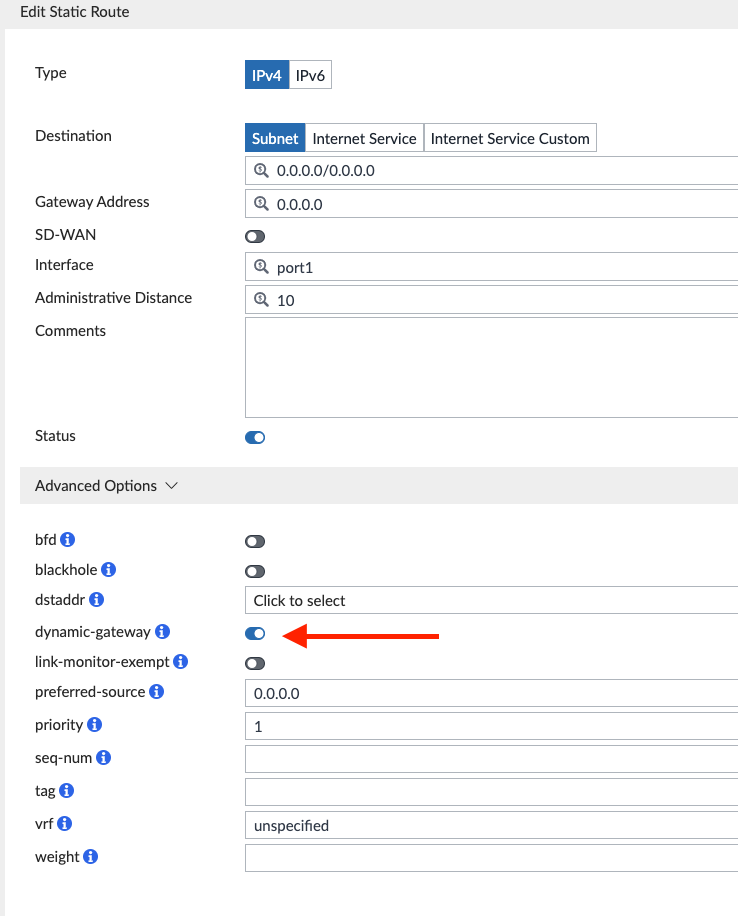
Branch Static Routes with “dynamic-gateway” enabled since I’m using DHCP from my Internet Providers:

Hub Static Routes just have the static gateway IPs of those two Internet Providers:
Bringing it All Together in the Template Group
Now that we’ve made any desired changes to our various Templates, we’re ready to bring them all together in our Template Groups. The Wizard created the Template Groups circle in red below:
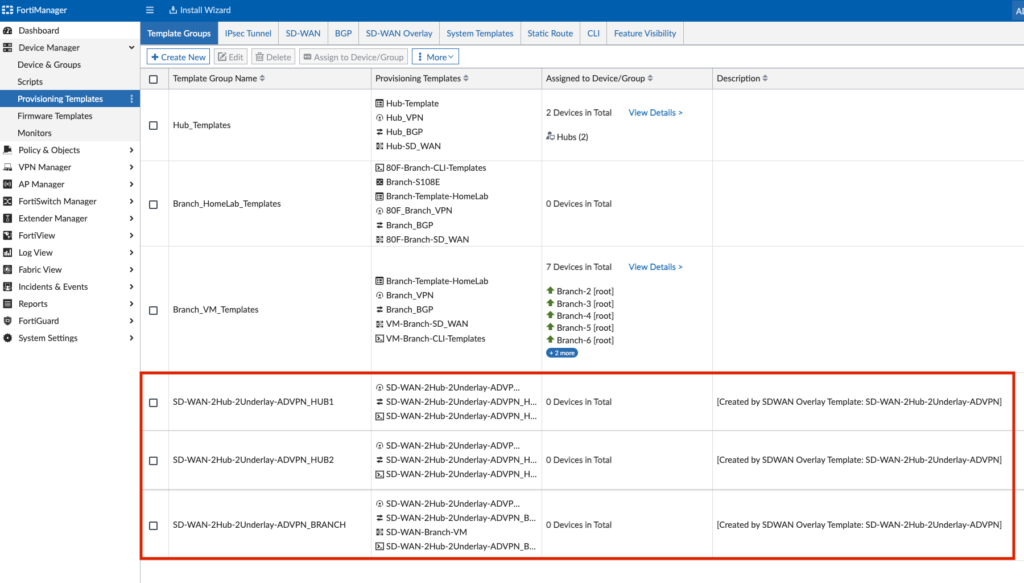
I just modified the SD-WAN-2Hub-2Underlay-ADVPN_BRANCH Template Group to add the Static Route Template that I had created, otherwise you can leave these Template Groups as-is.
At this step, I assign the SD-WAN-2Hub-2Underlay-ADVPN_HUB1 Template Group my “Hub” FortiGate cluster:
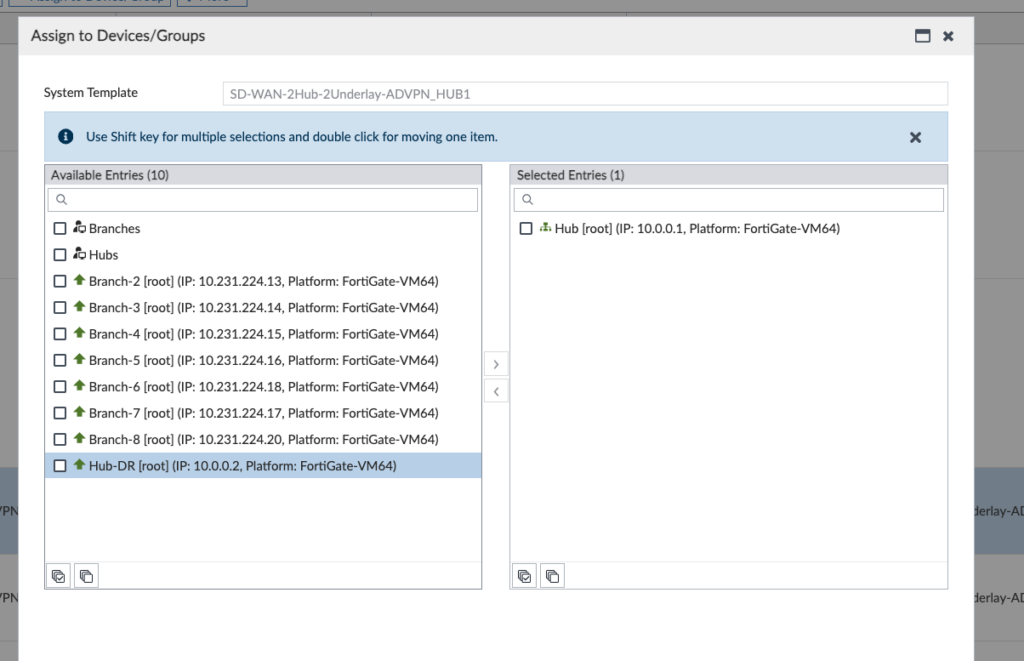
I then repeat SD-WAN-2Hub-2Underlay-ADVPN_HUB2 to my “Hub-DR” FortiGate.
And finally, I repeat SD-WAN-2Hub-2Underlay-ADVPN_BRANCH to my “Branches” Group.
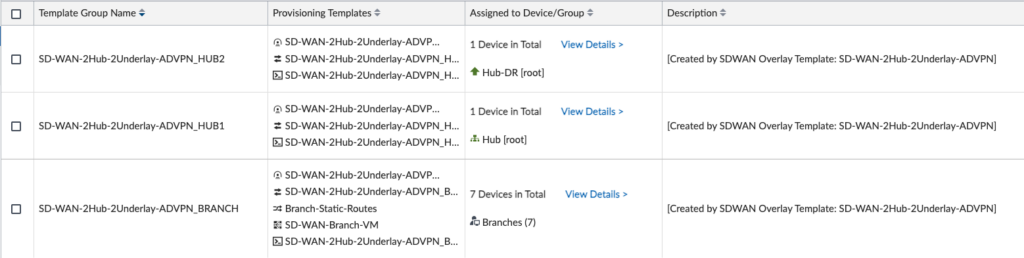
In the above screenshot, I see the assigned devices and device groups for each Template Group.
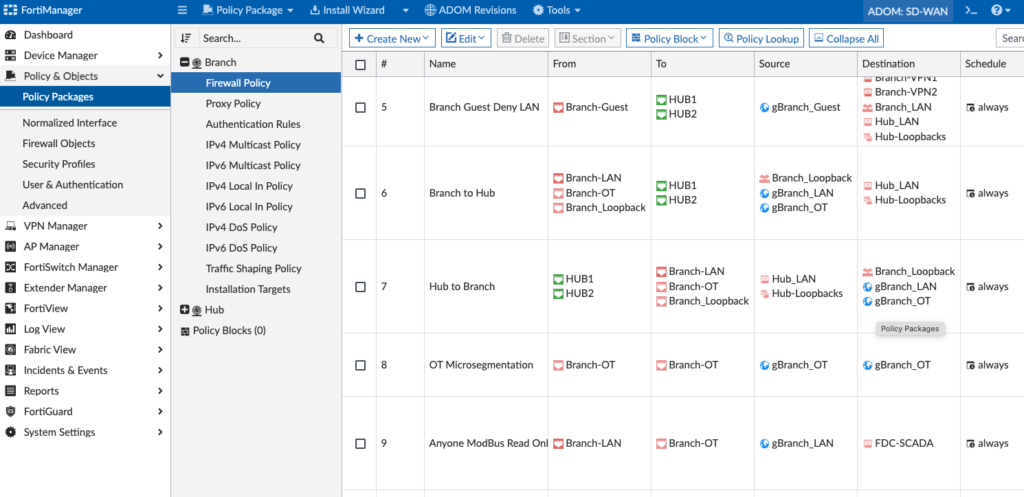
Firewall Policy Packages
Since this is an existing environment, I had existing Firewall Policies that I needed to modify. My existing Firewall Policies had my old SD-WAN Zones in it (before I rebuilt the lab with 2 Hubs) and I needed to reference those new SD-WAN Zones in the Policy Package. If you haven’t created a Policy Package yet, you’d do that in this stage in FortiManager > Policy & Objects > Policy Packages:
Installation
Now it’s the time to install all this config to our devices! In your first step, click the Install Wizard under Device Manager and select “Install Device Settings (only)”:
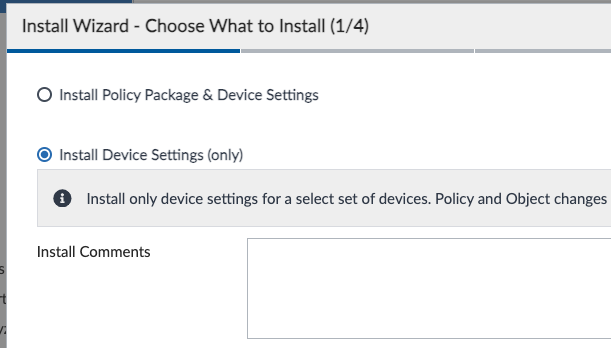
After that, you’ll walk through the wizard. Hopefully it will install successfully, but if not you can review the install log to determine why it failed. Typically, mine would fail because I forgot to map an address object or interface to a unique value for a device.
And in the second step, we’ll click the same Install Wizard and install the Policy Package this time:
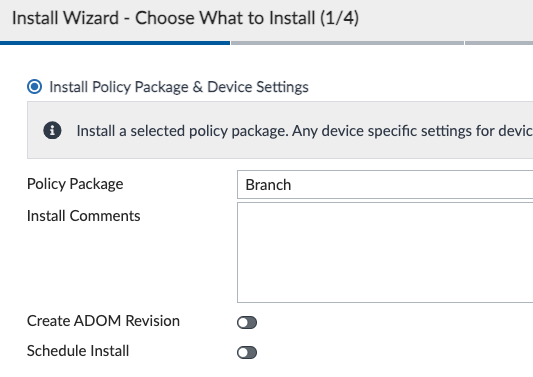
Finally, we’ll repeat for each Policy Package (“Branch” and “Hub”, in my lab).
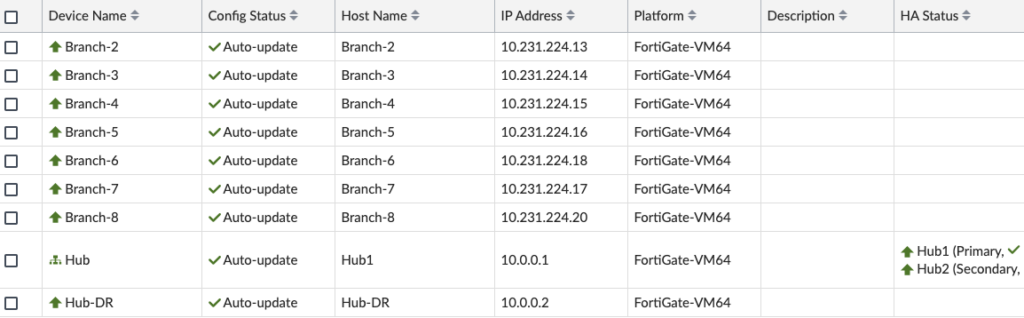
Validation
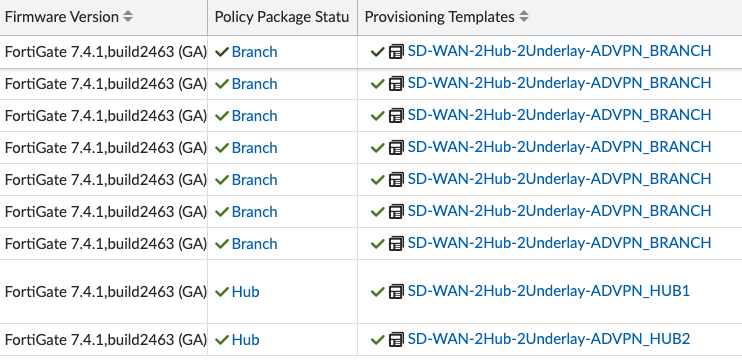
After the installation, we’re looking for green checks next to our devices in Device Manager, indicating the configurations in FortiManager and on the devices are synchronized:
And likewise for the Policy Package column:
Under Device Manager > Monitors we’ll look at our VPN Monitor to confirm our tunnels are up:
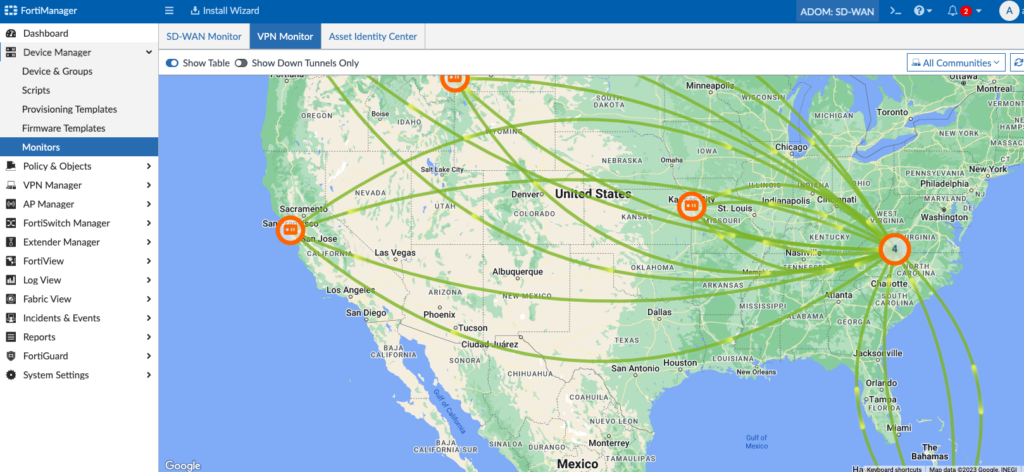
And we’ll spot-check some of your spokes/branches and ensure all the VPN tunnels to the Hubs are up:

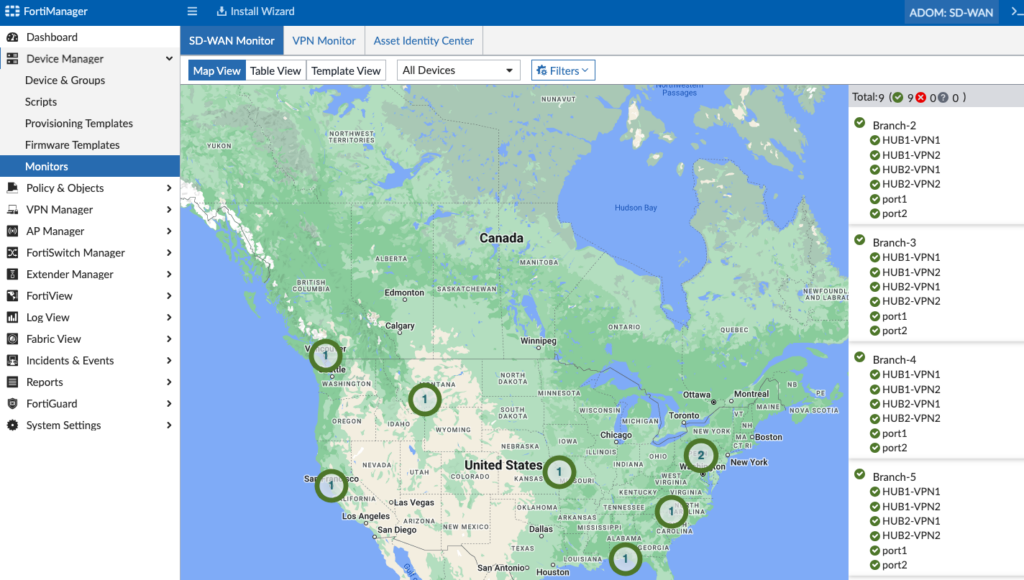
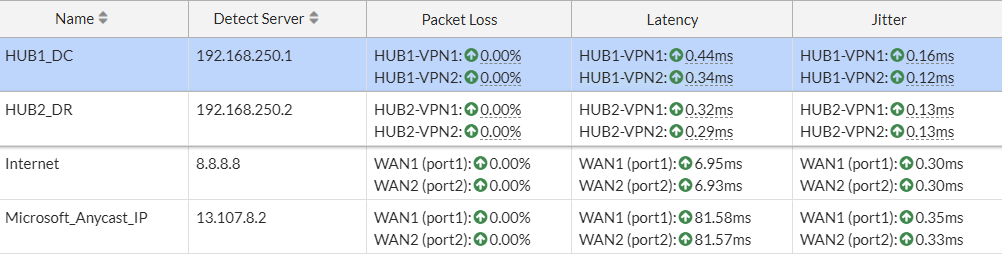
Likewise, we’ll check the SD-WAN Monitor to ensure we see that information:
We can login to a Branch to look at its SD-WAN config as well:
Conclusion
The SD-WAN Overlay Template Wizard greatly simplifies deploying SD-WAN, VPN overlays and BGP routing for the vast majority of deployment scenarios and at a massively global scale as well. And even with that simplicity, it allows you to edit each component to tweak BGP, VPN, SD-WAN, interface configurations, etc. as if you were creating all the Templates from scratch.
Give it a test drive and let me know your experience! And thank you for reading.