FortiGate IPsec VPN with SAML
I stumbled upon a heated and spirited debate: SSL VPN vs. IPsec VPN for remote access. As you know IPsec VPN predates SSL VPN, but was eventually replaced with SSL VPN due to the ease of deployment where some networks blocked IPsec traffic mixed with the inconvenience of distributing the IPsec preshared key with the VPN client. Fast forward to the present and SSL VPN is one of the most commonly attacked and exploited implementations. Just search for CVEs targeting Fortinet, Palo Alto Networks, Cisco, Checkpoint, F5, SonicWall, Ivanti, etc. and you’ll find plenty regardless of vendor. Why? Remote access is an incredibly effective method for attackers to gain access to a target’s network. And not to mention brute force and password spraying attacks targeting SSL VPN…
I won’t argue which VPN solution is more secure — both have their pros and cons. But what if you wanted to implement IPsec VPN and still leverage SAML for multi-factor authentication? Fortinet has documentation on how to implement this, but I wanted to document how I set it up since it took me a few attempts with some lessons-learned. Read on!
Setup SAML Single Sign-On
On your FortiGate, navigate to User & Authentication > Single Sign-On > Create New to setup a SAML Single Sign-On connection. I use FortiAuthenticator as my SAML Identity Provider (IdP), but Fortinet has a nice write-up using Entra ID that I walked through with a customer in a proof of concept recently: https://docs.fortinet.com/document/fortigate/7.4.4/administration-guide/432396/configuring-microsoft-entra-id-as-saml-idp-and-fortigate-as-saml-sp.
FortiGate SAML Part 1
In the screenshot above I wanted to note the port we chose. This is the port for the IKE-SAML connections that FortiClient will connect to and I chose 10428 since it’s random. The default port is 1001, but any unused port will do. Click Next and on this next page you’ll enter your IdP URLs either under Custom (if using a non-Fortinet IdP) or Fortinet (if using FortiAuthenticator):
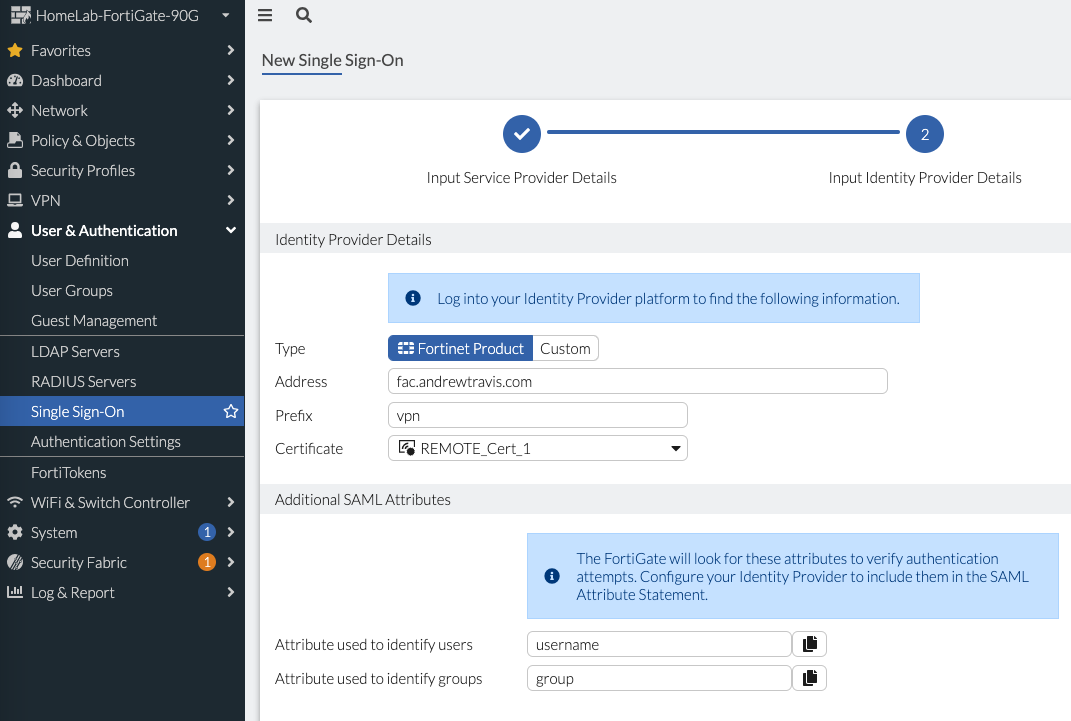
FortiGate SAML Part 2
In the above screenshot we import the IdP certificate by clicking the + in the Certificate drop-down menu; it then shows up as “Remote_Cert_1”. And make sure we match users to “username” and groups to “group” so those attribute from the IdP will map to the same on the FortiGate; that syntax will work with Entra ID.
On the IdP side, I’ll show how to configure FortiAuthenticator. You’ll navigate in FortiAuthenticator to Authentication > SAML IdP > Service Providers > Create New. Give your Service Provider (SP) a name, select a certificate for FortiAuthenticator as IdP and then create a new IdP Metadata (I used “vpn”). After this is complete, you’ll be ready to copy/paste your FortiGate SP URLs in the SP Metadata section. One thing I missed in the screenshot is specifying Assertion Attributes for “username” and “groups” mapped to FortiAuthenticator User and FortiAuthenticator Group, respectively.
FortiAuthenticator Service Provider Config
The last task for setting up SAML is to create User Groups on the FortiGate for each user group we’ll leverage in our Firewall Policies. Navigate to User & Authentication > User Groups > Create New and for our first Group we create a blanket user group with no group name associated (I called this “FAC-VPN”). We do this because we’ll reference this blanket user group later in our IPsec config and individual groups in our firewall policies. For my use-case, I didn’t want to restrict VPN access to only one Group (though you could if you’d like) but instead I allow any User in any Group to connect to the VPN and then use Groups in the Firewall Policies to restrict access to resources. Also worth noting In my testing, I received a “FNBAM_DENIED” and “Wrong EAP Credentials” message without this blanket user group.
Note that there is no Group Name specified meaning we’ll match “Any”.
We also create User Groups to map to the groups we’ll use in our Firewall Policies such as Accounting, Sales Engineers, Systems Administration, etc.:
User Groups matching SAML IdP’s User Groups; we can use these in Firewall Policies later.
FortiGate IKE-SAML Config
The FortiGate authd daemon accepts SAML authentication traffic from the FortiClient by the TCP port number configured in the auth-ike-saml-port setting (0 - 65535, default = 1001). Remember that we chose 10428 earlier when we configured our Single Sign-On SAML config on the FortiGate. Currently, this setting can only be configured in the CLI as follows:
config system global
    set auth-ike-saml-port 10428
end
Configure the “ike-saml-server” attribute on the WAN underlay interface listening for Remote-Access IPsec VPN connections. The “ike-saml-server” setting must be configured on the interface that is the first point of contact for FortiClient traffic:
config system interface
    edit "wan1"
        set ike-saml-server "FAC-SAML"
    next
end
FortiClient will validate the certificate presented to it by the FortiGate during its initial SAML connection. This certificate can be configured on the FortiGate from the GUI under User & Authentication > Authentication Settings > Certificate under User Authentication Options.
Specify the certificate the FortiGate will present FortiClient.
Note that to prevent an invalid server certificate prompt on FortiClient, the certificate’s common name (CN) should match the IPsec VPN remote gateway’s FQDN. If the certificate is signed by a custom Certificate Authority or one that is not well-known, the Certificate Authority’s (CA) certificate should be imported in FortiClient endpoint’s Trusted Root Certificate Authority store.
Configure IPsec IKEv2
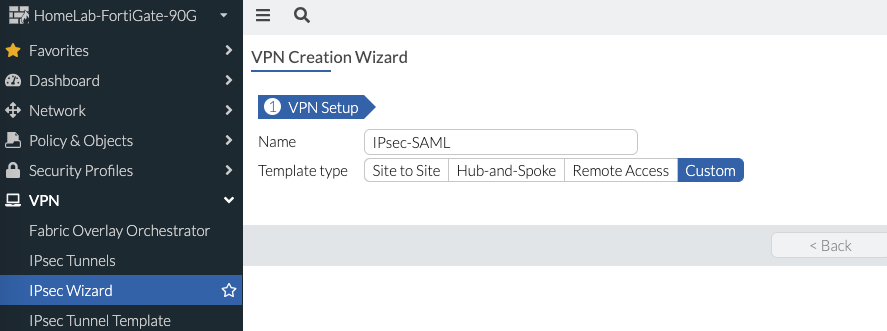
Now we’re ready to create the IPsec VPN configuration on the FortiGate. Navigate to VPN > IPsec Wizard > Template Type = Custom:
IPsec Wizard Step 1
Specify the following:
IP Version: v4 or v6
Remote Gateway: Dialup User
Interface: the WAN interface you specified in the previous step.
Mode Config: enabled
Assign IP From: specify range or address object
If desired, enable Split Tunneling and specify the network(s) accessible
Authentication Method: preshared key or certificate
IKE Version: 2 (this is important since we’ll use EAP for user authentication)
Accept Types: Any Peer ID
Phase 2 Selectors: leave all zeroes for local and remote addresses
IPsec Wizard Step 2
As IKEv2 uses EAP for user authentication, enable EAP using the CLI inside the configured IPsec tunnel for user authentication, as follows:
config vpn ipsec phase1-interface
    edit "IPsec-SAML"
        set eap enable
        set eap-identity send-request
        set authusrgrp "FAC-VPN"
    next
end
Remember how we created that blanket User Group to match any User? That’s why we created it, so that we can reference it here in our IPsec IKEv2 config and not restrict VPN access to specific Groups. Instead we use Firewall Policies to restrict access for specific Groups accessing specific resources as we’ll shortly demonstrate. For other advanced custom configurations as per your requirement, see Remote access. In the snippet above, I also define the authentication group to use FAC SAML.
Create Firewall Policies for IPsec VPN
Under Policy & Objects > Firewall Policy > Create New. The source interface will be the VPN one you just created and under Source you’ll select your defined User Groups:
Firewall Policies using User Groups to restrict access to resources.
My home lab is simple and I don’t need to restrict by Groups, so I just have a rule to permit the VPN for any Group (in that blanket “FAC-VPN” User Group):
Simple Firewall Policy without User Groups
FortiClient Configuration
Now that everything is configured, we’re ready to configure FortiClient! You can download the latest from support.fortinet.com and once installed, click Configure VPN:
FortiClient VPN Configuration
You’ll specify the following settings:
VPN: IPsec VPN
Remote Gateway: public IP on your WAN interface
Authentication Method: Preshared Key or Certificate
Enable Single Sign On for VPN Tunnel
Specify the port we selected earlier (i.e. 10428)
Expand Advanced Settings > VPN Settings
IKE: Version 2
Options: Mode Config
After adding the new VPN configuration, click Connect and you’ll be prompted to login to your IdP and will be connected. You can confirm connection on the FortiGate as well:
In the above dashboard, we see the Peer ID of the computer name…
It’s worth noting that the logged Peer ID is that of the computer’s name, not of the actual user. For the user info, that’s logged in the IdP (FortiAuthenticator in my case) and should be ingested into your SIEM:
FortiAuthenticator Access Log
Troubleshooting
If you’re like me, something won’t go quite right with your setup. I found the following FortiGate debug commands to help me get to the bottom of any errors I received when attempting to connect:
diag debug reset
diag debug application ike -1
diag debug application samld -1
diag debug application fnbamd -1
diag debug application eap_proxy -1
diag debug console timestamp enable
diag debug enable
Conclusion
Now we have the security of IPsec VPN’s encryption with the added security of multi-factor authentication via SAML! It doesn’t answer the debate over which VPN method is better — I honestly feel that that is a subjective decision. If you want to remove future 0day CVEs targeting SSL VPN, then go with IPsec VPN. If you don’t want your users to be blocked when connecting to the VPN on public hotpots, then go with SSL VPN. Regardless of which method you prefer, I hope this post illustrates how you can use SAML with IPsec VPN just as you would with SSL VPN.
Thanks for reading!


